Continue to Site

Welcome to our site!

Electro Tech is an online community (with over 170,000 members) who enjoy talking about and building electronic circuits, projects and gadgets. To participate you need to register. Registration is free. Click here to register now.

  • Welcome to our site! Electro Tech is an online community (with over 170,000 members) who enjoy talking about and building electronic circuits, projects and gadgets. To participate you need to register. Registration is free. Click here to register now.

24-12 volt step down regulator

Status
Not open for further replies.

bryan1

Well-Known Member
Hiya Guy's,
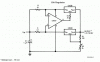
Rather than just go buy a stepdown regulator I reckon the circuit below will fit my needs. Now I'll be using a 24 volt solar powered battery bank rated at 400 amp/hours and what I want to do is have a variable regulated voltage of no-more than 15 volts so I can power the 12 volt nominal lights in my shed. The specs for these cfc fluro's is a max input of 15 volts. The reason I'm going for a 10 amp regulator is when all 8 light are on I'm pulling around 8 amps on average. Now say if I set the output to 12 volts when the batteries are sitting on 24.5 volts when the batteries are topped up the supply won't be over 15 volts. Now as far as the circuit saying 100mA continious I'll put a small 12 volt fan on the back of the heatsink. I'm open for suggestions on this project and any comments will be appreciated.

Cheers Bryan :D
 

Attachments

  • 10a_regulator.gif
    10a_regulator.gif
    11.1 KB · Views: 1,830
The posted circuit will waste quite alot of energy. A switching regulator would be much more efficient.

The SwitcherCADIII circuit analysis software (available for nothing from the LInear Technology web site) includes many switching regulator examples.

You could also search this forum and the net.

Len
 
Thanks for the input Len,
As far as wasting alot of energy, when I'm not using the circuit it would be isolated at the input via a switch. the idea of the fan is to help keep the regulators cool. However, at the moment I'm running the lights directly off the batteries which is setup for 12 volts but I've got a bank of solar panels on the roof setup for 24 volt and I have a 24 volt 1700 watt inverter. I'll have a look for switching regulators as you suggested.

Thanks again mate

Cheers Bryan :D
 
Bryan,
With a switching regulator you probably would not need the fan as the switching transistor is either on or off and so it does not dissipate much.

Len
 
Hiya again Len,
Eh mate I just downloaded that switchercad freeware and looked at my requirements, it came up with 1 solution using the LTC1775 stepdown chip. But looking at their samples they only come in surface mount chips which is way beyond my capabilities with circuit boards. Anyway thanks but I'll keep looking for other circuits that can use.

Cheers Bryan :D
 
Bryan,
O saw a swi\tching mode regulator circuit just a week or 2 ago but can't recall where. It may have been in this forum. I'll let you know if I find it again.

Have a look at the IC section in the JayCar, Dick Smith & Altronics web sites or catalogues if you have them. They may have one.

Len
 
There are switching regs which aren't in SMD pkgs. You will need a well-selected inductor and MOSFET which is tricky but necessary.

You have to have a switcher- otherwise you're talking 100w nominal dissipation which is unrealistic as well as a killer for your solar system capacity. It would take a bank of a bunch of transistors in an external output stage to handle all that heat.

Regulators cannot be paralleled as in your schematic. And the regulator itself can only dissipate a few watts even with a good heatsink and fan.

There are some off-the-shelf 24V-to-12V inverters. They're not all that expensive.
 
Thanks for the info Len and Oznog,
I'm currently looking on the net for a chip and the thought of trying to solder a 4x10 mm chip with 16 leads is going to give me nightmares. I'm sure I'll find something but as far as 24-12 volt step down converters commercially an 8 amp one is around $100 here in Oz. This is why I want to make my own and once I get 1 working I'll make another one for a different application.
Oh and Oznog that schematic I posted before came straight of the LM338 datasheet.

Still Looking Bryan :D
 
As already mentioned, throwing away 50% of the energy collected by your solar panels is horrific!. A switchmode supply would reduce the waste drastically - but have you considered a much simpler (and cheaper) option?.

You specified 12V LIGHTS - as in plural?, how about putting two of them in series and feeding them off the 24V? - you should only try identical ones though!.
 
Hiya Guy's,
Eh Nigel thanks for the suggestion on putting the lights in series, I'll try it out with 1 pair and check out the brightness but when working on 12 volts nominal I've noticed when the batteries are at 13.8 ie. fully charged the lights are the brightest. Anyway I spent most of last night searching for a suitable buck converter chip in dip pinout with no sucess, so I finally ordered some samples of the LTC 1775 in ssop and soic format. Guess I have to get over my phobia of surface mount chips and just design and learn to solder then. I have noticed a few sites where old toaster ovens can be modiefied to do reflow soldering so I might check them out.

Just an update

Cheers Bryan :D
 
Bryan , have you considered that your solar regulator may be the problem..
what i mean is your solar panels can be wired for just about any voltage , therefore you dont even need the 24V to 12V stepdown regulator.. just rewire them to charge the 12V batteries directly..
 
Hiya Willi,
The reason I've got a 24 volt array on the solar panels is the whole setup used to be on the house but since replacing the house setup with a $25,000 solar array I'm using the old array in the shed. This is also 24 volts so I have a 24 volt regulator and a 1700 watt 24 volt modiefied sinewave inverter. I do have a second set of batteries the first set is lead acid rated at 400 amp/hours and the other set are nife batteries my mate gave me. These came from a military instalation and I don't know what amp/hours they are but my mate reckons they'll handle a decent beating.Anyway from what I've seen of 12 volt inverters there's no way I'll part with good money when 24 volts is a much more robust system. So I'm looking around for a decent pure sinewave 24 volt inverter so I can run some electronic stuff and give me extra watts for running equipment. Otherwise I have to run a 15 kva genset all the time. Now after that rant the reason I want 12-15 volts is not only for my lights but also for a few 12 volt wiper motors I'm setting up for automating some processes in my leatherwork.

The software Len suggested I download has a beaut schematic based on the LTC1775 that runs around 98% efficient so I've orders some samples and I'm in the process of tracking down the other bits I need.

Cheers Bryan :D
 
Hi Willi,
yea the lead acid batteries are 12 volt ones and I know what you mean. Now looking at this circuit it draws just over 5 amps on 24 volts and outputs 10 amps on 14 volts. It boggled me at first but going off the results on the simulation using ohms law it worked out correct. With running 20 watt cfcl lights and there's 8 of them along with 2 twin 30 watt fluro's I'm currently drawing nearly 10 amps off the batteries. Now I've got the inverter fixed I'm keen to get the 24 volt inverter setup but that leaves me with reduced lights as the current draw will be too much to handle. So time for me to learn to refolw solder using a toaster oven should be fun, to practice I've a heap of surfacemount stuff off old circuit boards.

cheers Bryan :D
 
SMD can be done just as well with a heat gun (used carefully), or a butane Weller soldering iron with the "heat blower" (not the torch) attachment.

Some people have said that just adjusting the temp on the toaster oven manually while holding a stopwatch works well too, it just keeps you watching it.

And simple SMDs like a SOIC-8 are easy to do with a soldering iron. Some use a fine point iron, others use a wide, blunt point and drag the solder ball across the pins. Some people got good at doing even fine pitch ones by hand with the blunt point too.

The trick with the buck converter is going to be finding the right inductor. For starters, saturation current must be a healthy margin above 8 amps. The resistance of the copper wire should not create excessive heat, a hot inductor has a substantially reduced saturation current as well as inductance. And the inductor needs to have enough inductance to satisfy your ripple limits at the freq you've chosen at the max current you will be drawing.

Feel free to check back with us with questions of inductor and transistor selection.
 
Hiya Guys,
Here's the schematic from switchercad that I was talking about, Oznog do you think you can help me out on the inductor as it doesn't say anything about it's rating. But as you can see it looks a pretty simple circuit so I shouldn't have too much trouble making up a circuit board, I've got both single and double sided board with that press and peel iron on paper for the etching, this will also be new to me as I've only used veroboard in the past. I've requested 4 samples(LTC1775) just to be on the safe side. The next part is finding where I can get the mosfet's I'll look in my farnell cat tonite.

Cheers Bryan :D
 

Attachments

  • schematic1.gif
    schematic1.gif
    120.6 KB · Views: 460
Bryan,
I have 2 questions

1. You said in the previous post "I've got both single and double sided board with that press and peel iron on paper for the etching"

Where do you buy the iron on paper?

2. How did you convert the SwitcherCAD screen to a .gif?

Len
 
ljcox said:
Bryan,
I have 2 questions

1. You said in the previous post "I've got both single and double sided board with that press and peel iron on paper for the etching"

Where do you buy the iron on paper?

2. How did you convert the SwitcherCAD screen to a .gif?

Len

Hi Len,
1. The press'n'Peel pcb film is available from Jaycar(item no. HG-9980) and the price listed is $34.95, Altronics have it aswell at $31.50 (item no. H-0770). Off memory I paid about $25 for mine but it was a couple of years ago.

2. To convert the Switchercad screen I simply hit the print screen button then pasted it in ifranview, resized it for the forum and saved it as a .gif file. If you don't have ifranview I recommend you get it as it's the best freeware image editor available. I even use the program for all my scanning needs too.

Cheers Bryan :D
 
Hiya Again Guys,
Well trying the simulation a few times I kept getting a question mark on the sckotty diodes so I changed them from a 1n5818 to a 1n5819 and this seemed to solve the problem. In the lastest picture below I've included the efficiency report from the simulation looking at the inductor the report states L1 (IRMs) 10071mA (Ipeak) 12125mA (Dissapation) 443mW. Now looking in the farnell catalogue I can't find anything that even comes close to those specs so I will need some help on this inductor. The mosfet( SI4410DY) is a surfacemount component and I wonder if their would be a standard to-220 equavilient. Anyway I'm slowly getting my way the circuit it's just these few niggling problems to sort out.

Cheers Bryan :D

Edit: silly me didn't right click on the inductor and when I did I got a part no for it and within 5 minutes I arranged a few samples :D But as far as the mosfets went for samples fairchild won't send samples to Oz and I'll get stung about $13.00 each on a minimum order of 10 :(
 

Attachments

  • schematic1_215.gif
    schematic1_215.gif
    27.8 KB · Views: 433
Status
Not open for further replies.

Latest threads

New Articles From Microcontroller Tips

Back
Top