Continue to Site

Welcome to our site!

Electro Tech is an online community (with over 170,000 members) who enjoy talking about and building electronic circuits, projects and gadgets. To participate you need to register. Registration is free. Click here to register now.

  • Welcome to our site! Electro Tech is an online community (with over 170,000 members) who enjoy talking about and building electronic circuits, projects and gadgets. To participate you need to register. Registration is free. Click here to register now.

Why LEDs create higher sound volume compared with other diodes when used in Ring modulator

Status
Not open for further replies.

Fluffyboii

Active Member
There is a whole argument here about using LED's in Ring modulator.
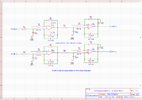
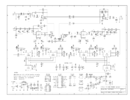
This is my own DIY ring modulator.
The question is: I don't really understand why LED's produce high volume output. They should decrease volume more because they have 1.84V voltage drop in this case while Germanium diodes have around 0.7V voltage drop. Yet Germanium diodes are quieter. Maybe there is an obvious inverse relationship here that I am not understanding. Can someone explain it.

Maybe I should use LED's as diodes more often since I have like 500 yellow LED's. I know they are crappy when used for diodes but sometimes it works enough.

Ring modulator works awesome btw. But I need to increase mic volume with an op amp and decrease square wave volume with a pot to get clean output without carrier passing through. I think for testing it gave best results when both were about 5V peak to peak. My transformers are 3400 turns of 0.07mm copper wire, 750 ohms resistance. I don't know how people calculate AC resistance or impedance for these but they say you need 10K AC resistance for 10Khz bandwidth. The transformers they use usually have 600ohm DC resistance. This ones were custom made to pass that value since I failed to find anyone selling 1:1 transformers locally.

I bought an AD633 thinking I never would get transformers. The 3 USD AD633 was obviously fake and it rapidly heats up when negative rail is connected :/
 
Last edited:
Try swapping the connections to the ends of one of the transformer windings? The leakage is possibly from inter-winding capacitance, or otherwise something to do with the overall circuit layout, grounding etc.
I again spent few hours checking wires and changing some ground connections to another places, changing op amps but I can't get it sounding as nice as it did when I first tested it with no nulling pots. Now if I disconnect nulling pots it is a mess of leaking issue at output. Even when I use my oscilloscope to precisely adjust the nulling pot, the carrier will go through. I think the pot needs to be adjusted for specific frequencies because leak seem to increase with higher frequency carrier.
Now for some reason other diodes than LEDs are working better with this circuit at its original state for unknown reasons.
If there was a op amp configured for decreasing the carrier volume when the signal level is under a specific level it would fix my issue. I wonder what would happen if I use a voltage controlled amplifier and pass the carrier through that VCA and use the signal as input of that VCA. In theory that should decrease the gain of the carrier according to signal level and fix the leaking when the signal input is low. What you think, is it worth a shot? It looks like there is no hope of fixing the leaking normal way.

Would you like to listed to what it sounds like? Maybe I am over thinking this and the current setup is normal in terms of carrier leak.

My other theory is that when I first tested it with LEDs it worked nicely with zero carrier leak because LEDs basically did not switch open with low signal volume because large Vd. Maybe I did something wrong at first and got a good result out of luck and it is impossible to replicate it now.
 
Last edited:
I've just tested up a lashup version of the new design I dreamed up after seeing the problems you were having & parts costs etc.
It is using the PAM8403 I mentioned, plus some other common bits.

It works!
Two independent channels, or stereo. Most of the interconnections are on the underside, made with wire wrap wire. Thee are a couple more 10K resistors under each opamp IC as well.

Everything is battery powered for the test, except the focusrite interface, which has the audio fed via an isolating transformer, as the PC has a lot of high frequency noise on the USB cables.

The small board is just a simple mic preamp to get a suitable audio level in to it; I was using an SM58.

Provisional schematics attached.

The prototype only has a second order filter and the caps are far too small, there is RF carrier leakage on the audio, seen on on a scope. The one in the schematic should be better.

I'll be doing a proper article on if for my youtube channel sometime soon.

Audio of the initial test here, as MP3 to keep the size down. The levels are a bit off and it's clipping somewhere, but for a first test and no proper adjustments, I don't think it is too bad!


Edit - filter schematic updated. I was half asleep and mixed up the capacitor connections..

IMG_7820.jpg


IMG_7821.jpg


RJ_Ring_Modulator_Sheet_1.png


RJ_Ring_Modulator_Sheet_2.png
 

Attachments

  • RJ_Ring_Modulator_Sheet_2.png
    RJ_Ring_Modulator_Sheet_2.png
    75.1 KB · Views: 165
Last edited:
I've just tested up a lashup version of the new design I dreamed up after seeing the problems you were having & parts costs etc.
It is using the PAM8403 I mentioned, plus some other common bits.

It works!
Two independent channels, or stereo. Most of the interconnections are on the underside, made with wire wrap wire. Thee are a couple more 10K resistors under each opamp IC as well.

Everything is battery powered for the test, except the focusrite interface, which has the audio fed via an isolating transformer, as the PC has a lot of high frequency noise on the USB cables.

The small board is just a simple mic preamp to get a suitable audio level in to it; I was using an SM58.

Provisional schematics attached.

The prototype only has a second order filter and the caps are far too small, there is RF carrier leakage on the audio, seen on on a scope. The one in the schematic should be better.

I'll be doing a proper article on if for my youtube channel sometime soon.

Audio of the initial test here, as MP3 to keep the size down. The levels are a bit off and it's clipping somewhere, but for a first test and no proper adjustments, I don't think it is too bad!

That is awesome. The noise is there but only when you talk in it which is much better than constant leakage. I also experienced the USB power supply noise problem greatly when I first tried making a mic preamplifier and ending up just using a lithium battery with a boost converter which is still noisy but it is much better.
Amplifier boards with PAM8403 are super cheap. I found one thats super similar to what you used. I would like to experiment with your circuit if in the future.
 
The (unwanted) distorted sound is intermittent, so I think it relates to levels somewhere or the poor filter & it just needs a bit better adjustment. I'm going to do a PCB with the full filter and some level adjustment facility.

I forgot to mark on the drawing; the whole bottom left block with the PAM8403 is equivalent to one of those little amp PCB modules - it connects directly the inputs to the 74HC86.

The PAM8403 section needs an attenuator at each input, to work with modular synth signal levels, as it has high gain internally - probably somewhere around 100:1 as a starter value, like 100K to 1K divider.
A PAM8406 would also work in that circuit, it would just need pin 9 to 5V rather than 0V.

The analog switch IC can be any similar quad switch 411, 412, 441, 442 etc., either all normally open or all normally closed. Using the opposite type would just invert the output phase.

The test board has a 5V regulator to run the 5V parts from the +15V supply I was using. If the synth has that already a separate one is not needed. The current is very low.
Got this EG8406 board. I did not had time to check all specs but circuit diagram looks the same with modulator inputs. It was very cheap.
I got the MN3102 for MN3008 delay clock but NE570 seem to just doesn't exist locally so I will get some questionable SA571 from China as usual. There is schematic that uses 4x MN3008 so I will construct it with only 2 of them. Also got a cheap wood box for the modular synth project. Seems like I can supply the reference voltage with a single 4148 diode voltage drop. But since 14/15 of 12V is 11.2V I just got a quality Zener diode for that voltage.
 

Attachments

  • IMG_20220920_173517269.jpg
    IMG_20220920_173517269.jpg
    2.5 MB · Views: 173
  • IMG_20220920_034028.png
    IMG_20220920_034028.png
    645.5 KB · Views: 166
  • IMG_20220919_193325.jpg
    IMG_20220919_193325.jpg
    1.5 MB · Views: 186
That looks to be another makers copy of the same amp module as the ones I got, so it should be good!

I've recorded another test with mine, after adding a pot to set the carrier input level and adjusting the output down a bit. That has completely eliminated the overload distortion, it seems to work very well now.

The recordings are on my web page for the project, here:

The latest schematic file is at the very end of the page, it has some minor changes to add carrier null.

Seems like I can supply the reference voltage with a single 4148 diode voltage drop. But since 14/15 of 12V is 11.2V I just got a quality Zener diode for that voltage.
It really needs referencing to the negative pin, and ideally should be adjustable to get the lowest distortion.

Try two diodes with a pull up resistor so they have around 1.2V across them, then connect a preset across the upper one so you can adjust it between 0.6 - 1.2V ??
 
Transformers are not rated by impedance rather by inductance L and resistance R with a T=L/R the pulse 63% decay time . The half power Bandwidth (BW) is when the resistive load matches the inductive impedance X(f)=2 pi * f * L
Also the wire resistance must be a low % of the load impedance. 1% to 10% as resistance does not transform any power. It just absorbs it.

Because of inductances and interwinding capacitance, it is not cheap to make one with more than 2 decades of bandwidth and high X(f)/R ratio unless something is compromised.

Audio Transformers are sold by audio circuit impedances when the frequency range is defined, but the design must be done in inductance and inductive impedance.


Part of your circuit for giggles & kicks. 1:1 ratios https://tinyurl.com/2zvrge8s

1663885351841.png
 
Last edited:
Transformers are not rated by impedance rather by inductance L and resistance R with a T=L/R the pulse 63% decay time . The half power Bandwidth (BW) is when the resistive load matches the inductive impedance X(f)=2 pi * f * L
Also the wire resistance must be a low % of the load impedance. 1% to 10% as resistance does not transform any power. It just absorbs it.

Because of inductances and interwinding capacitance, it is not cheap to make one with more than 2 decades of bandwidth and high X(f)/R ratio unless something is compromised.

Audio Transformers are sold by audio circuit impedances when the frequency range is defined, but the design must be done in inductance and inductive impedance.


Part of your circuit for giggles & kicks. 1:1 ratios https://tinyurl.com/2zvrge8s

View attachment 138724
The final circuit I put on perfboard actually had 100K resistance across the last transformer output and coils themselfs were around 20 Henry. Looking at your graph it looks like it would get around 10Khz max so maybe my measurements were bit off. But many people just use max 10Khz transformers to save money on the modulator. I think it is low bandwidth is not really hear able when you put in the harmonics and other distortions of this type of modulator. I think LEDs provided some kind of limit to carrier leakage with their high voltage drop but for some reason I wasn't able to replicate the first circuits performance after adding the cancelling fine tune pots. Even after removing those pots it wasn't the same. Probably pursuing this old way of making a ring modulator is pretty cost inefficient and ain't any better in quality department compared with modern aproach. I was honestly messing around to see if I could get the original Dalek voice from Doctor Who in the original way they did. But if I build another one in future I will go with rjenkinsgb's design.
 
1n34 diode compared to a silicon small signal one give similar Vd
Datasheet says forward voltage is max 1V. Should I buy another diode. 1n270 datasheet also says max 1V.
Most point-contact small-signal PN diodes have small contact area with relatively high contact resistance,, so the current that passes through them is limited and causes a higher voltage drop than "regular" diodes.
 
Most point-contact small-signal PN diodes have small contact area with relatively high contact resistance,, so the current that passes through them is limited and causes a higher voltage drop than "regular" diodes.
Very true and predictable. The electrode interface is the main part of the bulk resistance that makes the square-law diode into a resistor at power limit. The rated power is usually inversely related to the Rs bulk resistance. Rs=k/Pmax where k = 0.2 to 1 typically. High voltage zeners have more bulk resistance in the semiconductor and thus a much high k value.
 
Found this thing at flea market and thought these might be isolation transformers since it was mentioned ethernet stuff used them. Not gonna attempt building another ring modulator but funny I come across these when I do not need them.
1674931132818.png

1674931145008.png
 
Status
Not open for further replies.

Latest threads

New Articles From Microcontroller Tips

Back
Top