ForumUser1
Member
Hi All,
Quick preface - I have attempted to repair my electrical and electronic devices whenever they failed - and, while successful at the occasional large format PCB repair based on others’ recommendation of the likely failure mode/component (and, replacements of various PCBs, sensors, etc), I am not trained to be able to understand or troubleshoot past looking for obvious deterioration, overheat, deformations, etc. Always wanted to be, but wasn’t part of my life’s flow. I have used training materials, including videos to try and improve my knowledge level, but most of the failures I need to repair are “one offs” - usual stuff like appliances, HVAC systems, pumps, etc (I have a couple of rental houses and something is always failing). And, turns out, like mechanical systems, I enjoy this sort of thing! It’s not just the money saved, it’s knowing a basic component can be replaced, repairing a larger component or device - and, saving it from the landfill.
So, with the understanding I don’t know much about the topic - I’ll outline my recent troubleshooting and intent to repair - if this is the wrong forum, or sub forum, please tell me!
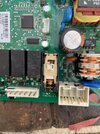
Neighbor had been out of town for three months - at some point a few days prior to their return, the compressor stopped working on their side by side Whirlpool Gold refrigerator with in door icemaker, etc - about 10 years old, but perfect in every other way. I found it this way when delivering some food for their arrival. Did a quick on site evaluation - determined, by flexing/pushing/tapping/wiggling the main control board (using the condenser fan as the indicator), that something on the board was intermittent.
Neighbor then tells me there was a problem “awhile back” that was traced to the board, but everything started working while the tech was evaluating the board. So, consistency, at least. They were not interested in repairing or replacing the board - just bought another of the same make. New frig installers dropped the old one in my garage.
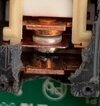
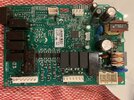
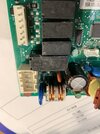
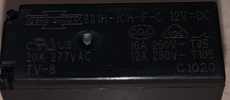
Pulled board, reflowed a few dozen connections, but was not able to get consistent operations - after some time isolated the issue to the power relay on the board. New boards are about $400 with used ones around $100. Figuring I had nothing to lose, destructively removed the top cover of the relay, to find the power on contact badly burned. Sanded the contact and cleaned. Still intermittent, but a bit more often. Removed the plastic actuator, applied force to bend the metal frame a bit, reinstalled and works normally - all other controlled functions of the frig appear to work normally, including the ice maker (the usual biggest failure point). Been running for a few days. I put a Ring camera on the compressor/condenser fan area and observed it turn on and off - looks to be normal ops.
The relay is Chinese made, so ordered exact same from China via eBay from a reliable supplier - if I knew more about this, I could probably substitute another manufacturer, but don’t - so, took the easy way out. I can ham-handed replace the relay - eight pin, but I can’t answer the question - “Is it just the relay, or is there another component on the board that caused the initial points to start to arc?” It’s usually a capacitor, so perhaps I should be replacing one/more of these at the same time.
Appreciate your thoughts!
Quick preface - I have attempted to repair my electrical and electronic devices whenever they failed - and, while successful at the occasional large format PCB repair based on others’ recommendation of the likely failure mode/component (and, replacements of various PCBs, sensors, etc), I am not trained to be able to understand or troubleshoot past looking for obvious deterioration, overheat, deformations, etc. Always wanted to be, but wasn’t part of my life’s flow. I have used training materials, including videos to try and improve my knowledge level, but most of the failures I need to repair are “one offs” - usual stuff like appliances, HVAC systems, pumps, etc (I have a couple of rental houses and something is always failing). And, turns out, like mechanical systems, I enjoy this sort of thing! It’s not just the money saved, it’s knowing a basic component can be replaced, repairing a larger component or device - and, saving it from the landfill.
So, with the understanding I don’t know much about the topic - I’ll outline my recent troubleshooting and intent to repair - if this is the wrong forum, or sub forum, please tell me!
Neighbor had been out of town for three months - at some point a few days prior to their return, the compressor stopped working on their side by side Whirlpool Gold refrigerator with in door icemaker, etc - about 10 years old, but perfect in every other way. I found it this way when delivering some food for their arrival. Did a quick on site evaluation - determined, by flexing/pushing/tapping/wiggling the main control board (using the condenser fan as the indicator), that something on the board was intermittent.
Neighbor then tells me there was a problem “awhile back” that was traced to the board, but everything started working while the tech was evaluating the board. So, consistency, at least. They were not interested in repairing or replacing the board - just bought another of the same make. New frig installers dropped the old one in my garage.
Pulled board, reflowed a few dozen connections, but was not able to get consistent operations - after some time isolated the issue to the power relay on the board. New boards are about $400 with used ones around $100. Figuring I had nothing to lose, destructively removed the top cover of the relay, to find the power on contact badly burned. Sanded the contact and cleaned. Still intermittent, but a bit more often. Removed the plastic actuator, applied force to bend the metal frame a bit, reinstalled and works normally - all other controlled functions of the frig appear to work normally, including the ice maker (the usual biggest failure point). Been running for a few days. I put a Ring camera on the compressor/condenser fan area and observed it turn on and off - looks to be normal ops.
The relay is Chinese made, so ordered exact same from China via eBay from a reliable supplier - if I knew more about this, I could probably substitute another manufacturer, but don’t - so, took the easy way out. I can ham-handed replace the relay - eight pin, but I can’t answer the question - “Is it just the relay, or is there another component on the board that caused the initial points to start to arc?” It’s usually a capacitor, so perhaps I should be replacing one/more of these at the same time.
Appreciate your thoughts!