Continue to Site

Welcome to our site!

Electro Tech is an online community (with over 170,000 members) who enjoy talking about and building electronic circuits, projects and gadgets. To participate you need to register. Registration is free. Click here to register now.

  • Welcome to our site! Electro Tech is an online community (with over 170,000 members) who enjoy talking about and building electronic circuits, projects and gadgets. To participate you need to register. Registration is free. Click here to register now.

Trouble Shoot noises in DC circuit

Status
Not open for further replies.

mickey1940

New Member
I know enough about using a Scope to be dangerous, but .
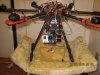
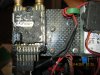
I want to troubleshoot for noises injected into DC power circuit on a Drone using a Oscilliscope .
How do I do it ?
 
Welcome to ETO, mickey1940!

Have you used a scope before?

Reason I ask is that I don't ordinarily think of using a scope on low voltage DC circuits as "dangerous"... o_O.

That said, what kind and level of noise are you expecting to see on the power circuit(s)? What symptoms are leading you to believe there is a noise problem?
 
Noise problems involving microprocessors operated in close proximity and sharing power supplies with high-current, inductive loads like DC motors usually involves ground-loops and common-mode coupling through the power distribution wiring, which is difficult to troubleshoot, oscilloscope, or not...
 
The power circuit is +5v that come off voltage regulators with a 22v battery.
What leads me to believe a possible noise problems is from they 900mhz radios, six motors, etc,etc.
I have not flown the Drone yet, so if there is noise in the +5v circuits I want to be prepared to know how to troubleshoot it.
Yes I have use a Scope before but I'am far from being a Expert.


SemperFi
 
We can certainly help you with operation of the scope.

There might be the issue, with respect to the RC RF sigs, of the max frequency the scope will handle. What scope(s) do you have?

I would be surprised, however, that any ambient noise generated by the drone's various ckts hadn't already been addressed by the manufacturer.
 
I Assemble this Drone piece by piece and purchased parts that would meet the specs of a six motor Drone , that also has a Laser Range finder that can avoid from running into trees, power lines. the cost to build this drone is half of the $4000.00-5000.00 it would cost to buy one, The size is two feet across from motor to motor, and has a retractable landing gear. The flight time is double and triple compared to a small one you buy out of a Hobby Store.
I use a Virtual googles to see where it flying, It has a GoPro camera with a gimble that allows me Pan 360 degrees and Tilts 180 degrees. It also has a Lightbar that has 10 mm 10 watt 10 leds that can fly at night and see the ground from 200 feet up from the ground.
I forgot to add, that all devices that is supplied with the +5v has a a 100uf 16v electrolitic caps across the power supply.
 
Last edited:
I Assemble this Drone piece by piece and purchased parts ...
I bet that was fun! :cool:
... I forgot to add, that all devices that is supplied with the +5v has a a 100uf 16v electrolitic caps across the power supply.
If you encounter cross talk or any HF noise issues, you might consider placing decoupling caps (I'd suggest Multilayer ceramic (MLCC) surface mount capacitors for starters, 0.01uF - go lower if need be) between the +5Vdc terminal of all ICs and the nearest ground plane (NOT the nearest ground trace!), keeping any leads used as short as possible and routed perpendicular to any traces.

Like this:
**broken link removed**
 
Last edited:
I bet that was fun! :cool:

If you encounter cross talk or any HF noise issues, you might consider placing decoupling caps (I'd suggest Multilayer ceramic (MLCC) surface mount capacitors for starters, 0.01uF - go lower if need be, between the +5Vdc terminal of all ICs and the nearest ground plane (NOT the nearest ground trace!), keeping any leads used as short as possible and routed perpendicular to any traces.

Like this:
**broken link removed**
Even better is to put the capacitor slightly above the IC (in the picture) with the pad covering the power supply trace.
That way any noise to or from the IC has less of a sneak path around the capacitor terminal.
 
cowboybob, thanks for the suggestions
I will be mounting the caps at the power supply of header pins that a cable plug is plugged into.
The only IC on the drone is in a encloser that has it own circuits built in. which is the Flight Controller that is programmed to control the drone.
Does this forum allow pictures, if so how do you attach one, If you could see the electronics of the Drone you will be able to better advise me.
 
You're welcome.
... Does this forum allow pictures...
Easiest method I use is to "Copy/Paste". Works great for "Snips" or pix I've opened in my browser. Or from a pic editor, whatever. Just remember to to put the entry cursor where you want the pic before you paste (probably more my issue :)banghead:) than yours...).

There's also the "Upload a File" button at the lower right of the window for adding to the thread. Gets a little more complicated.

Either way, there will be more info added to the bottom of the added post entry window that looks like this:
upload_2017-1-14_17-26-38.png

... I will be mounting the caps at the power supply of header pins that a cable plug is plugged into. ...
Not the best solution but, under the circumstances, it will have to do. There may be decouplers already in place.

... If you could see the electronics of the Drone you will be able to better advise me.
That would be great, mickey!! Love to see your handywork :cool:.
 
Last edited:
Would this be a better package to use. instead of the small retangular size ?
Obviously easier to handle (the smd stuff is like trying to solder grains of sand, from my perspective).

The basic idea is to minimize ESR and potential capacitive coupling (e.g., wire to trace).
 
Here is Drone layout, you will see on the 900+ radio module of the three pictures where the caps will be soldered to, and the other two pictures you will the elecronics layout and the Drone it self.
 

Attachments

  • Tarot680Pro1.JPG
    Tarot680Pro1.JPG
    1.3 MB · Views: 118
  • Tarot680Pro2.JPG
    Tarot680Pro2.JPG
    1 MB · Views: 129
  • Tarot680Pro3.JPG
    Tarot680Pro3.JPG
    1.3 MB · Views: 118
Wow...

What capacity battery(s) are you using and what sort of flight time (including video) do you expect?

I think you're only the second member to have built their own drone (the other is LittleGhostman).
 
The battery is a 22v 20,000mah Lipo , The flight Time is yet to be determine until I get it airborne this spring, I need to take it outside to calibrate the Compass, it also has GPS .
I really need to live in Florida instead of Indiana, it's in the 30's here and has been since Dec.
If you look real close above the camera you will see a 3.8mhz transmitter antenna that sends the video back to my Fat Shark virtual googles.
 
Lived in Jeffersonville, twice... . Oh, and dropped out of Purdue :oops:, back when Bob Griese was quarterback.

Much nicer here.
 
Very nice, mickey.

... I use a Virtual googles to see where it flying, ...
Does the camera aim where you look, or does it have a wide angle lens so you look within the frame, or does drone fly in the direction you're looking, or what...?
 
The GoPro does have a wide angle lens.
I have two slider switches on the Radio Transmitter that I can control the Panning and Tilting of the camera to where ever I want to see, the camera is my eyes in the sky.
This website shows the GoPro cameras and specs.
https://shop.gopro.com/cameras
This is what I like most about a Drone, the beautiful landscape video. View this video. To see video, at bottom of page click on "See It in Action" button.
**broken link removed**
 
Last edited:
Sure beats my first rubber band powered RC ratchet "flight control" system on my Cox .049 driven balsa airplane... :woot:.
 
Status
Not open for further replies.

Latest threads

New Articles From Microcontroller Tips

Back
Top