Continue to Site

Welcome to our site!

Electro Tech is an online community (with over 170,000 members) who enjoy talking about and building electronic circuits, projects and gadgets. To participate you need to register. Registration is free. Click here to register now.

  • Welcome to our site! Electro Tech is an online community (with over 170,000 members) who enjoy talking about and building electronic circuits, projects and gadgets. To participate you need to register. Registration is free. Click here to register now.

t flip-flop to turn on/off LED w/tact switch

Status
Not open for further replies.

hillie

New Member
Hi, I just signed up on here.. I hope this place will be a interesting place to get me going in the world of electronics. I've always messed around with electronics kits from radioshack as a kid but now I'm finding myself wanting to do stuff that requires more.

Basically I am trying to build a simple light using 3.3v LED's that you when you press a button, it turns it on, you press it again, it turns it off. The button has to be a tactile switch because of the small form factor of the device's shell that I'm modding.

It's a mod of an iPod accessory because you know those dock connectors aren't exactly available at Radio Shack ;)

The device in question already has a tact switch on board, and it may even have a T flipflop too, the thing is I dunno what it looks like and i can't find any pics of t flipflops.. All I know is it's a skinny long chip with only 4 pins, which seems to match every diagram of a t flip-flop i've seen on the net.

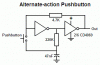
I have a diagram of what I currently have that works here: http://www.aarlabs.com/cdiag.gif.

...using a 10ohm resistor and the LED.

I've been told the best way to achieve what I want is to use a T flip-flop and a pull-high resistor to get it working but I have NO idea how to wire a t flip-flop.. I'm just confused at every tutorial I see online because of there being two outputs and two inputs.

I have a picture of the actual device's board with the pic of what I am suspecting might be a T flip flop here:

http://www.flickr.com/photos/hillie/1460896673/

That's the device. I have 3 of these things too so it's no problem removing components to see where things go. I already ripped a chip off the back of that one :D

Any help would be greatly appreciated.. and I apologize for the crude schematic.
 
Is the tactile switch SPST or SPDT?

If it is the latter, it is very simple to connect it to a flip flop.

If the former, you will need bounce suppression.

I suggest you do a search of this forum using key words such as:- "flip flop", "bounce suppressor", "momentary switch" since there have been many threads on this subject in the past.

However, the simplest solution (if you can get one small enough) is to use a toggle switch.
 
how can you tell which one it is? I could look on the box of the one I bought from the electronics store but the one in question is a part of this device already.

i dunno if you mean what i think by bounce suppression? i was kinda wondering about how to avoid a situation where since when you hold the switch in it's constantly sending current, what happens with the flip flop, does it just keep toggling for as fast as the current can go through it?

and then how do you toggle it just once.

i am really new to especially digital stuff.
 
Bounce suppression is commonly known as de-bouncing too, there are many circuits out there that do the job well, but personally, I prefer using a 555 timer as a debouncer. Check google for circuits. There are also some simpler resistor-capacitor setups that may not work as well, but could be suitable for your application.

what happens with the flip flop, does it just keep toggling for as fast as the current can go through it?
No. it will stay at whatever level it was at until the input changes.

the simplest solution (if you can get one small enough) is to use a toggle switch.
True, but he wants to use the tactile he already has. Plus, its an iPod- all about aesthetics and toggle switches just cant cut it.
 
hi,

>>> Basically I am trying to build a simple light using 3.3v LED's that you when you press a button, it turns it on, you press it again, it turns it off. The button has to be a tactile switch because of the small form factor of the device's shell that I'm modding.


If thats all you want do, ie: push ON, push OFF, buy a simple push button toggle switch, the type that used on the base of a table lamp.
 
That long black thing with the four wires coming out is a crystal, not an electronic IC. The ICs are only on the other side of the board, and the two I see are large with many leads meaning they are complicated and you can't use them. You will have to add your own flip flop.

Most people make a T flip flop using either a D type or a JK type flip flop. Often this same circuit is referred to as a divide-by-two counter as this has the same function. If using a D type, you feed the logic level from your debounce circuit to the clock input of the D flip flop. You wire the D input to the /Q output (/Q means the "Q NOT", which is the one with little dash over top of the Q on most schematics). The output is taken from the Q output.

If using a JK flip flop, you wire the input from the debounce circuit to the clock input. You connect both the J and K input to Vcc, and you take your output from the Q out.

With all these configurations, the flip flop is triggered by an edge, not by a steady level. So you have to add a debounce circuit that ensures that any press of your switch gives you only one edge, despite the tendency of most switches to bounce on and off quickly when you push them. That is the purpose of the debounce circuit. If you are using a NO button, I would suggest that the simplest debounce circuit is a resistor and a capacitor. Starting at Vcc, you connect the resistor in series with the switch and the other side of the switch is to ground. So, when the switch is open (not pressed) the junction between the resistor and the switch is at Vcc. When you push the switch, the junction voltage falls to ground. Now, if you add a capacitor across the resistor, the voltage can fall to ground very quickly when you press the button, but it can't jump up to Vcc quickly at all because the capacitor can only charge up through the resistor, which takes time. This filters out the switch bounce. The resistor can be a high value, like 27K ohms or so, and the capacitor should be chosen so that R x C is more than 0.01.

I started to sketch a schematic for you then realized that it was more work than I was willing to do, so instead, why don't you try and draw the schematic, then post it and we'll tell you if anything is wrong with it?

Ron
 
Last edited:
Why not buy a T flip flop directly?

Ok so that makes since to wire both inputs to Vcc, that was for me the biggest confusion on schematics and tutorials i saw online, why it has 2 inputs.

Would it be something like this?

Vcc--->debounce--->both ends of JK ff, q out--->gnd ?

and you're telling me the debounce is a resister connected to a capacitor in that order?

The JK flip flop method looks simpler.

what kind of resistor/capacitor do I need in this case? by 'kind' as far as resistor goes i mean how many ohms?

As far as push button switch goes, if I can find one small enough to solder in place of the tactile and still have the normal "iTalk" button work, then that will do, although a digital solution would be a lot more attractive, and a better learning experience for me.

Thanks for all the replies
 
hillie said:
Why not buy a T flip flop directly?

Ok so that makes since to wire both inputs to Vcc, that was for me the biggest confusion on schematics and tutorials i saw online, why it has 2 inputs.

Would it be something like this?

Vcc--->debounce--->both ends of JK ff, q out--->gnd ?

and you're telling me the debounce is a resister connected to a capacitor in that order?

The JK flip flop method looks simpler.

what kind of resistor/capacitor do I need in this case? by 'kind' as far as resistor goes i mean how many ohms?

As far as push button switch goes, if I can find one small enough to solder in place of the tactile and still have the normal "iTalk" button work, then that will do, although a digital solution would be a lot more attractive, and a better learning experience for me.

Thanks for all the replies

You can try and find one directly, but I'm not aware than anyone makes such a thing. What you typically find is D type and JK type flip flops, both of which can be configured for Toggle operation, but I don't find any T flip flops and I've never seen one in my modest 33 years in my little corner of this business.

As to your proposal, it is appropriate to communicate a circuit configuration using a schematic diagram. Anything else is too ambiguous and difficult to understand. Please post a schematic diagram of the way you think it should go. thanks
 
QUICK! IGNORE ALL THESE SILLY NANNIES!!!

Use this circuit:

Works every time without fail. I have pressed the button over 500 times and It never skipped a beat :)

You just have to get the parts CLOSE, they actually dont really matter. I used a 0.1 uf instead of the 47nf cap. I used a 74HC04 instead of the 4000 series counterpart, the 4069. the 4069 has a VDD range of 4.5 to around 12V, but a low output. All you gotta do is add a MOSFET or a good transistor to the output of the circuit, and you can figure out the rest :D
 

Attachments

  • Alternate-action.gif
    Alternate-action.gif
    3.6 KB · Views: 2,382
Last edited:
Krumlink said:
QUICK! IGNORE ALL THESE SILLY NANNIES!!!

Use this circuit:

Works every time without fail. I have pressed the button over 500 times and It never skipped a beat :)

You just have to get the parts CLOSE, they actually dont really matter. I used a 0.1 uf instead of the 47nf cap. I used a 74HC04 instead of the 4000 series counterpart, the 4069. the 4069 has a VDD range of 4.5 to around 12V, but a low output. All you gotta do is add a MOSFET or a good transistor to the output of the circuit, and you can figure out the rest :D

That's a clever circuit, well found. But "silly nannies"? Now you're just being cruel.

regards
Mary Poppins


.
 
Im sorry, I did not mean to hurt your feelings mary :D
 
I will draw up a schematic of it soon.. How was my schematic that I posted in the first post?

btw: I'm glad i'm not the only one to not understand something like the above thing I posted. I received something like that in instructions given to me when I first asked how to wire a T flipflop (this was in irc)
 
Last edited:
Loaded ok for me just now. And it looks reasonably schematickey, but for future reference, it's usual practice to show the positive supply higher than Ground. But it doesn't strictly matter, especially in such a simple diagram.

Also, the proper LED symbol is a circled diode with arrows coming off it; you have to wire them the right way round, but presumably you know that :) If it's clear enough what it's supposed to be and how it's connected, don't fret too much. Anyhow, good luck in doing your new schematic.
 
Last edited:
Status
Not open for further replies.

Latest threads

New Articles From Microcontroller Tips

Back
Top