Continue to Site

Welcome to our site!

Electro Tech is an online community (with over 170,000 members) who enjoy talking about and building electronic circuits, projects and gadgets. To participate you need to register. Registration is free. Click here to register now.

  • Welcome to our site! Electro Tech is an online community (with over 170,000 members) who enjoy talking about and building electronic circuits, projects and gadgets. To participate you need to register. Registration is free. Click here to register now.

Speaker - usb charging repair

thomasabcd

New Member
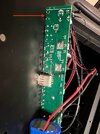
My kids have a bluetooth karaoke speaker that will not charge. After opening the speaker, I could see, that a part of the micro USB-port used to charge the speaker was broken off. Since I am a beginner and don't have a soldering iron I am trying to figure out, whether I can fix it easily without soldering.

The speaker is powered by a battery that connects to the print board through a black and a red wire.
IMG_0217 copy.jpg


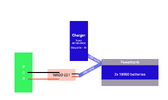
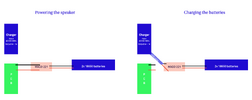
By doing some googling, I found this Youtube-video which got me thinking if I can cut the red and black wires and connect them to a usb-cable and charger like in the video:
?

If it works it seems straight forward to either solder the wires compared to soldering the micro usb-port which is in a very tight spot. Or maybe even just use some electronics tape like here

Your input is much appreciated
 
If the red and black wire to the right of the photo goes directly to the USB charge socket, it should be OK to connect that to a separate USB plug.

If you do not want to solder, I suggest you get some Wago 221 or similar lever-operated cage clamp terminals.

Just strip the insulation from a wire for the correct length, open the lever, put the wire end in and close the lever. They form an extremely reliable connection.

All the sections are electrically connected in these, so two of the two position type can be used for joining the wires - one for the reds and one for the blacks.

s-l500.jpg
 
Thanks for all your replies. They are much appreciated!

I think I will start with a couple of WAGO 221s so I don't have to solder.

Do you think I can cut the wires and connect a USB charger directly to the print board (the left side of the image above) and then run the speaker continuously from a USB charger? Or should I use a USB charger to charge the battery only (the right side of the image) and then shift the wires back and forth from the USB charger to the battery when charging and then shift over to the battery to the print board when using the speaker?
 
If you can connect a different USB socket or plug in place of the original USB socket connections, it should work exactly as before.

It's very unlikely to be able to run directly from USB power, it will need the battery to supply the amp as that's likely to take higher current pulses than the USB side can handle.

And, you cannot connect the battery directly to USB power; it must be connected via its charging circuit, or you risk the battery bursting or catching fire...

Where is the USB socket? I got the impression it was connected via the right hand red & black, but it sounds like that was a wrong guess??
 
The USB port is connected to the print board and then connected to the battery
IMG_0200.jpg


IMG_0197.jpg


But the USB port is broken. The black part in the circle is broken off the USB port and is loose, which is why I will not charge, I assume. I was hoping I could provide power from another source or charge the battery without having to fix the USB port. The red and black wires in the lower left corner of the board are the wires connected to the battery.

IMG_0217 copy.jpg


IMG_0199.jpg
 
You can't connect the USB feed directly to the battery (BOOM!!!!) - the charger circuit is on the board - you need to solder a USB lead to the USB socket connections on the board (or at least the input of the charger circuit on the board).
 
Thanks! I am happy I didn't go ahead and connect the USB feed directly without checking here first!

Just to be sure, what you mean is that I have to remove the USB port and then solder a new one on? There isn't much room. Is there an "easy" way to do this?

Thanks for all your input. I am new to all of this, so your input is much appreciated!

IMG_0233.jpg
IMG_0234.jpg
 
That is a surface mount part, from what I can see. eg. The pin connections were soldered to tracks on the top of the PCB, with just the metal body having tabs through the PCB to hold it in place?
(Can you get a photo of the underside of that area?)


The broken black part that holds the socket contacts needs removing, but without causing more damage to the PCB.
It looks like the connections it carries have been pushed through and twisted so may be shorting things.

Will it push back in from the rear of the socket and out through the front of the socket?

Once the damaged part is clear, we can see the PCB tracks and figure out what to do next.
 
I tried pushing the broken black part through the front of the socket but didn't succeed.

This is the underside of the PCB. The red arrow marks where the micro USB is attached.
 

Attachments

  • IMG_0248 copy.jpg
    IMG_0248 copy.jpg
    264 KB · Views: 196
OK, it is definitely surface mount, the only through-board pins are to hold the connector body.

You can't really go any further until the broken connector contacts have been removed.
 
In regards to charging the batteries directly, I understand that they cannot be charged directly from a USB feed as per the answers above, but could the batteries be charged using the charger, that was used before the USB port broke and then manually change back and forth between charging and powering the speaker with the red/black wires using the WAGO 221 to change between charging and powering the speaker?
batteries.png

IMG_0255.jpg


IMG_0257.jpg


IMG_0253.jpg


IMG_0254.jpg


Or maybe even buy a cheap 18650 powerbank which can be charged through one of the usb ports on the powerbank using my existing charger and then connect the red/black wires to the other usb port on the powerbank using a USB cable and a WAGO 221?
powerbank.png

160638793.jpg


Even though both of the above solutions would be a bit more cumbersome and manual than replacing the USB port, it would be much easier for me to do, since I don't have a soldering iron, don't have any experience using one and the space where the broken micro USB port is, is very tight. We don't use the speaker that much, so I don't mind having to open the speaker to charge it when needed and doing a bit of manual back and forth with the wires.

Or am I just trying to desperately do something, that is not doable and the only option is soldering :) ?
 

Attachments

  • powerbank.png
    powerbank.png
    50.8 KB · Views: 87
  • batteries.png
    batteries.png
    88.3 KB · Views: 74
I understand that they cannot be charged directly from a USB feed as per the answers above, but could the batteries be charged using the charger, that was used before the USB port broke
No; calling USB power units "chargers" is a leftover from early mobile & portable devices before USB was standardised, that each had a specific charger to suit the battery type they used.

USB wall units like that are technically just 5V power supplies; the "charger" part that adapts it to the specific battery and actually regulates the charge current and voltage is in the device itself (phone / tablet / speaker etc).

As previously mentioned, a direct connection from any USB power source to a lithium battery would wreck the battery and make it either burst, explode or catch fire - or some combination of those!

They contain a massive amount of energy and have cause many fires including houses and cars being being destroyed.


As a rough comparison, charging older type batteries like NiCd, NiMH, Lead-acid etc. is a bit like filling a water tank - slightly too much is messy but not totally catastrophic. They can be trickle charged forever, as long as it's a slow enough trickle.

With lithium cells, it's more like blowing up a balloon - even slightly too much pressure (voltage) beyond the full point (4.2V) and - Bang!


You could connect the battery in place of the battery in a power bank, as the electronics in a power bank have the charge control circuitry. However, usually due to the way they are made, you would still need to solder wires.

Or use a power bank module like this - but again, it needs soldering..
Edit - missed the link.

 
Last edited:
Thanks.

I was really hoping the option with a power bank case like this in which I would be able to charge the batteries using my normal USB charger in one of the power bank's ports and then strip the isolation from a USB cable to connect the other USB port in the power bank to a WAGO 221 and then connect the WAGO 221 to the PCB would do the trick instead of soldering
Link: https://gbr.grandado.com/products/m...-bank-battery-charger-case-diy-box-for-iphone

But I guess I will have to learn how to solder :)

Thanks a lot for your patience and all the help - I really appreciate it!
 

Latest threads

New Articles From Microcontroller Tips

Back
Top