Continue to Site

Welcome to our site!

Electro Tech is an online community (with over 170,000 members) who enjoy talking about and building electronic circuits, projects and gadgets. To participate you need to register. Registration is free. Click here to register now.

  • Welcome to our site! Electro Tech is an online community (with over 170,000 members) who enjoy talking about and building electronic circuits, projects and gadgets. To participate you need to register. Registration is free. Click here to register now.

Soldering questions

Status
Not open for further replies.
The rosin in solder is supposed to be a cleaner, not a fuel. If you have fumes and smoke then your soldering iron is way too hot.
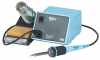
My temperature controlled Weller soldering iron doesn't burn the rosin. It also doesn't smoke and it produces no fumes. Instead it makes a pleasant aroma.
 
Are you sure audioguru? Everyone I've seen soldering and has talked about soldering says it has fumes, I don't know if they were using rosin core or not. Maybe you just have your iron the coolest it can possibly be for it to melt? Which I think is a good idea anyway, so yeah.
 
Maybe you just have your iron the coolest it can possibly be for it to melt?
My soldering iron regulates its temperature, it does not have a Mickey Mouse light dimmer circuit to adjust its power. A light dimmer circuit allows the soldering iron tip to cool when it is used then overheat when it rests. The tip of my soldering iron senses its temperature and regulates the power to it so its temperature is always correct. Never too hot and never too cold. Its tip lasts for many years even when it is hot all day every day.
My Weller soldering iron is about 40 years old and is still being manufactured.
 
Ah the pleasant aroma of rosin core.
JimB
I love the smell of.JPG
 
My soldering iron regulates its temperature, it does not have a Mickey Mouse light dimmer circuit to adjust its power. A light dimmer circuit allows the soldering iron tip to cool when it is used then overheat when it rests. The tip of my soldering iron senses its temperature and regulates the power to it so its temperature is always correct. Never too hot and never too cold. Its tip lasts for many years even when it is hot all day every day.
My Weller soldering iron is about 40 years old and is still being manufactured.

Oh, okay.

What model is that Weller?
 
Hi Technoid

Any proper temperature controlled iron is an essential piece of kit for serious electronic work. Makes your life easier to do things neatly and if looked after....can go for yonks ....

My first Magnum (locally made here in SA) lasted 20 Years of solid hard work fixing TV's. And did not cost an arm and a leg.

There are plenty others out there that are made to work....

Regards,
tvtech
 
i agree too, temperature control is a MUST. But, isn't that too cinda temperature control if it shuts down via burn element? :D...
 
But, isn't that too cinda temperature control if it shuts down via burn element?

What?

Mine is this one:

Thanks! I already bought one but I'll get that one if I ever need another!

I finished my kit! It looks horrid, I'm not even going to bother cleaning the flux, but whatever. There's a few joints that look pretty good though! When I was going through the desoldering practice to replace resistors to make it work right, it stopped working. I think I might have gotten the 555 timer too hot or something, because it says the desoldering wick gets hot, so I need to hold it with pliers, and I can't figure out what else could be wrong. But whatever I don't care it's probably just because it's cheap. A lot of the joints looked good at first but after they cooled they looked grey. Is that because the iron was too hot?
 
Take a pic.

Remember what I said earlier, push the soldering iron against the lead, and make sure the lead and pad get hot. With practice, you will know about how long the iron has to contact the connection. Apply solder OPPOSITE the iron. i.e. where the pad and lead meet, but not the iron.

Holding the brad with pliers should not be necessary. Just real out a longer amount. Put braid down over solder and let the braid wick it up. Cut off and discard as the end collects solder.
 
A good solder joint looks shiny, not grey.
If the soldering iron is too hot then the flux in the solder burns and leaves behind a sticky mess of charcoal.
At the proper soldering temperature the flux evaporates or leaves behind a very thin light colored film on the outside of the solder joint.
 
I keep meaning to take a picture but never get to it, I will before I post next time though.

Holding the brad with pliers should not be necessary. Just real out a longer amount. Put braid down over solder and let the braid wick it up. Cut off and discard as the end collects solder.

It's not in a roll, it's just a length.

At the proper soldering temperature the flux evaporates or leaves behind a very thin light colored film on the outside of the solder joint.

Maybe that's what it is..

I took apart a 9 volt battery and soldered some wires to the connector end to attach 9 volt batteries to, and no matter what I did, colder, hotter, held the iron on it longer, shorter, whatever, it always turned grey a few seconds after I took the soldering iron away. It always looks nice and shiny at first, but I guess as it cools off and solidifies it does that.
 
Lead free solder hardens and looks frosted upon hardening, not shiny as when melted.
 
You can't solder to some metals easily. That contact may be plated with a metal that is difficult to solder too. This also might be where a specific flux is required. See: https://en.wikipedia.org/wiki/Flux_(metallurgy)

When you "silver solder" which should be called brazing, flux is extremely important. Oxides can form on say steel with the application of heat. The Flux keeps the oxides from forming. In some cases, like when brazing refrigeration lines, it's necessary to run an inert gas in the pipe to prevent oxide formation.

I know the feeling - been busy too. PS: Got the "thank-you".
 
I know it's a moot point now, but the comment about cheap soldering iron tips turning black because they're too hot, well I found you can actually reduce the temperature by undoing the grub screw that holds the tip, and feed the bit out an inch or more, so less heat makes it to the tip, so it's cooler. Not long after I discovered this, the element failed. Crappy iron...

Also when I used to have an Antex iron, when the crud on the tip got too hard and thick to wipe off, I used to file it very gently and carefully with a worn needle file. Never damaged the cladding.
 
PS: Got the "thank-you".

Cool!

A pic! Finally!

I couldn't get much better pictures than this with my camera.
P7180231.JPG
P7180232.JPG

9 volt connector:
P7180236.JPG


I've been praticing desolering stuff on an old DVR (Not sure if I've already said that) and soldering it back on.
I am having trouble putting the components back in the holes to solder, when I turn the board over to solder them they fall out, so I have to hold them with something, so then I don't have a free hand to apply solder with and have to put some from the iron on it quick so it stays in the hole enough for me to put more solder on it better.
And even when I have the iron at what seems to be the lowest tempature possible to get the solder to melt, it takes forever for it to melt and when it finally does there's still smoke.
And not touching the iron with the solder and just holding the solder on the other side of the pad never works, even if I have the iron really hot. I have to touch the iron with it a little and then it starts flowing. Maybe it's just cause I don't clean the board before I solder like people say to?
 
I don't think your soldering iron is hot enough.

The flux needs to be cleaned off the board.

I'll use SLT to denote Solder, Lead and Tip and PAD to denote pad.
...........SLT
.........(PAD)

Note mentally, about long long you need to heat before applying solder. Otherwise, "touch" the solder briefly to see if it will flow easily. If it does, continue soldering.

Squish the (lead against the hole, the lead and the pad all together) with the solder tip. Apply solder to the lead.

To "hold stuff"
1. Build with the lowest dimension parts first.
2. Use foam on the component side.
3. Use a cut and clinch tool (hard to find these days). The tool cuts and bends the lead over so it doesn't fall out.
 
Back to the basics.
The tip of the soldering iron must be tinned and it must be fairly clean. Mine came tinned from the factory and if I touch it to solder then the solder quickly coats the entire tip.
I clean the tip with a single wipe on a grooved damp natural sponge made for my soldering iron.
Each solder joint takes 1 second of heat from the tip of the soldering iron.
 
While AG has soldering down to a precise art, I still occasionally find that a bit of fresh solder with rosin core on the tip applied while touching the part leads to a better joint due to rapid heat transfer, plus the rosin in the solder wire is released to combat any oxides. This is because a cylindrical tip does not contact much of a joint and slows heat transfer which then permits oxidation of the joint during the process and compromises the finish.. Difficult angles for the solder tip only makes the lack of proper contact worse.

On the matter of hands free.....the best approach I have is to pre solder the pad by itself leaving the hole clear (toothpick helps here) , leaving a thick (1mm) layer and then tin the lead to be soldered. Then insert your part and reflow the solder that is already on the pad. This is effective as you can stabilize the part with one hand and solder with one hand. You can always add more solder after the reflow if the fillet needs augmenting as the part is stable after the reflow. You can solder stainless metals with reflow techniques. Even 308 stainless steel welding rod. You just need to load the melted solder on, then scrape the metal with a blade under the molten solder covering the spot to be soldered permitting solder to metal bonding in the absence of oxygen. Afterward you can reflow as normal.

I have been soldering about 35 years now....and I recently got my first temp. controlled iron. It does help with keeping the tip non oxidized and makes soldering heavier joints simpler. It also limits the smoking of the rosin.
For big joints with heavy leads I preheat with a hot air tool and apply flux before soldering.
 
Status
Not open for further replies.

Latest threads

New Articles From Microcontroller Tips

Back
Top