Continue to Site

Welcome to our site!

Electro Tech is an online community (with over 170,000 members) who enjoy talking about and building electronic circuits, projects and gadgets. To participate you need to register. Registration is free. Click here to register now.

  • Welcome to our site! Electro Tech is an online community (with over 170,000 members) who enjoy talking about and building electronic circuits, projects and gadgets. To participate you need to register. Registration is free. Click here to register now.

Solar Panel Controller & setup

Scudders

New Member
I recently salvaged a solar panel from a barge and would like to use it to ultimately power LED lighting in my bike shed, to extend tinkering time in the darker months.

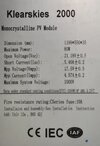
I'm a total layman when it comes to this but I've been told I'll need a controller and storage. The image is from the back of the solar panel.

I'd like to charge a lithium power bank from the panel and simply plug in USB LEDs, and maybe phone and USB speaker to the power bank when needed.

I'm having trouble when browsing the web for available controllers as they all seem to indicate for use with car battery only, hence I'm now here looking for any assistance whatsoever.

You can probably tell I would like to keep it as simple as possible. Any and all help appreciated.

20230304_164256.jpg
 

Attachments

  • 20230304_164256.jpg
    20230304_164256.jpg
    940.1 KB · Views: 148
You could just try connecting a multi output USB power unit intended for use in both 12 & 24V vehicles to the solar panel output?

A device made for that type of use should accept anything from around 11V up to 30V input, so the maximum 21V from the panel is well within range, and it would still give some power with fairly low illumination.

eg. Something like this:

You would have to limit the number of devices connected if there was not much sun, or none would work.

You would not get the theoretical maximum from the solar panel, but it's a simple and relatively cheap solution.

Just be certain the polarity of the connection between the cell and the USB unit input is correct!
 
It looks like it could be worth a try. I'd rather it just had a single USB though, then I'd use that to charge a Lithium power pack. Such a thing must exist, right?

Solar Panel --> car charger device --> power pack --> LED lights & other devices!
 
This is about the smallest I can find; most single or dual USB output ones are totally built in to a cigar lighter plug, so not easy to connect to or mount outside of a vehicle.


Also, you have a solar panel capable of 80W in full sun!
Each USB A port can only deliver 12 - 15W, so most of the panel capacity will go unused with only one or two USBs.
 
Thanks again, so, in order to optimise more the energy captured by the solar panel, I would need a solar panel controller?

In my energy illiterate head I was thinking of using the solar panel to charge something like this (in the link). Then plug in lights and devices as and when needed.

I think I've just got too big of a knowledge gap to understand which controller would be suitable. Obviously I dont want to go OTT but nor do I want to buy cheap/unsuitable and buy twice.

 
Thanks again, so, in order to optimise more the energy captured by the solar panel, I would need a solar panel controller?
Not necessarily; it depends what you want to run with the power.

There should be enough output to run or charge several USB devices though; it could be eg. a mix of USB power packs and battery lamps that charge direct from USB, using something like the first multi-output unit I linked to.

More USB outputs give more possibilities & get nearer using the possible maximum from the panel.

eg. I have one of these; it will run all day on a full charge using the lowest brightness setting (still blinding!) and it charges direct from USB:

There are many other types of rechargeable lamp, though not many run that long; that's the best I have seen.

You could charge such as that and normal power banks to then charge other devices.
 
To set up a solar panel system with a solar panel controller, here's a step-by-step guide:

  1. Determine Your Energy Needs: Assess your energy requirements to determine the size and number of solar panels you need. Consider factors such as average daily energy consumption, peak load, and available roof or ground space for panel installation.
  2. Select Solar Panels: Choose high-quality solar panels that suit your needs and budget. Consider factors like efficiency, power output, durability, and warranty.
  3. Choose a Solar Panel Controller: Select a solar panel controller, also known as a charge controller, based on your system requirements. There are two main types.
    A. PWM (Pulse Width Modulation) Charge Controller: Suitable for small to medium-sized systems, PWM controllers regulate the battery charging by controlling the voltage delivered from the solar panels to the battery. They are generally cheaper than MPPT controllers.
    B. MPPT (Maximum Power Point Tracking) Charge Controller: Ideal for larger systems and systems with complex configurations, MPPT controllers optimize the power output of the solar panels by actively tracking the maximum power point and adjusting the voltage and current accordingly. They are more efficient and harvest more energy than PWM controllers.
  4. Battery Selection: Determine the type and capacity of the battery bank that will store solar energy for later use. Common types include lead-acid batteries (flooded, sealed, or gel) and lithium-ion batteries. Consider factors like capacity, voltage, discharge depth, cycle life, and maintenance requirements.
  5. Mount the Solar Panels: Install the solar panels in an optimal location, such as a rooftop or an open area with maximum sunlight exposure. Ensure proper orientation and tilt angle for optimal energy generation.
  6. Connect the Solar Panels: Set up the solar panels in a series or parallel configuration, depending on the system voltage requirements. Follow the manufacturer's guidelines and safety precautions while connecting.
  7. Install the Charge Controller: Mount the solar panel controller in a suitable location near the battery bank. Connect the solar panels' positive and negative terminals to the controller's corresponding input terminals. Connect the battery bank's positive and negative terminals to the controller's output terminals.
  8. Connect the Battery Bank: Connect the positive and negative terminals of the battery bank to the appropriate terminals on the charge controller.
  9. Connect Load: Connect your electrical loads (appliances, lights, etc.) to the charge controller load terminals.
  10. Verify Connections and Test: Double-check all connections for proper polarity and tightness. Ensure all wiring is secure and protected from environmental factors. Test the system to ensure proper functioning, including charging the batteries and powering the loads.
  11. Monitor and Maintain: Regularly monitor solar panel performance and battery status. Keep solar panels clean and debris-free. Follow the manufacturer's guidelines for battery maintenance, such as checking electrolyte levels (for lead-acid batteries) and ensuring proper ventilation.
It's crucial to follow safety guidelines and regulations while installing and working with solar panel systems. If you're not familiar with electrical work, consult a professional installer.
 

New Articles From Microcontroller Tips

Back
Top