Continue to Site

Welcome to our site!

Electro Tech is an online community (with over 170,000 members) who enjoy talking about and building electronic circuits, projects and gadgets. To participate you need to register. Registration is free. Click here to register now.

  • Welcome to our site! Electro Tech is an online community (with over 170,000 members) who enjoy talking about and building electronic circuits, projects and gadgets. To participate you need to register. Registration is free. Click here to register now.

SMPS Adjustable DC Power supply 0/10 - 300 volt/0.3-0.5 Amp

Status
Not open for further replies.

pikstart

Member
Hi.

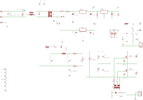
I 'd like to upgrade my design of such a DC voltage power supply that currently, to reduce power losses on the pass element, uses SCR controlled rectifier. The SCR is fired when the difference between the output and smoothing cap is less than about 10 volts.

This method has two main disadvantages.
1. Needs a rather bulky transformer to isolate main power.
2. Produces nasty pulses (of about 0.1 to 5 Hz) on the rectifier that are also audible on the transformer itself as ticks that user notice it.
3. Those rapid pulses will eventually reduce the life of smoothing capacitor.

I 'd prefer total SMPS solution with a smaller ferrite transformer, but the wide adjustable output is something that could not find how to do it.

Any ideas welcome.
Thank you
Ioannis
 
Thanks for the suggestions. I know it is not a childs play this design and also for the moment at least I am not going to a powerfull supply. The specs are not more than 100watts of output in any combination of current-voltage.

Few years ago I tried the attached design on a prototype for Ultra Sonic cleaners of about 500 Watts but the transformer T2 was ready made and did not deal with it. Also the operation was relatively limited in control, as the voltage and current to the transducers was stable. TR1 is also off the shelfe driver transformer. This is half bridge design that may work, maybe not in the range I need. Before blowing the mosfets(!) I'd like to know at least how to properly construct the transformer T2. Please note that the real part has one coil on each side and not as shown on the schematic.

Here I need to adjust the output voltage on a wide range and this is puzzling me. If anyone knows more on ferrites or can lead me to design specs and calculations, it would help alot.

Ioannis
 

Attachments

  • Main PCB-SCH.png
    Main PCB-SCH.png
    38.1 KB · Views: 183
I'd b tempted to try a dual-stage supply again, if I were going to build one.

eg. A pre-regulator (isolated?) covering say 30 - 300V and tracking ~10V above the second stage regulator output, other than at very low voltages.

That restricts the min to max ratios of both stages, and should give a more stable output than directly reducing a max. 300V system to very low voltages.
 
That preregulator, what kind would be? Linear or switching?
Switching.
Something like a 300V DC out unit that uses an optocoupler for feedback, so you can modify the feedback to control the voltage to the second stage, which could probably be a simpler non-isolated buck type.

The first stage may be possible with such as a TOP258 single IC SMPS device?

It would likely need a small floating aux PSU to supply the feedback circuit power, as the range is too wide to run it from an extra winding on the main transformer.

That does make the transformer simpler, though. You can get eg. 3W encapsulated PSU modules very cheaply that could work as the aux supply.
 
I would suggest finding an old ATX style desktop computer power supply, and modifying it.

All of the ATX supplies that I have looked at use a half bridge architecture and have an independent auxiliary supply that powers the internal operation. The independent aux supply is important so that the internal operating voltage is stable even though the main output varies. (as mentioned by rjenkinsgb in post 24)

With that as a foundation, about all you should need to do is:
  • Rewind the transformer and main output inductor
  • Change the output rectifiers and filter capacitors
  • Change the voltage feedback network
  • Change the fixed voltage reference to a variable one
When looking for a supply to use consider these points:
  • One built using all through hole parts will be easier to modify
  • An older, non PFC model (will have a 115/230V switch) will be less complex and easier to modify
  • Try to find one that has a published schematic.
 
It is a small production (about 15 pcs per year) of a Electrophoresis Power Supply, (https://www.signalcom.gr/en/electrophoresis-power-supplies/electrophoresis-power-supply-ps-220/) and that is why I was not able to show the schematic of the current design.

I wish to offer clients a better product, less heavy (this one is over 4 Kg) and with better current and voltage range.

Small SMPS power supplies with fixed or small voltage range is relatively easy to design. There are so many chips today for almost any type of power supply. But not in my need of wide adjustment range. I do understand that 10 or 20 up to 300 is not an easy job for switcher, but maybe someone has an idea how to crack it.

Ioannis
 
One other idea is to use a lower voltage, say 0-48 Volts DC as primary supply and then drive a half bridge of switching circuit like that of #21 post. Adjusting the Vdc of the bridge may also adjust the voltage of the secondary of the ferrite transformer. This needs also an adjustable SMPS of 0-48Vdc which is either not easy to design.

Ioannis
 
The problem remains that no obvious solutions are jumping out. Putting the issue of cost effectiveness and manufacturability aside for the moment. I suggest you start with:
  1. Mains (120-240VAC) to unregulated 340 VDC
  2. 340 VDC to high frequency AC inverter (frequency and amplitude TBD)
  3. Small and efficient transformer with multiple secondaries (Number of secondaries TBD)
  4. Multiple buck regulators, one per secondary winding. (Number TBD)
This scheme might well be impractical, but I see it ahead of any of the other alternatives mentioned so far.
 
Yes, I see your point.

Let me express another idea that I tried on the fly with not good results though, because I used optocouplers. Optocouplers are not fast enough and the end result was enough power loss.

I 'll try to make a schematic later but the general idea is to have a Mosfet right after the rectifying bridge and BEFORE the smoothing cap. On zero crossing, the Mosfet is ON and is charging the cap up to the Vreg output plus say 10 volts. Then it is turned OFF for the rest of the period.

I tried this with an optocoupler design that was a bit slow in response, leading to power losses on the Mosfet. The opto was necessary because of the big voltage differencies in the circuit.

Ioannis
 
Let me express another idea that I tried on the fly with not good results though, because I used optocouplers. Optocouplers are not fast enough and the end result was enough power loss.
You used the wrong opto-coupler then, there are plenty of fast ones - and they are VERY, VERY commonly used for feedback in SMPSU's.
 
It could be, but all I tried (4N25-27, PC817) had the same result.

Maybe something was wrong in the Mosfet driving circuit. Did not turn it on/off fast eough. Will make a ciruit file and upload it.

Ioannis
 
Indirect because Mosfet was getting hot.

OK, here is the schematic with the opto coupler. The regulator is not important and was used for testing only. The real regulator is different.

The idea is that when the output is around 10volts less than the cap C1 voltage, the Mosfet M1 turned OFF and stop charging C1.

The Q1 was added to protect M1 from high current charging C1. Unfortunately the M1 is getting very hot.

Ioannis
 

Attachments

  • Power_Supply_optocoupler.asc
    4 KB · Views: 167
I do not see how that can do anything? The opto is driving against a 3.9 Ohm resistor to turn on the transistor, and there is no turn-off for the MOSFET??

The MOSFET gate needs pulling towards the drain to turn on, with voltage limiting, and to near 0V relative to the source to turn it off. I just don't follow this.


PSU_FET.jpg
 
You are right. I forgot to draw the resistor from gate to ground, of 270K. That way the Mosfet is driven to ON state and the optocoupler would turn it OFF when the difference of output to C1 voltage is more than 10 volts.

I attach the corrected file. Thank you for spoting the error.

Ioannis
 

Attachments

  • Power_Supply_optocoupler.asc
    4.2 KB · Views: 165
I wouldn't be happy trying to drive a switch-mode FET with an opto-coupler, neither for speed, not current driving capability. However, I can't see your circuit, as you've posted it in a non-standard format - luckily rjenkinsgb posted part of it as a sensible jpeg (although png would have been better :D)
 
Status
Not open for further replies.

Latest threads

New Articles From Microcontroller Tips

Back
Top