Electro Tech is an online community (with over 170,000 members) who enjoy talking about and building electronic circuits, projects and gadgets. To participate you need to register. Registration is free. Click here to register now.
Welcome to our site! Electro Tech is an online community (with over 170,000 members) who enjoy talking about and building electronic circuits, projects and gadgets. To participate you need to register. Registration is free. Click here to register now.
Hi,
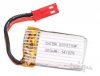
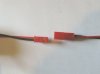
I use these plugs/sockets see attached:
After buying some more I find the polarity has changed.
I can easily change the ones on the left of the photo (I call these sockets), but I haven't been able to change the plugs. Is there a way?
Camerart.
There will be some kind of latch holding the pins in place, you need to find a way of holding the latch out of the way whilst pulling the pin out. There 'may' be a special tool available to do this, or you may have to manufacture something to try and do it - or there may be no room to do it at all?.
There will be some kind of latch holding the pins in place, you need to find a way of holding the latch out of the way whilst pulling the pin out. There 'may' be a special tool available to do this, or you may have to manufacture something to try and do it - or there may be no room to do it at all?.
As per Nigel, The small window with the brass latch just needs to be pushed down while pulling on the wire.
At least all the ones I have come across.
Max.
Hi,
I use these plugs/sockets see attached:
After buying some more I find the polarity has changed.
I can easily change the ones on the left of the photo (I call these sockets), but I haven't been able to change the plugs. Is there a way?
Camerart.
If you bend out the pointy bit off a medium sized safety pin you may be able to puncture the plastic socket body above the tab that retains the contacts. Heating the pin may help.
Then push the pin in a bit further to depress the contact retaining tab and by pulling on the connecting wire the contact should just slide out- hopefully.
As per Nigel, The small window with the brass latch just needs to be pushed down while pulling on the wire.
At least all the ones I have come across.
Max.
If you bend out the pointy bit off a medium sized safety pin you may be able to puncture the plastic socket body above the tab that retains the contacts. Heating the pin may help.
Then push the pin in a bit further to depress the contact retaining tab and by pulling on the connecting wire the contact should just slide out- hopefully.
I have made up cables using the same looking connector and had to change the connections at times, and it has always been a simple pressure on the brass latch, that is why it is exposed, and what retains them in the first place.
They look identical to the ones I use.
Max.
the exposed brass locking edge or flange is easy to break.
It is visible in the square slot hole..
There is a special size, slit-straw shaped TOOL to insert over the wire and expand the red plastic tab to unhook the metal crimp , gently, so the wire can be pulled out , without damage.
You might break it , but you can try a small knife to pry up the red plastic 1mm max in the square slot then gently tugging on the wire, it will unhook.
For the ones without windows you need an extraction tool designed for that particular contact. Usually it is a tube whose inside diameter exactly matches the outside diameter of the contact. The contact has one or two tines, and the tube slides down over the contact, down to the tines and compresses them back into the body of the contact so it can be removed. Molex has app notes on how to extract pins.
There's basically a tube that fits over the pin on the pin side that will likely compress the tabs. Extractors, in general, have pretty tight tolerances.
AMP has a really neat tool for their contacts. Its a tube with a plunger made like a syringe. It fits the close confines of the sockets and they come out really easy.
D connector extractors are pretty much expendable. They are a tube, but the side doesn't exist so it's more like a trough. There isn't much clearance.
Is there a convention for which way round they are? I have a LI-ON battery with expose pins towards me and the wires going down, the RED wire is on the right, but I have lots of them the other way around.
C.
Another point to ponder is the way the metal part is already inside the plastic body.
So far i think you know that there is a tiny part of the metal that expands when the pin is first pushed into the plastic body when the connector is first assembled. The metal part is expanded before it is pushed in, but as it is pushed into the plastic body the tiny metal tab compresses in slightly and once the metal part gets so far into the plastic body that tiny metal tab again expands and then if you try to pull the metal part back out of the plastic body that tiny metal tab that has now expanded again keeps you from pulling out the pin again, and that keeps it in the plastic body from then on, and that is the way it should work.
However, the metal tab is somewhat sharp so if the wire is pulled on that tab may 'bite' into the plastic so that if you try to push it down it may be hard to do and take a lot of pressure and possibly ruin the tab. Not only is it sharp though, it is also on an 'angle' so that as you press down at least part of the force is pushing the tab into the plastic and that's not what we want in order to get the pin out. A picture would help here if you need it, but i think you can visualize the situation at hand.
To help circumvent this secondary issue of the tab either biting into or pushing into the plastic, all it takes is a little force on the wire but not to PULL the pin out, but to actually PUSH the pin in farther into the plastic BEFORE trying to push the metal tab in. This prevents the tab from being pushed into the plastic and possibly warping the tiny tiny tab that holds the pin inside the plastic when the connector is assembled again later.
If this is not clear i'll draw a small diagram.
___\______
In the above rough drawing the metal tab is the part sticking up on an angle. It compresses in during installation, then expands back out once the pin is inside the connector body.
Hi A,
I can visualise it ok, so picture not necessary.
I've just tried pushing a thin piece of plastic down to hole, but it didn't work. Next I cut open one of them and pushed the 'ratchet' down, but it can't be done so that it springs back. (Probably my cheap ones) so they would need to be bent back, before re-fitting. (Not easy)
I think the best way for me is to cut the wires, then re-solder them using heat shrink.
I looked at the tools, but I would need to see them work with the plugs I have before investing in them.
The pin through the plastic body works fine (if the connector is the type I think). The problem is that you really need to see it done.
Having to reset the tang is quite normal and simple to do. On occasions, you even have to reset the tang on contacts that have not been used before- that is no big deal.
Using the official contact extractor tools are best way, but often they are difficult to use, especially if the plugs and sockets are not made by the manufacturers of the extraction tool. The tools are also expensive- unless you get a plastic version which would be useless- and not freely available.
Hi S,
Thanks for reminding me about the pin method. Having cut one open to see where the tang is precisely. Push the pin through the plastic, pull out the wire. I found a hole in the back of the pin that allows re-setting the tang. Easy
Hi S,
Thanks for reminding me about the pin method. Having cut one open to see where the tang is precisely. Push the pin through the plastic, pull out the wire. I found a hole in the back of the pin that allows re-setting the tang. Easy
This site uses cookies to help personalise content, tailor your experience and to keep you logged in if you register.
By continuing to use this site, you are consenting to our use of cookies.


 thanks.