Continue to Site

Welcome to our site!

Electro Tech is an online community (with over 170,000 members) who enjoy talking about and building electronic circuits, projects and gadgets. To participate you need to register. Registration is free. Click here to register now.

  • Welcome to our site! Electro Tech is an online community (with over 170,000 members) who enjoy talking about and building electronic circuits, projects and gadgets. To participate you need to register. Registration is free. Click here to register now.

Repairing a Metrix OX 8050 Digital Oscilloscope

Status
Not open for further replies.
Hi Tony, I spent a bit of time trying to make sense of that first picture too, but the best I could come up with was that it was a stored sinusoidal waveform distorted by the collapse of the plate driver voltages.

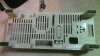
This is a slightly odd scope in the sense that it is both analog and digital. Two scopes in one as it were. I can't find the user manual for it, best I could get was the **broken link removed**

I think if we have it in analog mode, it exhibits the same problems (and in analog mode, it is basically just that, an analog scope displaying the waveform from the BNC connectors with no digital processing whatsoever). If this is the case, then we can eliminate the digital card altogether. If however it works in analog mode, but not in digital mode, then the issue may well lie on the ADC/DAC side of the digital board (most likely the DAC, since this would probably affect the characters on the screen, the ADC would probably only affect the waveform).

It is possible to draw characters on an oscilloscope CRT without the use of a DAC of course, so I may be missing the mark there too.

No doubt Tom can shed more light on this.
 
I took a quick look at the PSU in my OX 803B, with my multimeter and the scope.

Results below.

Code:
Metrix 803B PSU

12 pin power connector

Although the board has no obvious markings, assume pin 1 is the one with the black stripe.

Note: DC ground is tied to main earth, and that for safe operation of the scope it must be earthed.
As with most scopes, all scope input BNC connectors therefore have the Ground side tied to mains earth.

DC Power connector (J1)

Pin 1)  -12V Checked
Pin 2)  -5V  Checked
Pin 3)  +12V Checked
Pin 4)  +5V 10mS pulses> See Scope trace.
Pin 5)  +5V  Checked
Pin 6)  GND
Pin 7)  GND
Pin 8)  ??? Looks like 0V perhaps feedback power good signal to PSU. Needs confirming
Pin 9)  +120V DC  Verified (6 x 2 x 10 V) Scoped Measured at 118.0V on multimeter
Pin 10)  +180V DC  Verified (3.6 x 5 x 10 V) Scoped Measured at 177.7V on multimeter
Pin 11)  GND
Pin 12)  +5V regulated -> Option Card (A/D board) - scoped.

Note the +5V on Pin 12 is the same power rail as the +5V on J2 which goes to the option card (Digital (A/D) board in an 8050 etc).

2 pin DC Power connector (J2)

===== <--Locking tab
[. .]

1 2

Pin 1)  GND (Black)
Pin 2)  +5V (Red)

RIMG0556.JPG


Above is an image of the pulses on pin 4

Note: All of the DC outputs are rock solid and ripple free.

The two supply rails we are most interested in are...

Pin 9) +120V DC Verified (scoped at 6 div x 2V/d probe on x 10 = 120V) on scope. Measured at 118.0V on multimeter. Presumably Y voltage.
Pin 10) +180V DC Verified (Scoped at 3.6 div x 5V/div probe x 10 =180V) on scope. Measured at 177.7V on multimeter. Presumably X voltage.

Both of which are clean as a whistle, not a glitch to be seen.

Hope this helps.

EDIT: The signal on pin 4 above is produced by one of the two optoisolators and appears to be in sync with the mains frequency. It is presumably used to synchronize the scope with the mains. I presume, but haven't confirmed that its rising and trailing edges are at the zero crossing points of the mains sinusoid. I think this is the same signal that appears on J18 pin 8
 
Last edited:
Hi the problem is definitely on the x axis as things are very steady on the y axis! And had about half an hour on the PSU again tonight and found some interesting things that I didn't before! The -12v leg has dropped to -9.5 and when put on the oscilloscope is a complete mess! I have tested this before and didn't find anything wrong so the caps on this PSU are obviously decaying! The +12 also shows signs of slight noise now so again need to order some caps! I'm calling pin 1 the -12 which is the one pictured so pin 9 in the ribbon is the first higher voltage measuring 114v dc, the next pin is what I would call pin 10 and measures 187v dc! I'm using pin 11 as ground and then pin 12 is +5v ! And no Andy no serial port!
 
Last edited:
Hi yes put scope onto pin 9 and found a big sawtooth style wave! Same on pin 10 but not quite so enhanced! The wave pictured is on pin 1 -12 leg! The wave seems to be 10µs peak to peak and about 1v span hence why it only measures -9.9 on the multimeter! In terms of what you say about the DAC's Tony I would agree only the fact is the scope exhibits the same trouble in analogue mode as in digital mode! You can almost make out the writing from the digital processor if you look at the dots that appear most bright! So that is how the text is displayed as a series of dots joined up! Going to get these caps changed and will see what the output voltages look like for smoothness then will try the probe in the test point! Oh and Andy thanks for the PSU pin out that is a perfect rep for me to work to! Cheers Tom
2015-02-02 00.25.40.jpg
2015-02-02 00.25.57.jpg
 
Glad you are making progress. Please report back once you have changed those caps.

Thanks for confirming you don't have the serial option, I suspected this was the case from the photos. If you can get some better pictures of the digital card, we might be able to figure out where the serial port connects on your variant. I think your scope's serial board is entirely different, and may also include pins for a GPIB (IEEE) interface.

Once you have it up and running I would like to know what signals are on the connectors that join the Digital card to the motherboard (J18 and J19) and also what is on the 5 pin ribbon that goes between the Digital card and (J301)
 
Hi the problem is definitely on the x axis as things are very steady on the y axis! And had about half an hour on the PSU again tonight and found some interesting things that I didn't before! The -12v leg has dropped to -9.5 and when put on the oscilloscope is a complete mess! I have tested this before and didn't find anything wrong so the caps on this PSU are obviously decaying! The +12 also shows signs of slight noise now so again need to order some caps! I'm calling pin 1 the -12 which is the one pictured so pin 9 in the ribbon is the first higher voltage measuring 114v dc, the next pin is what I would call pin 10 and measures 187v dc! I'm using pin 11 as ground and then pin 12 is +5v ! And no Andy no serial port!

The differences in the high voltages may be due to some feedback issue in the PSU, caused by the problems with the low voltages, but while you have the board out anyway it might be a good idea to check and perhaps replace those caps too. Having said that, both voltages are within about 5% of what they should be, so assuming they have no visible ripple or spikes they are probably fine.

The dodgy -12V might be sufficient on its own to cause the issue you are seeing, since it, along with the +12V is probably used as a reference rail for all of the op-amps and low voltage analog side. I would think that it would cause a multitude of problems. About the only thing that would work correctly would be the digital stuff since that all looks to be TTL level. As well as the processor, ram, flash etc. there is a mix of logic families, some 74 series and 4XXX CMOS but all +5V so far as I can tell.

My current theory about the serial card options is that the OX 803B plugs its serial connector on to J18, and that the digital card in your 8050 uses this same interface to control the analog side of the scope. This is why I am interested in the signals on J18. I am expecting a TTL level serial port to appear on some of those pins, probably, but not necessarily at 9600 baud. I will no doubt be proved wrong :¬)
 
Last edited:
Hi yer there's noise on the 114vdc and the 180vdc !

That's interesting, what sort of level is the noise? Is there also noise on the +5V line? If not, then the switcher (TDA4605 and the Mosfet) is probably working.

I would change all three (-12V, +114V and +180V) electrolytics and see if the issue resolves, remember to ensure they are quality caps, and have the same or greater working voltage as the originals and the same or better temperature rating and low ESR. Go for a good brand of cap. there are a lot of low quality noname brands that will be cheaper, but they typically don't perform well.

Because caps are cheap, and you don't want to mess around taking the board out and in too many times, and because they are all similar ages and probably from the same manufacturer just replace all three.

There is also the possibility that the TDA4605 and/or the associated mosfet is playing up, but start with the caps. If replacing the caps doesn't resolve then the TDA4605, power mosfet (P4NB80FP) transistor the 220K resistor and the associated electrolytics (as per my fix here http://www.badcaps.net/forum/showthread.php/showpost.php?p=523130&postcount=23 ) would be next.

If you want to know what waveforms to expect on the TDA4605, the datasheet here is probably the best place to look. There are other variants, from ST micro and a few other manufacturers, but they all work the same way so far as I can tell.
 
Last edited:
The **broken link removed** I ordered for my OX 803B arrived today, and while they may not be Tektronix, they look well constructed, and function perfectly.

RIMG0564.JPG


Now all we need is to get your 8050 looking a bit more like this.
 
Last edited:
Hi yes put scope onto pin 9 and found a big sawtooth style wave! Same on pin 10 but not quite so enhanced! The wave pictured is on pin 1 -12 leg! The wave seems to be 10µs peak to peak and about 1v span hence why it only measures -9.9 on the multimeter!

The source of the ripple is the switcher, this almost certainly proves the TDA4604 and the MOSFET are fine. If the ripple was glitchy and all messed up, then I would say they were suspect, but since the ripple is a nice clean 100kHz which is the switcher speed of the TDA4605, then it is almost certainly simply due to the dying capacitors on the DC side.

To quote the DTA4605 spec..

TDA 4605
In the different load ranges the switched-mode power supply (SMPS) behaves as follow:

No load operation:
The power supply unit oscillates at its resonant frequency typ. 100 kHz to 200 kHz. Depending upon
the transformer windings the output voltage can be slightly above nominal value.

Nominal operation:
The switching frequency declines with increasing load and decreasing AC-voltage. The duty factor
primarly depends on the AC-voltage. The output voltage is load-dependent only

.. in other words if there is insufficient smoothing on the DC side (in this case presumably due to duff caps), you will see an AC ripple component with a period consistent with a switching frequency somewhere between 200 kHz (off load) and 100 kHz or less on load. The worse the smoothing, the larger the ripple.

Furthermore since the ripple is of the order of 1v on a supply of 12v once it finds its way in to the amplified signals, my gut feeling is that I would expect it to cause a high frequency shimmering or smearing, or a flattening probably of the order of 1/12th or perhaps 1/24th (over the split + and - 12V supplies) of the size of the image.. or approximately 1 to 2 cm, which looks pretty consistent with what we see.
 
Last edited:
Hi again some of the new caps came today! Just need the rest to come and we're rolling again! Probes look good need to get some more myself seen as you can never have enough! Right I have chatted complete and utter rubbish when I said that it has no serial port, it does it has a RS232 port!! I don't know why I didn't look on the back panel but it's on there, comes off the rear connector on the digital board!
 
Hi again some of the new caps came today! Just need the rest to come and we're rolling again!
Sounds good, any ETA?
Probes look good need to get some more myself seen as you can never have enough!
Right I have chatted complete and utter rubbish when I said that it has no serial port, it does it has a RS232 port!!
I don't know why I didn't look on the back panel but it's on there, comes off the rear connector on the digital board!

Good news, in that case you can chat with the scope using the **broken link removed** and a usb serial adapter. Not only does that let you control the scope front panel, but I think that it also you to download trace data to let you plot the results on your computer.

Can you provide some pictures of the serial connection on the motherboard?
 
J4 is next to the connector but don't know if it is that one?
 

Attachments

  • WIN_20150204_200115.JPG
    WIN_20150204_200115.JPG
    525.3 KB · Views: 460
So we are talking about that 26 way header next to the end of the board I presume. I think it read somewhere that this could actually be a combined IEE488 and RS232 Serial port. If you have the option for IEE/GPIB in the menu, then I am correct, otherwise your version of the scope is RS232 only.

Once we have the PSU issues resolved, I would be interested to see what signals we have on J18, which is the wider of the two connectors on the base of the Digital card, (i.e. the 14 way connector). If I am correct about the way these scopes work, then it may be the case that there is a simplified RS232 link between the Digital card and the controller on the front panel.

Pin- Colour - Signal
1 - Blue1 - Floating input???
2 - Purple1 - Floating input???
3 - Grey1 - Floating input???
4 - White1 - Floating input???
5 - Black - Floating input???
6 - Brown - +12V
7 - Red - -12V
8 - Orange - 10ms +5V Pulses (20ms pk to pk)
9 - Yellow - Floating input???
10 - Green - Ground (Confirmed zero ohms to BNC Earth)
11 - Blue2 - Floating input???
12 - Purple2 - Floating input???
13 - Grey2 - +5V (floating input ?)
14 - White2 - +5V (floating input ?)

You can see from the above partial analysis results, that I probed J18 on my scope (attached a bit of coloured ribbon cable, and brought it out through the base of the scope), but I haven't actually had a chance to do anything further with this.

I thought it might be interesting to see if I can use an Arduino pro-mini or similar to hack about with this and perhaps give me some additional on screen options.

EDIT: I just spotted an MC1489 TTL to RS232 level shifter/receiver chip on that board of yours below the 26 way ribbon header. I bet the chip next to it (just above, but which I can't see the markings on) is an the complimentary MC1488 RS232 line driver. All very familiar 1980's or 1990's serial port design technology.
 
Last edited:
For what its worth, the tube in your OX 8050 is probably the one below, since it appears that the tube in a large number of these Metrix scopes with 2kV acceleration is almost certainly..

D14-364GY / 123
CRT Heerlen BV
Made in the Netherlands

https://frank.pocnet.net/sheets/011/d/D14-364GY-123_1988.pdf

Furthermore, the tube in my OX 803B is most probably very similar if not identical (the principal differences being the Phosphor and graticule colours).
 
Last edited:
Caps replaced and no dig at your soldering intended!!
 

Attachments

  • 2015-02-07 16.24.44.jpg
    2015-02-07 16.24.44.jpg
    1.4 MB · Views: 478
  • 2015-02-07 16.25.05.jpg
    2015-02-07 16.25.05.jpg
    1.2 MB · Views: 545
Status
Not open for further replies.

Latest threads

New Articles From Microcontroller Tips

Back
Top