Continue to Site

Welcome to our site!

Electro Tech is an online community (with over 170,000 members) who enjoy talking about and building electronic circuits, projects and gadgets. To participate you need to register. Registration is free. Click here to register now.

  • Welcome to our site! Electro Tech is an online community (with over 170,000 members) who enjoy talking about and building electronic circuits, projects and gadgets. To participate you need to register. Registration is free. Click here to register now.

Problem using MAX1496 as car voltmeter

Status
Not open for further replies.

bigal_scorpio

Active Member
Hi to all,

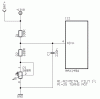
I have built a voltmeter for my car after some battery problems and used a MAX1496 IC which the datasheet has Voltmeter as one of its applications.

My problem is that I cant seem to get the voltage within range of the analog input of the IC. I have a 10k resistor from -Ain(which is grounded) to +Ain and a 1m resistor from +Ain to my cars + supply. The display goes overrange as soon as the supply is connected !

I have the Range pin grounded as in the Sheet for 0 to 2v as opposed to pulled high for the 200mV range and I am still getting no joy.

Could anyone look over the sheet for me and advise on how I should be connecting the supply to +Ain please. I have attached the sheet below.

Thanks......Al
 

Attachments

  • MAX1496.pdf
    907.8 KB · Views: 386
update

Hi to all,

After much checking I found a pin that was mis-connected and thought that would be the cure.

Now I get a 12.38 ish reading all the time WITHOUT AIN connected! Bear in mind that the SLA battery I'm using for testing is reading 11.85v on two separate DMMs. Where is the weird reading coming from?

I have checked the circuit many times and am sure there is now nothing wrong. When I connect AIN to the 5v supply the leds read about 2.6 ish that is still through the 1meg/10k divider which should give 1% or about .05v by my reckoning so whats wrong.

Should I be using the -AIN and +AIN as I am doing or is there a different way I need to connect the input to get the true reading?

Help please guys I'm baffled...........Al
 
Come on guys, show some Christmas spirit :)

Hi Guys,

I still need some advice on how the AIN should be connected.

Do I need to use both -AIN and +AIN together or can I just use +AIN through a divider?

The sheet only shows setup for a strain gauge and has a dummy gauge too, this makes it hard for me to understand the setup. Please help if you can.

Merry Christmas and a happy New Year to all...........Al
 
I'm guessing no one on this forum has used this part.
Are you using the internal reference? If so, do you have intref (pin 9) connected to VDD?
 
Hi scorpio,

may be you used a wrongly dimensioned voltage divider.

Connect the suggested divider as shown in the attachment. A bypass capacitor of at least 100nF should be connected to AIN+. Using 220nF won't hurt. Place the cap as closely as possible to pin4 and ground. Connect AIN- to ground.

The divider (if set correctly) divides the input voltage by the factor of 100.

So at a battery voltage of 13.8V the output is 138mV (measuring range of the chip ±199.9mV), and should give you a direct readout of the battery voltage.

Regards and merry Christmas

Boncuk
 

Attachments

  • DIVIDER.gif
    DIVIDER.gif
    8.8 KB · Views: 542
I'm guessing no one on this forum has used this part.
Are you using the internal reference? If so, do you have intref (pin 9) connected to VDD?

Hi Ron, yes internal and pin 9 is grounded.

Thanks.......Al
 
Hi Boncuk,

Thanks for the drawing I will try it now.

I will have to use a standard pot until I can get a 25 turn 500r, but I'm guessing that only the accuracy will suffer a bit for now.

All the best..........Al
 
If the circuit works on the workbench don't forget to filter the car supply voltage well to protect the chip from spikes caused by the alternator.

Select a suitable transil-diode, e.g. 1,5KE12CA.

Datasheet attached.

Regards

Boncuk
 

Attachments

  • 1,5KE-15CA.pdf
    76.3 KB · Views: 296
Last edited:
Hi Ron, yes internal and pin 9 is grounded.

Thanks.......Al
I asked you if you had connected pin 9 to VDD:
From the datasheet:
Internal-Reference Logic Input. Connect to GND to select external-reference mode. Connect
to DVDD for the MAX1447/MAX1498 and VDD for the MAX1496 to select the internal reference
mode.
I suspect that, if you have pin 9 connected to GND, and you don't have an external reference, you will get an over-range indication.
 
If you have full-scale set to ±2V, why don't you divide your input by 10 instead of 100?
 
Hi guys,

Ron, I was looking at the wrong pin, 9 is to vdd its 10 that is grounded.

Boncuk, your divider works fine and I even found a 1k 25 turn pot to use!

Anyway thanks to you guys I have it working, although there must be something iffy somewhere still as I had to as suggested use 10k instead of 100k in the divider because I cannot use the 2v scale. For some strange reason connecting pin 10 to vdd shorts out the circuit entirely so I left that as Gnd and changed the 100 to 1 to a 10 to 1 divider.

But as they say, don't mend what isn't broken so I'm happy enough! Though I would like to know if anyone else builds something with this IC if they can put Vdd to pin 10?

Just a couple more questions, Boncuk should I get the uni or single direction diodes which I assume would be used from Vdd to Gnd to kill spikes?

Or would it be better to use the diode on the circuit Before the 7805 regulator?

What voltage would you suggest to use on either one?


Thanks again Al
 
Hi Scorpio,

I assumed you wire the chip for a range of 199.9mV. Connecting pin10 to VCC the range is like that. (connected to ground the range is 1.999V).

My suggested voltage divider was designed for a range of 199.9mV.

The transil-diode you should use is bidirectional type as indicated by the letter C in the value describtion (1,5KE12CA.

Here is a power supply circuit which works well supplying an MCU in a motorbyce.

D1 does not only reduce the power dissipation of the voltage regulator, but also serves as false polarity protection.

Board dimensions are: 1.800X1.325".

Boncuk

P.S. Using a large piece of copper (as washer) on the solder side of the board the mounting screw will conduct heat from the voltage regulator to the cooling surface.
 

Attachments

  • PWR-SUPP-SCH.gif
    PWR-SUPP-SCH.gif
    11.1 KB · Views: 412
  • PWR-SUPP.gif
    PWR-SUPP.gif
    21.3 KB · Views: 465
Last edited:
Status
Not open for further replies.

Latest threads

New Articles From Microcontroller Tips

Back
Top