Continue to Site

Welcome to our site!

Electro Tech is an online community (with over 170,000 members) who enjoy talking about and building electronic circuits, projects and gadgets. To participate you need to register. Registration is free. Click here to register now.

  • Welcome to our site! Electro Tech is an online community (with over 170,000 members) who enjoy talking about and building electronic circuits, projects and gadgets. To participate you need to register. Registration is free. Click here to register now.

PIR to Arduino to Transistor and LEDs

Status
Not open for further replies.
Hello ETO forum,

The object of the project is to control seven groups of six LEDs with seven PIR sensors.
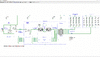
The endeavor was begun using 555 timers to turn on the LEDs for ten seconds.

Motion-sensor-light-circuit_200302_w_extension.gif


This circuit is thoroughly tested and works well.
Some complexity was added to the project as to how the LEDs react to the sensors
and an Arduino was added to allow some logic to be provided as to how the sensors
controlled the LEDs.
Staircase_schematic_1_PIR_1_LED_Mod_200707.jpg


This circuit works but there is a delay which has been timed with a stop watch at between 2.6 and 2.8 seconds.
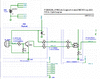
In the 555 circuit above the reaction of the LED to movement at the PIR is instantaneous. But the reaction of
the LED to the PIR is delayed almost three seconds.

To be sure the signal from the PIR in the second schematic must go thru the input and output of the Arduino
to get to the transistor but it was not expected that it would take three seconds.
The Arduino sketch (program) is simple (copied herewith below). And the part of the code that is looping and polling the sensor
is six lines long.

The Staircase... schematic controls one sensor/LED pair and the plan was to add six more. And so it is feared that the
latency will only increase.

Have done several projects using PIRs and Arduinos and have never seen this inertia. Maybe it is the mini PIR
used in this project. Whereas previously a larger HC SR501 was employed.

Any ideas?

Thanks.

Allen in Dallas
Code:
/*
 *  From
https://create.arduino.cc/projecthub/55845/innovation-lab-11-pir-motion-sensor-with-led-43420e

Innovation Lab #11: PIR Motion Sensor with LED © GPL3+

----------------------------------------------*/

int led = A0;               // the pin that the sensor is attached to
int sensor = 2;         // the pin that the sensor is attached to

void setup() {
  pinMode(led, OUTPUT);
  pinMode(sensor, INPUT);
  Serial.begin(9600);
}

void loop() {
  int sensorval = digitalRead(sensor);
  Serial.println(sensorval);
 
  if (sensorval == HIGH) {
    digitalWrite(led, HIGH);
  }
  delay(1000);
  digitalWrite(led, LOW);
 
}
 
Take a look at this post from your previous thread.

 
Last edited:
In your 555 diagram each LED has it's own resistor, this needs to be the same in the Arduino diagram. The BD437 doesn't have a lot of gain, the 220R resistor will limit the base current to ~20mA which will give a collector current of around ½A - is this enough? It is also likely to get very hot.

In your code, get rid of the delay and use an else to turn the LED off.
Code:
if (sensorval == HIGH) {
    digitalWrite(led, HIGH);
  }else{
    digitalWrite(led, LOW);
  }

Mike.
Edit, as mentioned above, 12V may be more suited to this.
 
Hello ETech Pommie and the ETO forum,

To Pommie:
Using the Else statement did the trick.
The response time went from nearly three
seconds to less than half a second.

Strange because the delay time was
tested reduced to 10 (ten milliseconds or
100th of a second) and the 2+
second latency persisted. Don't
understand why reading a line of
code would create the lag but it works
so I won't argue.

To eTech:
Inspired by your design, which
has been named POCADAL
(PirOptoCouplerArduinoDmosArrayLed)
attached.
it has been decided to scrap
the old schematic and start over
using the POCADAL schematic.

The rebuild approach has generated
some questions. (You knew there
would be questions, right?)

1. In the PODACAL schematic, at the
PIR module, Q1 uses a 2N3904
and Q2 shows a 2N3906. They
are both general purpose NPN
transistors, right? So why not
use the same transistor for both?

2. The suggestion to use 12 volt
must have good reason or it would
not have been suggested. And the recommendation
has been received before. I have
plenty of regulated 12 volt power
supplies.
The Arduino wants 7 volts.
I think the twelve volts can
be knocked down using an NJM2380AD
as shown in this diagram.
Voltage_regulator_200708.gif

But the AM312 takes 3 volts. So
could either
2a. Use another regulator to
go from 12 to three volts using
a 10k resistor at R6 and a
2.5k resistor at R3 in
schematic titled '12 v to 7.9 v....'
or
2b. Substitute an HC-SR505
PIR for the AM312. The HC-SR505
will operate between 4.5 and 20
volts. The AM312 is smaller but
the difference in size is not critical.

Thanks.

Allen in Dallas
 

Attachments

  • POCADAL_200708.gif
    POCADAL_200708.gif
    141.1 KB · Views: 184
  • Voltage_regulator_200708.gif
    Voltage_regulator_200708.gif
    22.5 KB · Views: 165
Hello ETech Pommie and the ETO forum,

To Pommie:
Using the Else statement did the trick.
The response time went from nearly three
seconds to less than half a second.

Strange because the delay time was
tested reduced to 10 (ten milliseconds or
100th of a second) and the 2+
second latency persisted. Don't
understand why reading a line of
code would create the lag but it works
so I won't argue.

To eTech:
Inspired by your design, which
has been named POCADAL
(PirOptoCouplerArduinoDmosArrayLed)
attached.
it has been decided to scrap
the old schematic and start over
using the POCADAL schematic.

The rebuild approach has generated
some questions. (You knew there
would be questions, right?)

yes....and welcome them. :)

1. In the PODACAL schematic, at the
PIR module, Q1 uses a 2N3904
and Q2 shows a 2N3906. They
are both general purpose NPN
transistors, right? So why not
use the same transistor for both?

The 2n3906 is a PNP, 2N3904 is NPN.
This forms the level shifter circuit.
Its job is to take the 2.0v PIR output voltage and shift it to the voltage at the emitter of Q2.
The circuit design requires both types of transistors.

2. The suggestion to use 12 volt
must have good reason or it would
not have been suggested. And the recommendation
has been received before. I have
plenty of regulated 12 volt power
supplies.

The main reason for using a 12V supply is to allow the LEDs to be wired in series and reduce the required total LED current.
You can see the typical estimated current draw for LED driver channel marked "LM1" on the schematic. Its about 80mA typical.
If a lower voltage supply is used (assuming a 5V supply), then the LED's would have to be connected in parallel, dramatically
increasing the current consumption. I felt the 12v supply is a much better choice.

The Arduino wants 7 volts.
I think the twelve volts can
be knocked down using an NJM2380AD
as shown in this diagram.
View attachment 125844
I have a Arduino MEGA 2560 so the following info is based on that. (Which Arduino are you going to use?)

Yes...you could use a regulator to drop the voltage to 7v but, after studying the arduino schematic...there are really two ways to provide operating power.
The onboard USB port, or the onboard DC jack. The USB port can be connected to a USB cube (AC-5v) adapter to provide 5V power.
Or.... The DC input jack circuit is designed to accommodate an AC-DC adapter and already has a inline 5V regulator on board. So you could
use 12 Vdc supply connected to the DC supply input jack if desired. I've shown a USB supply connected to the USB jack but this could be removed and a 12V supply connected to the DC jack instead. This 12V supply could also be used for the Input circuits.

But the AM312 takes 3 volts. So
could either
2a. Use another regulator to
go from 12 to three volts using
a 10k resistor at R6 and a
2.5k resistor at R3 in
schematic titled '12 v to 7.9 v....'
or
2b. Substitute an HC-SR505
PIR for the AM312. The HC-SR505
will operate between 4.5 and 20
volts. The AM312 is smaller but
the difference in size is not critical.

I've seen some conflicting statements regarding the operating supply of the AM312.
I have the AM312 PIR on hand. Fact of the matter is the AM312 is the onboard sensor and it is limited to 3.3 volts, however,
the support circuits on the little PCB have an onboard DC regulator, so it will happily run at 12V if desired.
The output, however, is limited to 2.0v. hence, the level shifter.

In short, the entire system could be operated from a 12v supply, if desired, with some minor circuit adjustments.

Thanks.

Allen in Dallas

Your welcome.
Let me know which supply voltage you want to use. I recommend 12V
 
Hello eTech and the ETO forum,

1. Had planned on using the Arrduino UNo Rev3 because have become
familiar with it. This is a project called Matthew that uses a PIR (feint white
dot beneath the nuimber '2'), Arduino Uno, Maxim 7219 (five chips daisy chained)
to turn on 300 LEDs in linear sequence.

2. Will go with 12 volt. So, if I understand your excellent reply,
one twelve volt with , say five amps, will work for
the PIRs (if the HC-SR505 is used [HC-SR505 datasheet}, the Uno,
and the LEDS.
The LED driver, TBD 62003A, shows 80 and 120 mA. But the
LEDs each use (max) 20mA each so twelve LEDs need 240 mA
and the LED module with eighteen lights would want 360
mA, about a third of an amp. Will the DMOS array sink that
much power?

3. Ordering parts from Mouser today. Hopefully can get the
sensor modules tested this weekend.

4. Usually my MO is to design the schematic, breadboard
the schematic, build the schematic using generic, protoyping
PCBs and then design custom PCBs using DipTrace and
Osh Park. Thinking about jumping straight to generic
PCBs. What do you think?

Allen in Dallas
 
Hello eTech and the ETO forum,

It may be bad form to ask another question before the previous query has been answered.
But parts are being ordered. Its not so much the dollars as if the wrong thing is ordered
it is days to discover the mistake and get replacements.

staircase_design_200528_600_x_400.gif


Will the LED driver take eight sensors? It was explained as seven sensors and seven
groups of lights to make the description simpler but the design has one more
sensor module than LED modules. Do we need to go to a bigger chip?

Thanks.

Allen in Dallas
 
Hello eTech and the ETO forum,

1. Had planned on using the Arrduino UNo Rev3 because have become
familiar with it. This is a project called Matthew that uses a PIR (feint white
dot beneath the nuimber '2'), Arduino Uno, Maxim 7219 (five chips daisy chained)
to turn on 300 LEDs in linear sequence.

Wow...nice:)

2. Will go with 12 volt. So, if I understand your excellent reply,
one twelve volt with , say five amps, will work for
the PIRs (if the HC-SR505 is used [HC-SR505 datasheet}, the Uno,
and the LEDS.
The LED driver, TBD 62003A, shows 80 and 120 mA. But the
LEDs each use (max) 20mA each so twelve LEDs need 240 mA
and the LED module with eighteen lights would want 360
mA, about a third of an amp. Will the DMOS array sink that
much power?

When the LED's are run in series, the same amount of current flows thru all LEDs in the series string.
So for a series string of three LEDs, each 3.2v@20mA, the total current is 20ma. So four strings in parallel equals 80mA.
That's the benefit of using a higher voltage to drive the LEDs.

The datasheet says each channel of the TBD62003 is capable of 500mA. Its a DMOS array so there should be low heat loss in the chip. You can always put a heat sink on it. The total current for all the LEDs is 760mA. Each channel could easily drive 100ma. One thing that helps is that all LEDs won't be on at the same time. If I remember the discussion, there may be three channels active at any one time.

3. Ordering parts from Mouser today. Hopefully can get the
sensor modules tested this weekend.

OK

4. Usually my MO is to design the schematic, breadboard
the schematic, build the schematic using generic, protoyping
PCBs and then design custom PCBs using DipTrace and
Osh Park. Thinking about jumping straight to generic
PCBs. What do you think?
Allen in Dallas

I think you should follow your original MO....its a good one.:D
There's always things that get uncovered during the process.....and may save you money.
 
Hello eTech and the ETO forum,

It may be bad form to ask another question before the previous query has been answered.
But parts are being ordered. Its not so much the dollars as if the wrong thing is ordered
it is days to discover the mistake and get replacements.

View attachment 125859

Will the LED driver take eight sensors? It was explained as seven sensors and seven
groups of lights to make the description simpler but the design has one more
sensor module than LED modules. Do we need to go to a bigger chip?

Thanks.

Allen in Dallas

I don't understand the question.

The LED drivers have nothing to do with the sensors. Or am I misunderstanding the question?

The DMOS chip has eight channels and they are all used.

Your going to program the arduino to light the LEDS based on sensor activity.
 
Hello eTech and the ETO forum,

Brain cramp.
Was thinking about the number of pins on the UNO
and confused that w pins on the LED driver.

Of course the LED driver has nothing to do w the sensors.

Thanks.

Allen in Dallas
 
OK...

I've updated the schematic based on your previous comments:
1. Change sensor to HC-SR505 and modified the support circuit.
2. Modified opto circuit to support higher supply voltage.
3. Modified Arduino block to show DC power input jack.
4. Re-arranged supply circuits to reflect required 12v supply busses.

See below.

BTW-
MCU= Micro-Controller Unit (Arduino).

1594396477491.png
 
Hello eTech and the ETO forum,

Man, have been covered up by family issues caused by the pandemic.
Finally got to building breadboard based on schematic posted in post #11 of this thread.

Instead of trying to connect the whole system started with the PIR to interface module.
PODACAL_PIR_to_Interface_200725.gif

Based on this schematic built breadboard:
PODACAL_PIR_Interface_Fritz_200720_d.gif

Added an indicator LED on the output of the optocoupler, PC817, to get a visual feedback on the signal.
Have checked and double checked that the board is the same as the schematic but not getting
a signal from the PC817. So started testing:
1. V and grnd from power supply = +12.4 v
2. V and grnd @ PIR = +12.4 v
3a. V and grnd rail @ PIR out = +2.4v
3b. V and PIR grnd = +1.65v
4. PIR out @ R13 & R15 and rail grnd =+2.4v
5a. R13 @ Q1 emitter and rail grnd during PIR positive = +.73v
5b. R13 @ Q1 emitter and rail grnd during PIR negative = +.49v
6.a Q1 base and rail grnd during PIR positive = +.73 v
6.b Q1 base and rail grnd during PIR negative = +.49v
7. R16 and grnd = +12.4 v
8. R7 @ R16 and grnd = +9.2v for eleven seconds then +11.2v
9. R7 @ PC817 and grnd = +6.3 v
10. R17 @PC817 and grnd = +9.1 v
11. PC817 @ collector and grnd = +12.4 v
12. PC817 @ emitter and grnd = 0 v

Tried lowering the value of the indicator resistor
but realize that if there is no voltage from the
PC817 the value of the resistor does not matter.

Pretty sure the issue is at the PC817. Have not
worked with an opto coupler before.

Any idea why there is no voltage from the
interface?

Thanks.

Allen in Dallas
 

Attachments

  • PODACAL_PIR_to_Interface_200725.gif
    PODACAL_PIR_to_Interface_200725.gif
    38 KB · Views: 224
5a. R13 @ Q1 emitter and rail grnd during PIR positive = +.73v
5b. R13 @ Q1 emitter and rail grnd during PIR negative = +.49v
6.a Q1 base and rail grnd during PIR positive = +.73 v
6.b Q1 base and rail grnd during PIR negative = +.49v

You show the emitter following the base voltage.

The emitter should always be at 0V; if it is floating, the transistor will not be turning on - there should be around 0.7V difference when the PIR output is high.
 
Hello eTech and the ETO forum,

Man, have been covered up by family issues caused by the pandemic.
Finally got to building breadboard based on schematic posted in post #11 of this thread.

Instead of trying to connect the whole system started with the PIR to interface module.
View attachment 126111
Based on this schematic built breadboard:
View attachment 126110
Added an indicator LED on the output of the optocoupler, PC817, to get a visual feedback on the signal.
Have checked and double checked that the board is the same as the schematic but not getting
a signal from the PC817. So started testing:
1. V and grnd from power supply = +12.4 v
2. V and grnd @ PIR = +12.4 v
3a. V and grnd rail @ PIR out = +2.4v
3b. V and PIR grnd = +1.65v
4. PIR out @ R13 & R15 and rail grnd =+2.4v
5a. R13 @ Q1 emitter and rail grnd during PIR positive = +.73v
5b. R13 @ Q1 emitter and rail grnd during PIR negative = +.49v
6.a Q1 base and rail grnd during PIR positive = +.73 v
6.b Q1 base and rail grnd during PIR negative = +.49v
7. R16 and grnd = +12.4 v
8. R7 @ R16 and grnd = +9.2v for eleven seconds then +11.2v
9. R7 @ PC817 and grnd = +6.3 v
10. R17 @PC817 and grnd = +9.1 v
11. PC817 @ collector and grnd = +12.4 v
12. PC817 @ emitter and grnd = 0 v

Tried lowering the value of the indicator resistor
but realize that if there is no voltage from the
PC817 the value of the resistor does not matter.

Pretty sure the issue is at the PC817. Have not
worked with an opto coupler before.

Any idea why there is no voltage from the
interface?

Thanks.

Allen in Dallas

The schematic is correct and will operate as designed.

Errors on your breadboard:
1. There is a short circuit from the base of Q1 to ground.
Remove the horizontal jumper that connects the PIR "gnd" pin to the junction of R15/R13.

2. The PIR is not grounded.
Add a vertical jumper from PIR "gnd" pin to supply ground.

Re-test and report back your findings.
 
Hello etech, rjenkinsgb and the ETO forum,

Thanks for the feedback.

Will be this weekend before can refactor.
Will re-test and advise.

Allen in Dallas
 
Hello etech, rjenkinsgb and the ETO forum,

Refactored breadboard:
PODACAL_PIR_Interface_Fritz_200801.gif


Tests:
Note unless other wise specified tests are done by connecting DMM to ground rail and probe to point indicated.
1. Power supply out: 12.4 v
2. PIR V: 12.4 v
3. PIR out: 2.1 v for nine seconds (duty cycle) then 0 v
4. R15/PIR: 2.1 during PIR duty then 0v
5. R13: .71 v during PIR duty
6. Q1 base: .71 during PIR duty then 0v
7. R18/Q1 collector: 2.81v during duty then 10.3v
8. R17/R18: 5.51v @ PIR duty then 10.7v
9. PC817 cathode: 5.5v @ PIR duty then 10.7
10. PC817 anode: 6.3v @ PIR duty then 11.4v
11. PC817 collector: 12.4v
12. PC817 collector to emitter: 12.4 v
13. PC817 emitter 0v

So it looks like the problem is in the optocoupler.
PC817.jpg

Since work has not been done with an optocouple before
want to make sure the PC817 operation is understood:
A signal at the anode causes an infrared light to shine
on the interior photo-sensitive base and the emitter and collector
connect allowing the voltage at the collector to flow to
the emitter. Right?
photo_PODACAL_200801_756_x_336.jpg


It seems that a signal is going to the PC817 but nothing is coming out. Maybe need to devise
a circuit to test that component.

Thanks.

Allen in Dallas
 
Hello etech, rjenkinsgb and the ETO forum,

Refactored breadboard:
View attachment 126185

Tests:
Note unless other wise specified tests are done by connecting DMM to ground rail and probe to point indicated.
1. Power supply out: 12.4 v
2. PIR V: 12.4 v
3. PIR out: 2.1 v for nine seconds (duty cycle) then 0 v
4. R15/PIR: 2.1 during PIR duty then 0v
5. R13: .71 v during PIR duty
6. Q1 base: .71 during PIR duty then 0v
7. R18/Q1 collector: 2.81v during duty then 10.3v
8. R17/R18: 5.51v @ PIR duty then 10.7v
9. PC817 cathode: 5.5v @ PIR duty then 10.7
10. PC817 anode: 6.3v @ PIR duty then 11.4v
11. PC817 collector: 12.4v
12. PC817 collector to emitter: 12.4 v
13. PC817 emitter 0v

So it looks like the problem is in the optocoupler.
View attachment 126187
Since work has not been done with an optocouple before
want to make sure the PC817 operation is understood:
A signal at the anode causes an infrared light to shine
on the interior photo-sensitive base and the emitter and collector
connect allowing the voltage at the collector to flow to
the emitter. Right?
View attachment 126188

It seems that a signal is going to the PC817 but nothing is coming out. Maybe need to devise
a circuit to test that component.

Thanks.

Allen in Dallas

The breadboard drawing is correct, however, the HW breadboard has an open circuit.
Check the jumper from R18 to R17...the jumper is not connected to R18.

Also...check R16....hard to tell but it looks like it might not be connected to +supply.

BTW- The opto output is sensitive to current drawn thru it. So I would use a larger current limiting resistor for your test LED so it wont draw so much current and skew your testing. Use a 1k to 2k resistor.
 
Last edited:
Hello etech and the ETO forum,

Substituted 1k ohm resistor for 470 ohm resistor at the indicator LED.
PODACAL_PIR_Interface_Fritz_200802.gif

Checked R16 it is connected to the plus side of C1 and the supply rail.

Checked the orange jumper between R18 and R17 and it seems to
be connected as shown in the fritz.
R17_close_200802_800_x_600.jpg

R17_close_200802_b_800_x_600.jpg


Used SLR camera to take close ups because better to control aperture/focus than w iPhone.

'however, the HW breadboard has an open circuit.' to what does 'HW' refer?

But perhaps more important than the visual evidence are the test results:
(All tests have negative probe connected to ground rail and results are taken w
positive probe at connection specified.)
1. At orange jumper side of R18: 2.8 v @ PIR duty
2. At orange jumper side of of R17: 2.8 @ PIR duty
3. At PC817 side of R17 cathode: 5.5 v during PIR duty then 10.7 v
4. At PC817 cathode: 5.7 v during PIR duty then 10.7

So if there is voltage at the cathode of the PC817 then there must be voltage
at the anode and the PC817 seems to be working except the PC817 is not
allowing the 12 volts to flow between the collector and the emitter.

What am I missing?

Thanks.

Allen in Dallas
 
Hello etech and the ETO forum,

Substituted 1k ohm resistor for 470 ohm resistor at the indicator LED.
View attachment 126212
Checked R16 it is connected to the plus side of C1 and the supply rail.

OK...

Checked the orange jumper between R18 and R17 and it seems to
be connected as shown in the fritz.
View attachment 126213
View attachment 126214

Ok...so you have moved the jumper so that it connects to R18. Good.

Used SLR camera to take close ups because better to control aperture/focus than w iPhone.

The picture is good but not 3D :) .
I still cannot clearly see the jumper connection but it looks correct. It would help if the pictures included a view rotated 90 degrees.

'however, the HW breadboard has an open circuit.' to what does 'HW' refer?

HW=Hardware
You have shown two "breadboard" views. I used two different names to describe each view. The one you called "fritz", I called SW breadboard.
The real physical breadboard, I called a HW breadboard.

But perhaps more important than the visual evidence are the test results:

Both visual and test results are important since I am not looking over your shoulder :)

(All tests have negative probe connected to ground rail and results are taken w
positive probe at connection specified.)
1. At orange jumper side of R18: 2.8 v @ PIR duty
2. At orange jumper side of of R17: 2.8 @ PIR duty
3. At PC817 side of R17 cathode: 5.5 v during PIR duty then 10.7 v
4. At PC817 cathode: 5.7 v during PIR duty then 10.7

So if there is voltage at the cathode of the PC817 then there must be voltage
at the anode and the PC817 seems to be working except the PC817 is not
allowing the 12 volts to flow between the collector and the emitter.

What am I missing?

What is PIR duty?
So to avoid confusion, lets settle on some terms. When the output of the PIR is high(>0.65v), indicate PIR_out=1, if low(<0.1v), indicate PIR_out=0

The following responses assume the PIR_out=1
1. 2.8v
2. 2.8v
3. 5.5v
4. 5.5v

The following responses assume the PIR_out=0
1. should be approx 11.5v
2. should be approx 11.5v
3. should be approx 11.5v
4. should be approx 11.5v

Check the values of R17, R18, R7, R16. The resistors in the photo seem to be coded Yel/Or/Yel/Gld=430k 5%.
These should all be 430 ohm 5%. That would explain the voltage measurement difference. It would also significantly reduce current flow thru the diode of the isolator which, in turn, would reduce the available current thru the iso collector/emitter (this would be bad).

Report back.

BTW- I have this breadboarded on my bench and works as intended.
 
Last edited:
Status
Not open for further replies.

Latest threads

New Articles From Microcontroller Tips

Back
Top