Continue to Site

Welcome to our site!

Electro Tech is an online community (with over 170,000 members) who enjoy talking about and building electronic circuits, projects and gadgets. To participate you need to register. Registration is free. Click here to register now.

  • Welcome to our site! Electro Tech is an online community (with over 170,000 members) who enjoy talking about and building electronic circuits, projects and gadgets. To participate you need to register. Registration is free. Click here to register now.

PIC16F84 test board!_PCB ready!

Status
Not open for further replies.

bogdanfirst

New Member
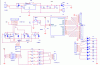
hello!. i want to make a simple board for testing the PIC and easy prototype testing with other circuit.
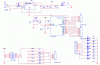
so i have designed this. it is very simle.
now, i want other's opinion about this. shoul i improove something? maybe i should add/remove something from it?
basically, the connectors in the schematic are there for connecting the PIC to the LEDs or buttons, or other circuits.
do you think that i should add more quartz cristals and enable selection between them? maybe 2 or 3?
after i will decide upon the schematic, i will create a PCB and post the desigh here.
please let me know what you think.....
 

Attachments

  • test_board..GIF
    test_board..GIF
    23.4 KB · Views: 3,139
I gave a lot of thought to this when I started my tutorials, and I came up with a few ideas which I decided on:

1) Use the 16F628, instead of the 16F84 - it's basically the replacement for the 16F84 - which presumably will be discontinued. It has the HUGE advantages of an internal oscillator, and the availability of 16 I/O pins on an 18 pin chip.

2) Make it a modular design, that way people can make whatever boards they want, and ignore those they don't want - you can also add extra boards whenever you wish. A single board is fixed, so it's out of date before you've built it.

I've also introduced other processor boards as the series has developed, these use exactly the same extension boards as the 16F628 ones, so no need to duplicate everything.

3) Use Veroboard, rather than a PCB, that way anyone can construct the boards easily and cheaply, and within a very short time. Many people, including myself, don't make PCB's. Obviously if you were planning selling the boards, it's a different matter.

4) Use identical connectors to each board, I gave some thought on this, and settled on 10 pins, 8 data ones, gnd, and +5V.

As for extra's to add to the circuit you already have, how about a few transistors connected as open-collector, with a resistor feeding the base, you could also have reverse biased diodes to the 5V line, and use them for relays or stepper motors (so 4 would be reasonable).

It's probably not too important to switch crystals, for the odd occasions when you might want to, simply unsolder the old one and solder a new one in.
 
thanks a lot for the quick answer!
you are right about the 628. i will use it. meanwhile i'll make a simple board for those 16F84's i have.
how about giving some links to some testing boards?(from your website??)
thanks a lot!
 
I think you should use 220R. It makes your led brighter.

Yeah, I think 16F628 is the best choice between small chips. it replaces for 16F84, has more functions, but cheaper. However, it's more difficult to buy, and with ORCAD, you cannot get F628 component. However, I remember that I found somewhere an addin lib that provide 16F628 and 16F877 components for ORCAD. I used ORCAD 9.2 but it doesn't has these components.

I lost my data, I cannot send it to you. If you find it somewhere, pls email meeh.

The power supply, you do not need to use many cap like this, you can make it as simple as the datasheet of regulator. It makes your board smaller.

About pcb, I don't know why, but I think make your own pcb is very easy in vietnam. First of all, you need a little of FeCl3, drop it into water. You can print your board onto a the smooth and shiny of a decan paper. A decan paper (it's like paper hangings, I don't know how to explain it in Eng, I'm in vietnam). The back of the decan (the waste part, the back of a decan that you don't use) Oh oh.. stuff...

I really don't know how to explain :D...

you print your board onto it than iron it onto a copper board. After that, you dip the copper board in liquid of FeCl3.

You can build a 10cm x 10 cm pcb in 15 minutes.

Goodluck
 
"Use the 16F628, instead of the 16F84"

Bummer... why didn't I know that last week when I ordered a 16F84A... ;-)
 
i know about the 16F628......though, here there is an insignifiant price difference.
and i have some 16F84-04/P and i want to build something with them. so this board wi quite all i need.
i have added 4 transistors, and VDD & VSS to the connectors. i completly forgot about needing them there. thanks for pointing this out.
though, i am not decided upon making the board a single or modular. i think i am going to make a single board. it makes thing simple.
any more suggestions?
 

Attachments

  • test_board2.GIF
    test_board2.GIF
    28.7 KB · Views: 2,964
From a new-to-uC perspective, don't presume I'm trying to teach you anything. :)

serial driver (dual?)
latch (octal?)
shift register (octal?)
resistor array (octal?)
opamp (quad?)
optoisolators?
RTC?
...etc

And a large grid area to add the things you didn't think of.

re: Nigel and prototype boards, too true. If you show a graphic of how it's laid out
and wired on a 3-Hole, more people will try it vs. how many would etch and drill it.

ICSP header? And maybe via a DIP switch block a way to disconnect the pins
needed for programming from the rest of the circuit in case the programmer cannot
power the circuit?

Is it possible to make a universal test board? Course not. Trying could be fun though.
my 0.000002

BTW, what do you think of the Olimex PIC dev boards?
 
I would suggest to have a In Circuit Serial Programming connector. (ICSP)...... and add a diode to the pull up MCLR resistor. A MAX232 chip would be nice in there too. I have use the PIC16F877 Development Board as testing boards, it might give you and idea or two.

Ivancho
 
If you make a switch path, I propose to combine resistors so that you can read the switch possition, but that you NEVER exceed the maximum allowed input or output current. If you make a software fault and you did not protect for such a fault your Pic is gone
Code:
                              switch
example:   V-  ----[ 680 ]-----/  ------[20K]---- V+
                                      |
                                      |   to pic
 
well....you hava a good point.....
i don't know if is should add those resistor.....maybe i will....
but that way the board would be full of resistors.........
 
The day that you blow up a port you will say..* * *
and you will look :mrgreen:

another:

Code:
                     switch

                  V- ---------/  -------------[ 20K ]------V+
                                       |
                                680   [R]  
                                       |
                                        To pic

Here you need only one additional resistor, so may swap V- V+
 
PIC's are surprisingly tough devices - a simple pull-up resistor and switch to ground is all you need to provide. Admittedly, you could add lots of extra bits to prevent you doing something really stupid - but it's probably not worth it, and you certainly wouldn't do so for a commercial application.
 
Nigel Goodwin said:
PIC's are surprisingly tough devices

Indeed, but short circuiting there outputs does kill them though.
While experimenting I²C i made a software error once, making the pic output logic 1 (5v) while a bus device was pulling the bus low.. result: bus device (eeprom) completely destroyed and the pic's output was also defective, only that particular pin though, not the whole chip.

So i used that pic in a project for someone else which didn't need that pin :twisted:
 
Exo said:
Indeed, but short circuiting there outputs does kill them though.
While experimenting I²C i made a software error once, making the pic output logic 1 (5v) while a bus device was pulling the bus low.. result: bus device (eeprom) completely destroyed and the pic's output was also defective, only that particular pin though, not the whole chip.

I've never managed to damage one yet, although if you plug them in the wrong way round they do get hot enough to burn your fingers :lol:
 
PIC dev board

I assume SW1 is some form of ganged switch with the ability of shorting 5v to 0v mechanically prevented ?

SW2 to 6 are push-to-test buttons or could three be push-to-test and two be toggle switches.

The idea of modular is OK but leaves dozens of tiny PCBs all over the place - stick to one board for the stuff you have and add a LCD module (or what ever) when you want/need/find one.
If the main board was to fit in a storage box then a project could be packed away mid-development and still be safe (just shut the lid), a power supply and collection of patch wires could be stored in the same box, blah blah blah.

How about adding a simple variable frequency oscillator to give some slow clock rates (or single-stepping?), a single crystal osc would be a bit restrictive.

ps. The 5 driver transistors ...
how about using a UCN5801 octal latch ? ... more compact, can switch 50v, 500mA per output.
 
clock options

How about adding a simple variable frequency oscillator to give some slow clock rates (or single-stepping?), a single crystal osc would be a bit restrictive.

Although not as flexible as a VFO, this page has some good suggestions for making a dual-speed RC clock for the PIC -
https://www.romanblack.com/pic2clk.htm (there are some other clever ideas here, I like the simple switching-regulator design)
 
ok....
i will not use extra resistors for protection. i don't think that it is worth it.
i am going to put all the components on a single board. i think it is a lot better than having a lot of little boards....need to connect power for each....and so it is not very easy to use them.....and plus, i keep loosing stuff..... :lol:

the latch seems like a good idea...but thisone suggested is VERY expensibe here....don't know why.....maybe another alternative? :?:

about the switch....
i am going to use a switch that cand swap the GND and 5V so i can make the push buttons active L or H. :wink:

and the oscilator....well...i don't think i will need a different frequency often, so i will just use a quartz cristal....in an extreme case, i can just replace it with another one...

what about a LCD module? can someone suggest one for me? :wink:

well, i hope i will have some time this weekend to design the board.....
 
bogdanfirst said:
what about a LCD module? can someone suggest one for me?

Basically they pretty well all conform to the Hitachi standard, and that's all you really need to support. If you check my tutorials at **broken link removed** I give full details of the LCD, including reliable working assembler routines. I run the LCD in 4 bit mode, but using hardware timing - this requires 7 I/O pins and runs as fast as it can (unless you use 8 bit mode!). It's well worth a look, and should help you decide how to implement it - LCD's can be quite difficult to get working - feel free to 'steal' the design and the code.
 
Status
Not open for further replies.

Latest threads

New Articles From Microcontroller Tips

Back
Top