Continue to Site

Welcome to our site!

Electro Tech is an online community (with over 170,000 members) who enjoy talking about and building electronic circuits, projects and gadgets. To participate you need to register. Registration is free. Click here to register now.

  • Welcome to our site! Electro Tech is an online community (with over 170,000 members) who enjoy talking about and building electronic circuits, projects and gadgets. To participate you need to register. Registration is free. Click here to register now.

Outdoor flickering “candle” failure

Hafcanadian

New Member
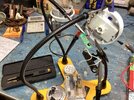
I’m always having issues with my garden and patio LED lanterns, whether battery or solar powered. The one I’m trying to fix now is two AA powered. The lamp won’t come on at all, even though in the past it and its twin had funky switches. The switch seems okay this time, at least when I check continuity between its posts, and at one point I temporarily soldered in a larger switch that didn’t alter the result.

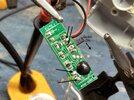
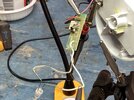
The board is cleaner than most that’ve been outside a lot, but the lamp won’t work. That said, if I set my LCR tweezers to “Diode” and put the tips across the lamp’s leads, the LED flashes (not flickers), so the LED seems okay. It’s flickering candle imitation must be controlled by a board component, or under normal voltage it may be the lamp’s built-in mode.

I note a “crystal”(?) can on the back of the board.

See photos and please advise what to check.

Thanks.
 

Attachments

  • IMG_0196.jpeg
    IMG_0196.jpeg
    2.4 MB · Views: 19
  • IMG_0197.jpeg
    IMG_0197.jpeg
    828.2 KB · Views: 17
  • IMG_0200.jpeg
    IMG_0200.jpeg
    1.4 MB · Views: 17
Set your multimeter to DC current (mA), in series with the LED if you can.
Or, if not possible, put it across one leg and see if any measurable current is flowing.
Use diode mode on your multimeter to probe between its pins (usually Base, Collector, Emitter).
You should see ~0.6–0.7V drop B–E or B–C in one direction. If you get 0V in all directions, or OL in all, the transistor may be dead.
 
First of all, I applaud your attempt to fix this and avoid sending another piece of E-waste to the trash.
Do you see that black epoxy blob on the board in there? There is a naked chip below. It is the absolutely cheapest way to purchase and assemble a semiconductor, saving the manufacturer a few micro-dollars versus a SOIC or TSOP.
But the bond between the epoxy and board is NOT hermetically sealed. Humidity can, and definitely will ingress and damage the semiconductor. And it cannot be replaced.

I sincerely hope that there is something different and you can actually fix this device. But garden lights are usually a prime example of fecal-matter electronics devices.
 

Latest threads

Back
Top