Continue to Site

Welcome to our site!

Electro Tech is an online community (with over 170,000 members) who enjoy talking about and building electronic circuits, projects and gadgets. To participate you need to register. Registration is free. Click here to register now.

  • Welcome to our site! Electro Tech is an online community (with over 170,000 members) who enjoy talking about and building electronic circuits, projects and gadgets. To participate you need to register. Registration is free. Click here to register now.

I need help with soldering; tips quickly wearing out

Status
Not open for further replies.

voltrobe

New Member
Sorry in advance for the long post, and for asking such a newbie question. I searched google, but couldn't find an answer.

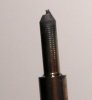
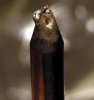
I got a Sears Craftsman soldering iron to replace some dead headphone sockets. I desoldered about 10 places (with desoldering braid), then started resoldering new parts in. It was working well for about 3 spots, and then I just couldn't get a good solder joint anymore. Solder seems to just stick to the bit, and I couldn't wipe it off. I examined the bit, and it looked badly damaged; as if it had melted or a piece broke off. (See attached images.)

I thought perhaps I had ruined it with the desoldering braid. So I got a new bit, desoldered the bad spots using a pump, and then started soldering again. But the same thing happened again, and with half as many solder joints!

I've soldered before, and read everything I could find on correct technique. I let the iron get hot, testing with solder to know when it's ready. Dip the brand new tip briefly in tip tinner/cleaner compound (from Radio Shack) when it's hot. Wipe the tip quickly on a damp sponge between each soldering and desoldering spot. I wasn't letting the iron sit idle for long.

What could I be doing to break my tips like this? Surely they aren't supposed to wear out so fast. I also had similar results with a Radio Shack iron. Are these irons/bits just too cheap and unreliable? Or is it the way I'm using them?

I wouldn't want to invest in higher quality tools, only to quickly wear them out too.

Any advise would be greatly appreciated!
 

Attachments

  • irontip.jpg
    irontip.jpg
    25.9 KB · Views: 636
  • irontip2.jpg
    irontip2.jpg
    21.1 KB · Views: 639
hi,
Which type of solder are you using.?
 
I hope you dont dip the soldering iron in flux ever ?
 
Having your iron too hot can decrease the life of your tips. Do you have a variable temperature control? If you do, the temperature should be set to around 650-700 deg. This will give you ample heat transfer. What type of material are the tips made from? If you have checked your technique, try giving the mfg a call and speak to customer service. Perhaps they can help you. Iron tips, with proper care, should last for months with constant use. Or you could just be using crap!

You may check in to the Weller brand. These irons I have been using for years. You can get them for a reasonable price.
 
Last edited:
Worn-out soldering iron

The iron on the photo tells me a whole story:

- you applied a flux normally used by plumbers
- you let the iron get too hot before tinning it the first time

Flux used in electronics consists of the same stuff professional violine players "wax" their bows, called "colophonium", a natural juice of pine trees, similar to maple syrup, but not as sticky. (Candadians might give it a try :D)

Using plumber's flux you not only ruin the soldering iron, but you also build in a programmed self destruct circuit in your PCB.

That flux contains acid to be able to solder oxidized metals.

To treat an even cheap soldering iron right you must follow these rules:

Heat the iron up initially and touch it with electronic solder (its core contains enough flux) from time to time and have the soldering tin melt on the tip.

Don't ever use any additional flux. Instead have the solder pads free of oxididized surfaces, meaning to remove any protective film shortly before soldering.

The iron tip will become "black" after some pads have been soldered. These are "leftovers" of burnt colophonium and unused soldering tin. Wipe them off with a damp sponge (a real sponge is best).

Best way of course is more costly and this includes a heat regulated iron with durable tips.

Last not least that kind of equipment will last for decades. (My selfmade soldering station will "celebrate" its 35th birthday this year.) :)

Boncuk
 
Like Boncuc says,
apply some solder to the tip when it first heats up, then slather on some solder each time you put the iron down...
wipe it on the sponge just before you use it, then some more solder before you set the iron down...

Looking at the photo on the left, it doesn't look like the tip has been tinned at all. (Perhaps the tip cleaner/tinning stuff is not any good?)
 
Is your soldering iron temperature controlled?

If not then I'd recommend getting a temperature controlled iron or making your own controller with a lamp dimmer switch.
 
It may not be a good idea to add solder to the tip between uses as BeeBop suggests. It is normal for copper from the soldering iron tip to slowly disolve into the liquid solder, eroding the tip. Leaving solder on the tip gives more solder volume for the copper to disolve into. To reduce the erosion, wipe off the tip between soldering to remove any drops of solder. And the hotter the iron, the faster this erosion occurs.

Some tips are plated to reduce this erosion. I've also seen solder with a small amount of added copper to minimize it.
 
Like Boncuc says,
apply some solder to the tip when it first heats up, then slather on some solder each time you put the iron down...
wipe it on the sponge just before you use it, then some more solder before you set the iron down...

Looking at the photo on the left, it doesn't look like the tip has been tinned at all. (Perhaps the tip cleaner/tinning stuff is not any good?)

What Beebop is suggesting is a standard soldering practice. This will help keep your tip tinned and last longer. If you are not using tips that are plated, I recommend switching to them.
 
Thank you all for the replies.

I'm using electrical solder. Lead-free 96/4 silver solder (Radio Shack brand).

I'm not using plumbers acid flux. Thank you for the long write up about it though.

I'm using this Tip cleaner. Maybe that's the culprit? It doesn't say what it's made of.

I believe the iron tips were chrome plated. They were shiny before use.

No variable control, this is a cheap ($10 USD) iron that came with 3 tips from a big department store.

I was wiping the tip off between uses on a natural cellulose sponge. Damp, not wet. I see two conflicting answers about leaving solder on the tip vs wiping it off. Perhaps I'll try leaving it on.
 
It sounds like it might be the lack of temperature control - I've had that problem with non-temperature controlled irons before.

The simple solution is to use a lamp dimmer which is cheap and easy.
 
Solder Tip Check....

Thank you all for the replies.

I'm using electrical solder. Lead-free 96/4 silver solder (Radio Shack brand).

I'm not using plumbers acid flux. Thank you for the long write up about it though.

I'm using this Tip cleaner. Maybe that's the culprit? It doesn't say what it's made of.

I believe the iron tips were chrome plated. They were shiny before use.

No variable control, this is a cheap ($10 USD) iron that came with 3 tips from a big department store.

I was wiping the tip off between uses on a natural cellulose sponge. Damp, not wet. I see two conflicting answers about leaving solder on the tip vs wiping it off. Perhaps I'll try leaving it on.

More than likely your tip has not got the correct plating. A Weller tip cost more than some cheap soldering irons. Have not bought a new tip in over 20 years, and here is why. The copper is plated with iron and nickel, you can check it with a magnet. This is what is protecting the copper from the corrosive reaction of the hot solder and flux. I would think most other good iron's tips are similar.
I newer use any other cleaning than a damp sponge.
Note: When I say to check the tip with a magnet that is what mean, the other end of this type of Weller tip is part of the temperature control and is magnetic.
 
In the words of an on-the-air fumble by John Cameron Swayze in the early days of live television advertisements: "Remember, with Timex, you get what you pay for; and you don't pay very much."

When one buys cheap tools, he gets exactly what he pays for.

I've been using Ungar and then Weller products for almost 50 years with no problems.

I always counsel beginners to bite the bullet, buy top-quality tools, use them properly and take care of them. This prevents a lot of frustration and disappointment.
 
A Weller tip cost more than some cheap soldering irons. Have not bought a new tip in over 20 years....

This is really good news for me. I just purchased a Weller analog station, and and extra tip... Should last the rest of my life, anyways! I love how quickly the thing heats up when you first turn it on, and how quickly it recovers after soldering a joint. After the last couple of years using a cheap Chinese made iron, this really cooks! :D

I always counsel beginners to bite the bullet, buy top-quality tools, use them properly and take care of them. This prevents a lot of frustration and disappointment.

I think this is great advice! Always, whenever I have 'cheaped out' on a tool purchase, I have ended up regretting it, and buying the same tool, but of better quality.

It may not be a good idea to add solder to the tip between uses as BeeBop suggests.
Well, perhaps for the equipment you are using, however, in the manual which came with my new iron, the first instruction says:
1. Keep tip tinned; wipe only before using.
and then:
5. Do not remove excess solder from heated tip before storing. The excess solder will prevent oxidation of the wettable surface when tip is re-heated.
 
Just guessing, I bet the tip's plating got chipped away, which allowed the solder to quickly dissolve the inner copper. This is why it's not advised to sand / grind a tip to remove oxides or change the shape. Once the iron / chrome plating gets penetrated, the copper gets eaten away very quickly. Weller does make a polishing bar...

**broken link removed**

Check out Weller's soldering guide that emphasizes tip care: https://www.electro-tech-online.com/custompdfs/2008/12/WellerSoldering.pdf

It also has pictures and explanations of the tip plating, which includes a nickel and then iron plating on the tip, and chrome on the shaft to repel solder.

Our guide has more info on flux chemistry if you're interested: Curious Inventor - Guides : How to Solder

Some people / guides recommending holding a piece of solder to a cold iron tip when first heating it up to cover the tip as soon as possible.
 
Status
Not open for further replies.

New Articles From Microcontroller Tips

Back
Top