Electro Tech is an online community (with over 170,000 members) who enjoy talking about and building electronic circuits, projects and gadgets. To participate you need to register. Registration is free. Click here to register now.
Welcome to our site! Electro Tech is an online community (with over 170,000 members) who enjoy talking about and building electronic circuits, projects and gadgets. To participate you need to register. Registration is free. Click here to register now.
If it is that urgent, and you need step by step instructions, try:
Go to laptop shop
Buy new battery charger
Go home
Connect new charger to laptop
Switch on and be happy!
If you wish to repair your existing charger, what tools do you have?
You will need:
Screwdrivers to open the case of the charger, (maybe a special "security" type for the special screws intended to keep the amateurs our).
Wire cutters.
Soldering iron and solder.
Solder sucker.
Maybe a sharp knife or scalpel.
And maybe some other things as well.
getting the case opened is the most fun you'll havethey can be a real bugger....channel-locks help alot. but it'll be rough looking when you put it back together, I've just ended up hot glueing them back. otherwise its just amatter of cutting the leads off and resoldering them back in. I'd put a piece of small tubing at the strain relief just to keep my son from kinking the leads at the case, (thats why his broke there all the time).
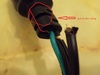
Cut Red lines with razor blade/utility knife WITHOUT cutting the wires.
Peel off jacket
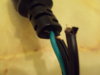
Strip wires 1/4" back
Use butt connectors to join the wires together then crimp.
Wrap each butt connector with electrical tape
Wrap all three wires together with electrical tape
Check output voltage of PSU before connecting back to laptop
This site uses cookies to help personalise content, tailor your experience and to keep you logged in if you register.
By continuing to use this site, you are consenting to our use of cookies.

 they can be a real bugger....channel-locks help alot. but it'll be rough looking when you put it back together, I've just ended up hot glueing them back. otherwise its just amatter of cutting the leads off and resoldering them back in. I'd put a piece of small tubing at the strain relief just to keep my son from kinking the leads at the case, (thats why his broke there all the time).