Electro Tech is an online community (with over 170,000 members) who enjoy talking about and building electronic circuits, projects and gadgets. To participate you need to register. Registration is free. Click here to register now.
Welcome to our site! Electro Tech is an online community (with over 170,000 members) who enjoy talking about and building electronic circuits, projects and gadgets. To participate you need to register. Registration is free. Click here to register now.
If you want to be current you need to work with or read about the current toner transfer methods. The pulsar transfer paper is very good. 100% release, the laminator provides a good transfer.
There are two things that I don't think any proprietary paper will solve:
The pressure of the iron or laminator squashes some of the toner so lines are always slightly thicker than they're supposed to be. This isn't problem with photo transfer, especially if you make sure the toner side of the film is against the board.
The printer missing bits out - both photo and transfer suffer form this and in both cases a marker pen solves the problem.
I am not saying anything negative about photo transfer execpt that the stuff ages.
True but I've used pre-sensitised board that's years old before with no problems. Keeping it in a cool and dark place and not tracking too close to the edge of the board also helps.
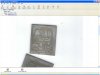
I made a PC board this weekend using the photo-resist method. We had never done it before but it was drop dead simple. We got 15 mil traces with no problem at all. We didn't do any real experimentation nor did we have any special gear. We used a common laser printer with normal transparencies, a one-bulb florescent light fixture with a common indoor bulb, garden-variety photo-resist solvent (soldium hydroxide) and 3 year old Radio Shack ferric (ferrous?) chloride. And a sheet of glass. And some q-tips.
We were like monkeys doing math but we got a great result.
There are two things that I don't think any proprietary paper will solve:
The pressure of the iron or laminator squashes some of the toner so lines are always slightly thicker than they're supposed to be. This isn't problem with photo transfer, especially if you make sure the toner side of the film is against the board.
I have been doing the he man thing and running the board through the laminator several times. There are one or two other things I could be doing different. Frank has been talking about transfering the toner by making it sticky but not melting it. If this works (I have yet to get bad info from him) the problem may be solved.
The pulsar system uses a foil that is laminated to the top of the toner once it is on the PCB. It does not cover major voids but will seal the pin holes. If the foils blocks light it may be of use in the photo process too.
set the printer to print density 5
warm the laminator for 1/2 an hour before using
use the 5mm setting on the laminator
CLEAN your board with dish soap and a Scotchbrite pad or 600 wet/dry sandpaper
pass the board through about 6 times switching around each time
use the green TFF paper to fill any voids in the print
pass through several times until you can see your circuit traces when you lift up an edge.
remove ink w/ acetone
CLEAN your board with dish soap and a Scotchbrite pad or 600 wet/dry sandpaper again
coat with liquid tin
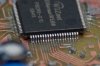
all my traces are .020 except the one between the ic pins =..010
I filled all the unused ares so they wouldn't etch - not needed anyway.
I now need to drill my holes
Pulsar has a great product, just wish they had an iron on solder mask
Does it really matter if the lines get slightly squished when heating on? I can do 8mil traces using regular photo paper and an iron. I haven't tried anything smaller than that. I guess if I needed them smaller I could give it a shot. The only reason I've ever needed 8mil was for this crazy IC with 0.4mm lead spacing.
This site uses cookies to help personalise content, tailor your experience and to keep you logged in if you register.
By continuing to use this site, you are consenting to our use of cookies.
")