Continue to Site

Welcome to our site!

Electro Tech is an online community (with over 170,000 members) who enjoy talking about and building electronic circuits, projects and gadgets. To participate you need to register. Registration is free. Click here to register now.

  • Welcome to our site! Electro Tech is an online community (with over 170,000 members) who enjoy talking about and building electronic circuits, projects and gadgets. To participate you need to register. Registration is free. Click here to register now.

Door Chime Sequencer Problem

Status
Not open for further replies.

holabr

New Member
I have a set of vintage door chimes that uses an electro-mechanical sequencer to activate a series of plungers to strike the chimes. The problem is the mechanism uses a low rpm motor to sweep a set of contacts over traces on a PC board to sequencially ring the chimes. It has worn to the point that it is no longer consistently rings the chimes. I'd like to build an electronic replacement and have a few questions.

1) What would be the best way to convert the 16 VAC pulse when you press the doorbell button into something the circuit can use to start the sequence?

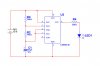
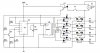
2) I'm thinking of using a PIC to drive the circuit. This would be my first attempt. Is this overkill or would hard logic be better?

Because of the existing wiring in the house and the fact that the plungers require the 16 VAC transformer, changing over to some other power supply is not an option.

I'd appreciate any direction and examples of similar circuits as a starting point.
 
How many sequential contacts? Are all of the chimes operated on AC? Will they operate on DC? If so, what voltage and current?
 
There are actually 4 chimes that either sequence 4 notes or the full 8 note Westminster chimes (switch selectable). The chimes operate on AC only (16 volts) so I was planning to use a relay for each chime.
 
You could hack an old sprinkler timer. They have TriACs to switch 24V AC to each sprinkler valve, so that would work for 16VAC.

I would use a CMOS 4017 decoded decade counter chip, with a 555 or other clock. This would give you two to nine equal time states, where the rate of stepping through the states is determined by the clock rate.
 
Do you have the sequence that you need?

OPTOMOS relays might be a good choice.Check current requirements. LED/MOS switch.

Interface might be just an OPtocoupler or bridge and an optocoupler for your 16VAC to PIC.

Now it does depend on how your doorbell is wired. 16 VAC to bell and frond and back door switches to bell. Your 16 VAC, if available might need to be rectified, filtered and then use a DC-DC buck converter to get operating voltage for the PIC. Suitable power supplies can be found on ebay already made.
 
Do you have any optocoupler numbers that would handle 16 Vac input? It's a 3 wire system so I have both 16 Vac constant and feeds from the front and back doors and a common.
 
You could use a 4017 (as MikeMI suggested), driving opto-triacs (e.g. MOC302x series), perhaps with some buffering depending on chime current.
 
See PDF page 16, here: https://www.electro-tech-online.com/custompdfs/2013/02/Optocoupler-Solutions-Guide.pdf

If you don;t know how to use them, holler. These basically use back to back LED's. The forward voltage of one protects the other. You can use two standard optocouplers if you need to. If you need a lower ON resistance, you can use Opto-FET's.

16 VAC rectified will give you about 22V. CUI makes a nice line of DC-DC converters and digikey stocks a lot of them. https://www.cui.com/Catalog/Power/Dc-Dc_Converters
 
I have been working in Multisim to understand how I could use a 555 timer and a 4017 counter to solve my problem. I seem to be having a problem with the LEDs just flickering. I simplified and isolated the circuit to just the 555 part of the circuit and still the LED flickers in simulation. I tried different resistor and capacitor values but it doesn't change anything. Any ideas what I am doing wrong? (see attached)
 

Attachments

  • test.jpg
    test.jpg
    29.1 KB · Views: 273
The 555 is wired as an astable, free-running multi, so yes the LED will flicker at the oscillation rate.

Look at these plots, they show what is going on. Is Multisim such a toy that it doesn't show this behavior?
 

Attachments

  • 555.jpg
    555.jpg
    94.4 KB · Views: 238
This is the design I came up with so far. I still have to add a regulator circuit to convert from the 16 VAC to 12 VDC to power the solid state part of the overall mechanism. I still need a little help with some of the AC/DC overlap areas.

1) What would be a good choice for U1 to take the AC momentary from the doorbell button (J1) to give the 12+ pulse to start the sequence?

2) Are the MOC3023s robust enough to power the plunger solenoids (P1-P4) or do I need to use some additional components to handle the current draw? What would that look like?

Any other suggestions would be greatly appreciated.
 

Attachments

  • Door Chime2.jpg
    Door Chime2.jpg
    122.5 KB · Views: 568
To: holabr
I have the exact same need on replacing the motor driven chime with electronics. Is the "door chime2.jpg" circuit the one you finally used and is there any additional changes to it?
Retiredtech
 
holabr - you clearly have better design skills than your initial question indicated. And whomever taught you how to draw a schematic gets a gold star.

Your schematic is almost there, If the idea is to cycle through the chimes once and stop, consider tying 4017 output "9" to the Q1 555 inhibit circuit. This will stop and hold the clock oscillator until the opto resets the 4017.

Now that the button-press reset signal goes to only one part, something else can be adjusted. If someone leans on the doorbell button, the system sits on note #1 until the button is released. Consider a differentiator between the opto and the 4017 to make the system more edge sensitive than level sensitive. In this way the chimes will start immediately with the button press, just like the original system.

ak
 
The start of this thread is over two years old. Holabr hasn't been back to eto since May 2013.
 
I appreciate your comments. I like to build things but am pretty slow at design and at age 80 it is going down hill fast! In regards to this chime circuit by holabr: 1. What device would be suitable for U1? 2. Are the MOC3023's OK to drive the solenoids or do we need another TRIAC in between? 3. Since there is no "back door switch" what would be needed to accomplish just pulsing 1 solenoid?
 
Note that the schematic is not complete. Several current limiting resistors are missing. Also, the diodes can be replaced with 1N914, 1N4148, etc.

1. 4N35 or similar general purpose optocoupler. Add a diode in reverse parallel across the input diode and a series resistor to limit current to 10 mA.

2. Depends on the solenoid power. Non-repetitive peak current rating is 800 mA, but repetitive current is only 2 mA. Probably need another TRIAC.

3. The circuit does not show the relationship between either AC power let and the circuit GND, so this is not perfectly clear. The long way is to add another 555 configured as a monostable, triggered by the back door button, and connected to one of the output optos with another diode.

ak
 
A VO223A TRIAC optocoupler has a 1A RMS and 10A surge current rating which may be adequate to drive the solenoids directly.
You need to measure the solenoid current to be certain.

Note that the OR-function steering diodes at the output of U3 can be replaced by a CD4071 CMOS quad OR-gate, which would reduce the part count.
 
Last edited:
Status
Not open for further replies.

New Articles From Microcontroller Tips

Back
Top