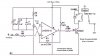
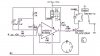
Well.......go figure~! The reason why I used this 5V reg was because my last circuit I built using the car's alternator voltage, didnt work. Although, that circuit was using a LM311. So maybe the LM311 operates at a lower voltage. Again, my stupid attempt to add something without sufficient knowledge ha..ha....
So...If I switch to a 12V regulator, will this work? The reason I am thinking a regulator is better is becuase of the type of supply. Auto voltages swing from 12-14.5 depending on battery condition/charging. Plus it isnt all that clean of a voltage.
Again, I want to thank you guys for helping me. This means a lot.
Stu
")