Continue to Site

Welcome to our site!

Electro Tech is an online community (with over 170,000 members) who enjoy talking about and building electronic circuits, projects and gadgets. To participate you need to register. Registration is free. Click here to register now.

  • Welcome to our site! Electro Tech is an online community (with over 170,000 members) who enjoy talking about and building electronic circuits, projects and gadgets. To participate you need to register. Registration is free. Click here to register now.

Conjuring ideas for art project

Status
Not open for further replies.

MrDEB

Well-Known Member
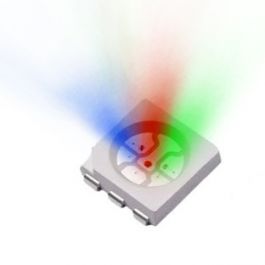
My idea for a lighted 3D art project is placing tri-colored LEDs under the edge of clear plexiglass.
Using an 18f2221 pic and Swordfish basic
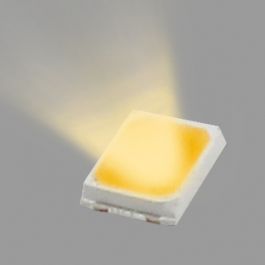
Each plexiglass will have 6 tri-color LEDs and 3 white LEDs under the plexiglass shining UP through the edge of the plexiglass.
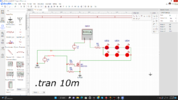
Using the EASYEDA simulation (pretty good simulation) I think I have come up with a solution for the maximum number of LEDs for effect.
The screenshot is a basic circuit but 61ma may be too high. May go with a 200-250 ohm resistor?
The idea is to put semi-transparent photos so it LOOKS LIKE a 3D photo on the plexiglass panels.
programming the pic so it appears going from dawn to dusk then repeat.
I may have to look at using PWM but am limited with PWM ports.
 

Attachments

  • Screenshot (29).png
    Screenshot (29).png
    261.6 KB · Views: 160
I would think having tri-color leds in series/parallel arrangement like that is going to cause a world of issues.
Each color has a different forward voltage... I bet your "simulation" used all one type with Vf=2V.
 
yes, the simulation only has one color.
Pommies' idea seems the most viable.
This is just the start of this project.
I need the red and blue LEDs for changing the lighting effect from dawn to dusk.
To tell you the truth, I have yet to test the effect of the LEDs projecting up through the plexiglass edge. If I get the time today that is on my list.
 
Why is it too much current? Can't the FET handle 60mA?

We've been through this before, but because of the different forward voltages of the three colors you typically want to use separate resistors for each color. With having only one resistor the current will change a LOT as you turn on the individual colors.
 
After thinking about this project and different resistor values etc. Plus if using one resistor per LED then I can have more versatility in how it displays in the final project and avoid issues with LEDs in parrele etc as suggested.
For the popcorn posted this code but I need to set up a test board and get it working correctly then maybe I can move forward with this project.
Code:
{
*****************************************************************************
*  Name    : SequenceTimer.BAS                                              *
*  Author  : For The Popcorn                                                *
*  Notice  : Copyright (c) 2022 [select VIEW...EDITOR OPTIONS]              *
*          : All Rights Reserved                                            *
*  Date    : 12/1/2022                                                      *
*  Version : 1.0                                                            *
*  Notes   : This program may be used to control LED sequences:             *
*          :   LEDs buiding from 0 to n                                     *
*          :   LED chasers and marque displays                              *
*          :   Alternating LED Patterns                                     *
*****************************************************************************
  ON interval, OFF interval and OFFSET interval must be specified for each
  LED in the INITIALIZE subroutine.  Whatever action is requred to turn
  on/off each LED must be specified in the UPDATESTATE subroutine.
 
  The number of items(LEDs) is specified as a constant below.  The timebase
  is also specified as a constant, in mS - 1000 = one second.
 
  For sequence development, debug output is available on UART1. Enable three
  UART.Write lines in the ITEMISTRIGGERED subroutine to use debug.
}

Device = 18f25k22
Clock = 20
                                      
Config   'for K-series device
    FOSC = HSHP ,'HS oscillator (high power > 16 MHz)
    PLLCFG = Off ,'Oscillator used directly
    PRICLKEN = Off ,'Primary clock can be disabled by software
    FCMEN = Off ,'Fail-Safe Clock Monitor disabled
    IESO = Off ,'Oscillator Switchover mode disabled
    'PWRTEN = Off ,'Power up timer disabled
    PWRTEN = on ,'Power up timer enabled

    BOREN = Off ,'Brown-out Reset disabled in hardware and software
    'BOREN = on ,'Brown-out Reset enabled
    BORV = 285 ,'VBOR set to 2.85 V nominal
    WDTEN = Off ,'Watch dog timer is always disabled. SWDTEN has no effect.
    WDTPS = 256 ,'1:256
    PBADEN = Off ,'PORTB<5:0> pins are configured as digital I/O on Reset
    HFOFST = Off ,'HFINTOSC output and ready status are delayed by the oscillator stable status
    MCLRE = EXTMCLR ,'MCLR pin enabled, RE3 input pin disabled
    STVREN = On ,'Stack full/underflow will cause Reset
    'LVP = On ,'Single-Supply ICSP enabled if MCLRE is also 1
    LVP = Off ,'Single-Supply ICSP disabled
    XINST = Off ,'Instruction set extension and Indexed Addressing mode disabled (Legacy mode)
    Debug = Off'Disabled


    Include "utils.bas"
    Include "isrtimer.bas"
    Include "usart.bas"
    Include "convert.bas"
    
    Const Timer1 = 0
    Const LEDon = 0
    Const LEDoff = 1

    Const NumberOfItems = 5 '<--- SET NUMBER OF ITEMS + 1 HERE
    Const TimerBase = 100   '<--- SET THE TICK INTERVAL IN MILLISECONDS
    
    Dim LED1 As PORTA.5         'to match LEDs on TAP-28 Plus
    Dim LED2 As PORTB.3
    Dim LED3 As PORTC.0
    'Dim LED4 As PORTB.2        'most TAP-28 variants
    Dim LED4 As PORTA.3         'TAP-28 + CH340 variant


    Dim Ticks As LongWord 'interval counter, interval depends on timer interval
    Dim ItemStartDelay(NumberOfItems) As LongWord 'delay from Tzero on startup
    Dim ItemOnInterval(NumberOfItems) As LongWord  'number of ticks at whatever interval the
                                    'timer is set to
    Dim ItemOffInterval(NumberOfItems) As LongWord
    Dim ItemTriggerTicks(NumberOfItems) As LongWord
    Dim ItemIsTriggered (NumberOfItems) As Boolean
    Dim ItemIsOn(NumberOfItems) As Boolean
    Dim I As Byte

Sub Initialize()    'set the parameters for each item here: on time, off time
                    'and delayed start (offset time)
                    'set up the timing intervals here - 3 parameters per item
    'item 1
    ItemStartDelay(1)= 0 'start immediately
    ItemOnInterval(1)= 10 'on time
    ItemOffInterval(1)= 2 'off time
    ItemTriggerTicks(1) = ItemStartDelay(1) + ItemOnInterval(1)
    
    'item 2
    ItemStartDelay(2)= 2 'offset time from item 1
    ItemOnInterval(2)= 8 'turn on for 60 seconds
    ItemOffInterval(2)= 4 'turn off for 30 seoonds
    ItemTriggerTicks(2) = ItemStartDelay(2) + ItemOnInterval(2)

    'item 3
    ItemStartDelay(3)= 4 'offset from item 1
    ItemOnInterval(3)=  6'turn on for 60 seconds
    ItemOffInterval(3)= 6 'turn off for 30 seoonds
    ItemTriggerTicks(3) = ItemStartDelay(3) + ItemOnInterval(3)

    'item 4
    ItemStartDelay(4)= 6 'offset from item 1
    ItemOnInterval(4)= 4 'turn on for 60 seconds
    ItemOffInterval(4)= 8 'turn off for 30 seoonds
    ItemTriggerTicks(4) = ItemStartDelay(4) + ItemOnInterval(4)

    'repeat for all items. 
    
    For I = 1 To NumberOfItems
        ItemIsOn(I) = false
    Next
End Sub

Public Function GetTicks() As LongWord
    Timer.DisableIntr()
    result = Ticks
    Timer.EnableIntr()
End Function

Public Sub OnTimer()
    Inc(Ticks)            'add one to the ticks counter each time timer event fires
End Sub

Sub ItemTriggered(ItemNumber As Byte)
    'USART.write(DecToStr(Ticks),"   Item Number: ", DecToStr(ItemNumber))    'un-rem for debug
    'ItemIsTriggered(ItemNumber) = False
    
    If ItemIsOn(ItemNumber) = false Then           
            ItemIsOn(ItemNumber) = true
            ItemTriggerTicks(ItemNumber) = Ticks + ItemOffInterval(ItemNumber)
            'USART.write(" is off.  On ticks = ", DecToStr(ItemTriggerTicks(itemnumber)), 13, 10)           
        Else
            ItemIsOn(ItemNumber) = false           
            ItemTriggerTicks(ItemNumber) = Ticks + ItemOnInterval(ItemNumber)
            'USART.write(" is on.  Off ticks = ", DecToStr(ItemTriggerTicks(itemnumber)), 13, 10)           
    End If
    
    ItemIsTriggered(ItemNumber) = false
End Sub   

Sub UpdateState()       'set the LED states
    'Item 1
    If ItemIsOn(1) = true Then
            'do what it takes to turn off
            LED1 = LEDoff
        Else
            'do what it takes to turn on
            LED1 = LEDon
    End If
    
    'Item 2
    If ItemIsOn(2) = true Then
            'do what it takes to turn off
            LED2 = LEDoff
        Else
            'do what it takes to turn on
            LED2 = LEDon
    End If
 
   'Item 3
    If ItemIsOn(3) = true Then
            'do what it takes to turn off
            LED3 = LEDoff
        Else
            'do what it takes to turn on
            LED3 = LEDon
    End If
    
      'Item 4
    If ItemIsOn(4) = true Then
            'do what it takes to turn off
            LED4 = LEDoff
        Else
            'do what it takes to turn on
            LED4 = LEDon
    End If
    
    'repeat for all items. 
End Sub

SetBaudrate(br57600)

Initialize

SetAllDigital

Output(LED1)
Output(LED2)
Output(LED3)
Output(LED4)

LED1 = LEDon      'verify code running and LED operation
LED2 = LEDon
LED3 = LEDon
LED4 = LEDon

DelayMS(1000)

LED1 = LEDoff
LED2 = LEDoff
LED3 = LEDoff
LED4 = LEDoff


Ticks = 0        'initialize ticks count

Timer.Initialize(1)

Timer.Items(Timer1).interval = TimerBase        '1000mS = 1 sec
Timer.Items(Timer1).OnTimer = @OnTimer   // timer event handler
Timer.Items(Timer1).Enabled = true
Timer.Start


While 1 = 1
    For I = 1 To NumberOfItems
        If ItemTriggerTicks(I) = GetTicks()Then
            ItemIsTriggered(I) =true
            ItemTriggered(I)
        End If
    Next   
        
    UpdateState    'call subroutine to set LEDs
Wend
orn posted some code counting TICKS to set the amount of time each LED is on and off without delays
 
After drawing up a schematic and using 1 LED/330 resistor combo per port pin, using a 5volt power supply (no MOSFETs required), and avoiding any issue with parallel LEDs etc.
Post #12 is funny.
 
yes basically. Why reinvent the wheel?
I like the word " permutations" Will look it up.
Just no parallel LEDs, Mosfets, or 12volt power supply.
 
Adding lots of changes to a code that Tumbleweed posted a long time ago. The dimming works rather well for this project.
Working on what goes where on the schematic. Using WHITE, YELLOW LEDs and a Bi-color LED (RED/BLUE) LED.
Placing LEDs to consider with the code ports.
schematic to follow. Am pretty sure this code has faults. Assembling a test board today to test code.
Code:
Device = 18F43K22  // CHANGE TO 18F2221
Clock = 8

// int osc and IO pin libraries
Include "intosc.bas"
#option DIGITALIO_INIT = true       // automatically call setalldigital
Include "setdigitalio.bas"

// hardware
Dim INDEX  As LongWord  //4294967295
Dim Counter As Word
Dim Counter_up As Word
Dim Counter_down As Word
Dim m As Byte
Dim w As Byte
Dim x As Byte
Dim y As Byte
Dim z As Byte
Dim bright As Word
Dim dimmer As Word
//BRIGHT_X IS FOR 4 DIFFERENT PORTS FOR 4 COLORS OF BRIGHTNESS ETC.
// all one color per port RED, BLUE, YELLOW, WHITE
Dim Bright_1 As LongWord        // a wider range of settings FOR A SMOOTHER TRANSITION
Dim Dimmer_1 As LongWord
Dim Bright_2 As LongWord        //
Dim Dimmer_2 As LongWord
Dim Bright_3 As LongWord        // a wider range of settings FOR A SMOOTHER TRANSITION
Dim Dimmer_3 As LongWord
Dim Bright_4 As LongWord        //
Dim Dimmer_4 As LongWord


Sub Fade(bright As Word, dimmer As Word, stop As Word, A As Byte, B As Byte, C As Byte, D As Byte)
    Dim dir As Boolean
 
    // figure out direction and account for 'repeat-until' end
    If (bright < dimmer) Then
        dir = true                // increase ON time
        stop = stop + 1
    Else
        dir = false                // increase OFF time
        stop = stop - 1
    EndIf
 
    Repeat
        PORTA = A            // ON time
        PORTB = B
        PORTC = C
    
        DelayUS(bright)
      
        PORTA = 0            // OFF time
        PORTB = 0
        PORTC = 0
        
        DelayUS(dimmer)
 
        If (dir) Then
            bright_1 = bright_1 + 1        // increase ON time
            dimmer_1 = dimmer_1 - 1        // decrease OFF time
            bright_2 = bright_2 + 1        // increase ON time
            dimmer_2 = dimmer_2 - 1        // decrease OFF time
            bright_3 = bright_3 + 1        // increase ON time
            dimmer_3 = dimmer_3 - 1        // decrease OFF time
            bright_4 = bright_4 + 1        // increase ON time
            dimmer_4 = dimmer_4 - 1        // decrease OFF time
        Else
            bright_1 = bright_1 - 1       // decrease OFF time
            dimmer_1 = dimmer_1 + 1        // increase ON time
            bright_2 = bright_2 - 1        // decrease OFF time
            dimmer_2 = dimmer_2 + 1        //increase ON time
            bright_3 = bright_3 - 1        //decrease OFF time
            dimmer_3 = dimmer_3 + 1        //increase ON time
            bright_4 = bright_4 - 1        //decrease OFF time
            dimmer_4 = dimmer_4 + 1        //increase ON time
        EndIf
    Until (bright = stop)
End Sub

main:
// init hdw
               // LED port - all outputs 2 LEDs per port in parallel 330 ohm resistor
TRISA = 0      // SET ALL PORTS AS OUTPUTS
TRISB = 0
TRISC = 0
TRISD = 0
TRISE = 0
 
   PORTC=%00000000  //turn off ports
   PORTA=%00000000
   PORTB=%00000000   

Bright_1 = 0
Dimmer_1 = 0
Bright_2 = 0
Dimmer_2 = 0
Bright_3 = 0
Dimmer_3 = 0
Bright_4 = 0
Dimmer_4 = 0


setalldigital
While (true)
    // fade brightness up
    Fade(1, 5000, 3000, %11001111, %00000111, %00010001, %11111111)

    // fade brightness down
    Fade(5000, 1, 1, %11001111, %00000111, %00010001, %11111111)
End While
 
Status
Not open for further replies.

Latest threads

New Articles From Microcontroller Tips

Back
Top