Continue to Site

Welcome to our site!

Electro Tech is an online community (with over 170,000 members) who enjoy talking about and building electronic circuits, projects and gadgets. To participate you need to register. Registration is free. Click here to register now.

  • Welcome to our site! Electro Tech is an online community (with over 170,000 members) who enjoy talking about and building electronic circuits, projects and gadgets. To participate you need to register. Registration is free. Click here to register now.

6v Regulator for a Generator System

Status
Not open for further replies.
Alec, can you trim the circuit down? Efficiently reduce it to it's essential elements?

The electronic version is so large and complex.

I hate to say it, but the 50 yr old mechanical regulator performs more functions, and in a smaller space.
 
Efficiently reduce it to it's essential elements?
I thought I had ;). Someone else may offer a simpler solution. Eliminating the existing generator indicator lamp would enable the circuit to be simplified somewhat.
The electronic version is so large and complex.
Well, not large. Apart from any components on a heatsink the remainder could fit in a matchbox.
the 50 yr old mechanical regulator performs more functions, and in a smaller space.
I thought I'd covered all the requirements. What does the mech reg do that the electronic version doesn't?
I won't be upset if you decide to stick with the mech reg :).
 
I apologize, i didn't mean to sound derogatory. Your skills in electronics are way beyond me, and this project wouldn't go anywhere without your considerable work.

Help me understand the schematic. Regarding the three small diagrams above the main schematic, do they represent three separate smaller devices to be added to the wiring loom?
 
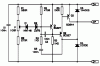
Those three little diagrams.
As stated, the circuit is a simulation.
The top left mini diagram simulates the existing generator with a D+ coil producing an output voltage V proportional to the current in the field coil (Lfield). The D+ coil has an assumed inherent resistance of 0.2 Ohms and the F coil has an assumed inductance of 0.3 Henries.
The middle mini diagram simulates your battery (discharged at 5.5V !), the optional charge current limiter (D1, R1, the only additions to the loom apart from the main regulator), the charge-indicator lamp (3W at 6V = 12 Ohms) and the ignition switch.
The third mini diagram simulates the existing load presented by the main/stop/tail lights, ignition coil, horn, ghetto-blaster, whatever. The 1 Ohm resistor provides a simulated 36W load at 6V.
Post #59 explains the remainder of the simulation. Shout if you want a more detailed explanation of any part of that.
 
Alec, how would you go about building the electronic regulator? My previous devices have been fairly small, so a perforated board with wired solder connections was fine, but I feel for this device a perf board would end up being too large. Would you use a homemade printed circuit board? Are there any other options?

Either way, after the holidays, I'll be making a breadboard version of the circuit, merely to test everything out before final construction.
 
Ideally a pcb (even two stacked pcbs, if space is limited) would be used (someone else on the forum may be able to help there), but most of the circuit (the parts not carrying high current) would be ok on stripboard (not that horrible type of matrix perfboard which has individual 1/10" squares of copper :)) or breadboard. On stripboard, resistors can be mounted on-end to save board space. The main high current path is from the D+ terminal, via R11 and M3 to the B+ terminal. A second high current path is from M2 to the DF and Gnd terminals. These paths would need to be wires/strips able to handle 10A/2A respectively without getting hot. The trickiest bit might be making good robust low-resistance electrical joints to R11 (a surface-mount component), which has to pass up to the chosen current limit (~8A-10A). M3 would need a small electrically-isolated heatsink, which could be a metal box housing the regulator. A water-proof and vibration-proof way of connecting wires to the regulator would be required.
Bear in mind that the regulator properties (inductance etc) are guestimates for simulation purposes; so how a built regulator circuit will behave compared to the simulated one is unknown. Some tweaking is to be expected. Hopefully the real world and simulated world won't be too far apart.
 
For the high current items I can make wire connections, no problem there.
But a stripboard isn't that much different from a breadboard. Look at the regulator schematic. Isn't the board going to be fairly large, given the space it's supposed to fit?

Don't get wrong. I like stripboard, because it's a technology I'm comfortable with. But I'm still a beginner. Is there a computer program or software that will arrange the components and connections in the smallest possible space?
 
Is there a computer program or software that will arrange the components and connections in the smallest possible space?
I'm not aware of any. You can use software such as Eagle to do auto-routing of connections, but it still needs manual input for component placement.
To minimise space, you could use surface-mount components on a custom pcb or on stripboard. Are you able to solder, say, resistors as small as 1.2mm x 0.6mm?
 
Last edited:
Resistors as small as 1.2mm? I don't think so. I use a standard soldering iron, and I think a resistor that small would get swallowed up by the solder.

The schematic shows the resister values and transistor models, but what current should they be rated for?

Pardon my questions, but I'm still fairly new at this.
 
The schematic shows the resister values and transistor models, but what current should they be rated for?
All resistors except R1 and R11 could be 1/8W. R1 would be 10W or more. R11 would be 30W or more, surface mount. I haven't yet investigated which FETs would be best (right specs, easily sourced). Who is your preferred supplier?
Still up for consideration in a practical design are transient-suppression components, terminals, FET mounts, housing.
Time permitting over the Christmas period I'll see if I can sketch up a small-size stripboard layout.
 
Why is R11 surface mount?
Because in my limited searching I was unable to find an axial 0.01 Ohm (or lower) resistor, able to handle 10A or so, at a sensible price ;). That said, here's one that would seem ok.
 
Last edited:
The attached zip file contains html files which open in Firefox and show a rough stripboard layout, size ~ 2" x 2.2", for a slightly simplified version of the last schematic I posted.

Edit: The html seems to have got somewhat garbled, but the board layout shows ok. IC connections aren't shown, but would be by jumper wires.
 

Attachments

  • 6Vreg_files.zip
    107.3 KB · Views: 306
Last edited:
Alec, sorry for the delayed response. Thanks for the layout guide! I'm going to print it out, manually drawn in the connections, and post a copy of it so you can see if it looks okay. Does that sound good?
 
I did say it was a rough layout ;). Just a starter for you to improve on.
I suspect the cost of building your own reg won't be much different from buying an off-the-shelf one. Have you considered that? I see them advertised for around £32 ($50).
 
A rough layout?! Please, I don't have the technical expertise to improve on anything. I, and the rest of the motorcycling community, need you electrical experts to figure it our for us.

Yes, there are some voltage regulators for sale online. I hesitate to buy them, especially the 6V version, because simple bargain basement products are common, that do the bare minimum. I'd like a quality system that does the job correctly. For a few dollars more and a little time you are assured a quality product you build yourself . If I'm wrong, let me know.
 
In truth, the mechanical regulators have a good reputation for reliability, although at 50+ yrs old they must be at then end of their life.
If I am wasting our time let me know.
 
If you're happy with the layout I posted it should suffice. I assumed chocolate-block style connectors would be attached at the top.
The layout allows for each of the heavy-current paths (D+, B+) to consist of three adjacent strips in parallel, reinforced by copper wire if necessary, and should accommodate a current-sense resistor (R11) of the type I linked to. There is space too for a transient supressor (TVS).
 
Here's the circuit version I referred to in Post #73. It now uses two rather than three FETs, but includes additional components (C1, C2, TVS) for IC supply smoothing and transient voltage suppression.
6VregMk3.PNG
 
I found a schematic for the Bosch regulator. It's not my reg, but the "next" version, for BMW motorcycles in the 1970s with alternators. The current is rectified by a diode board, and then sent to the regulator. I'm pretty sure it doesn't accommodate emergency starting by pushing the bike (connection B+ on the Benelli). Looking at this, does it simplify things?

Here is the page I snagged if from: https://bmwmotorcycletech.info/vrschematic.htm
 

Attachments

  • BMW V Reg for alternator bikes.gif
    BMW V Reg for alternator bikes.gif
    7.8 KB · Views: 342
Status
Not open for further replies.

Latest threads

New Articles From Microcontroller Tips

Back
Top