Krumlink
New Member
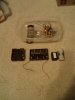
When I build robots, each one usually has a special design made out of Aluminum flashing (Spaghetti, Phobug) Cardboard (Fusilli) or everybody's favorite, Tupperware (fettuccine). But now that the robots become more complex, I need a more universal way of building my robot bodies so that I don't have to spend a bunch of time making a new body for the robot. I could just swap in the new control board and I would already be ready to go, no hassle. That is why I came up with Rflex1. Rflex1 is a Robot body that is ready to go, all you have to do is plug in the power and H bridge controls, and you are ready to go! (Pic1)
Rflex1 Stands for Robot Flexible 1. Meaning that I could easily adapt this body to other uses, say if I had to drill a hole, I could easily do that. Then once I have the entire robot completely made up, It would be in modules, making it easy to swap them in. A entire robot name would be (light seeking module) Lightflex1, which results in really cool names! Then when you come out with a better Light Seeking Module, you would call it Lightflex2! So much fun
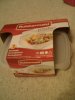
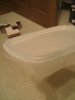
The Rflex1 Body consists of a RUbbermaid "TakeAlongs" Tupperware at 4 cups. This makes for a large body ready to go. The pack that I got was only 3 dollars (at Meijer) and comes with 3 of them, perfect if you accidentally mess up. (Pic 2)(Pic 3)
Tools Needed
Dremel with Drill Bit Attachment (Small size for cutting plastic)
Permament Marker
Parts Needed
Tamiya Twin Motor Gearbox #70097
Tamiya Truck Tire Set #70101*250
Tamiya Ball Caster (Metal Version) #70144
Rubbermaid "TakeAlongs" Rectangle 4 Cup
Where 2 Get
You can get the Tamiya Stuff at www.pololu.com really cheaply, with free shipping over $25. The rest should be easy (Tupperware at Meijer)
Step 1.
After ordering and receiving your Tamiya Stuff, you should proceed to assemble them.
NOTE: Assemble the Gearbox in configuration "C"
NOTE: Assemble the Caster in the 27mm Configuration
The Tires should be very easy (I hope for you) to assemble. Put a tire on each axle of the gear box. You may need more "lube" for the gearbox, as it can be VERY noisy.
Step 2.
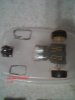
Now it is time to connect the Gearbox and caster to the Tupperware. You will not need the lid for now. Drill Holes in the front and Rear as shown in (Pic 4).
If you mess up, you always have extras
Step 3. Now mount the Gearbox on the tupperware and tighten nuts down FIRMLY. Be careful not to strip them.
Step 4. The caster will make the front of the robot dip slightly down, so you can use a 1/4 of an inch spacer to make it more level. It is your decisison. THen mount that into the Tupperware.
Step 5. You now need to install Your H Bridge Motor Controller system. I reccomend making a seprate one that will stay in the robot by itself, and be sure it can handle up to 0.6 amps (motor specs attachment)
Step 6. Attach the motor terminals to the H bridge and make sure everything is nice and secure. After completing, Adorn your robot body with something pretty (like stickers )
Step 7. Drill holes necessary for future modules, for example the Light Seeking module.
Step 8. Install a 1.5V to 3V Battery Holder/Pack over the Gearbox for the Motor and H Bridge. Also install a 9V Battery Holder (or two) for the Robot's Circuitry. These motors use up 0.6aH so they like their own little supply.
Step 9. You should be done with your Rflex1 Robot Body. Hopefully you will find some use for it.
NOTE: All original Text, All original Pictures. Please tell me how you like it
(I am very sorry about the attached images, they would not let me shrink them down)
Rflex1 Stands for Robot Flexible 1. Meaning that I could easily adapt this body to other uses, say if I had to drill a hole, I could easily do that. Then once I have the entire robot completely made up, It would be in modules, making it easy to swap them in. A entire robot name would be (light seeking module) Lightflex1, which results in really cool names! Then when you come out with a better Light Seeking Module, you would call it Lightflex2! So much fun
The Rflex1 Body consists of a RUbbermaid "TakeAlongs" Tupperware at 4 cups. This makes for a large body ready to go. The pack that I got was only 3 dollars (at Meijer) and comes with 3 of them, perfect if you accidentally mess up. (Pic 2)(Pic 3)
Tools Needed
Dremel with Drill Bit Attachment (Small size for cutting plastic)
Permament Marker
Parts Needed
Tamiya Twin Motor Gearbox #70097
Tamiya Truck Tire Set #70101*250
Tamiya Ball Caster (Metal Version) #70144
Rubbermaid "TakeAlongs" Rectangle 4 Cup
Where 2 Get
You can get the Tamiya Stuff at www.pololu.com really cheaply, with free shipping over $25. The rest should be easy (Tupperware at Meijer)
Step 1.
After ordering and receiving your Tamiya Stuff, you should proceed to assemble them.
NOTE: Assemble the Gearbox in configuration "C"
NOTE: Assemble the Caster in the 27mm Configuration
The Tires should be very easy (I hope for you
) to assemble. Put a tire on each axle of the gear box. You may need more "lube" for the gearbox, as it can be VERY noisy.Step 2.
Now it is time to connect the Gearbox and caster to the Tupperware. You will not need the lid for now. Drill Holes in the front and Rear as shown in (Pic 4).
If you mess up, you always have extras
Step 3. Now mount the Gearbox on the tupperware and tighten nuts down FIRMLY. Be careful not to strip them.
Step 4. The caster will make the front of the robot dip slightly down, so you can use a 1/4 of an inch spacer to make it more level. It is your decisison. THen mount that into the Tupperware.
Step 5. You now need to install Your H Bridge Motor Controller system. I reccomend making a seprate one that will stay in the robot by itself, and be sure it can handle up to 0.6 amps (motor specs attachment)
Step 6. Attach the motor terminals to the H bridge and make sure everything is nice and secure. After completing, Adorn your robot body with something pretty (like stickers
)Step 7. Drill holes necessary for future modules, for example the Light Seeking module.
Step 8. Install a 1.5V to 3V Battery Holder/Pack over the Gearbox for the Motor and H Bridge. Also install a 9V Battery Holder (or two) for the Robot's Circuitry. These motors use up 0.6aH so they like their own little supply.
Step 9. You should be done with your Rflex1 Robot Body. Hopefully you will find some use for it.
NOTE: All original Text, All original Pictures. Please tell me how you like it
(I am very sorry about the attached images, they would not let me shrink them down
)