Continue to Site

Welcome to our site!

Electro Tech is an online community (with over 170,000 members) who enjoy talking about and building electronic circuits, projects and gadgets. To participate you need to register. Registration is free. Click here to register now.

  • Welcome to our site! Electro Tech is an online community (with over 170,000 members) who enjoy talking about and building electronic circuits, projects and gadgets. To participate you need to register. Registration is free. Click here to register now.

Trying To repair transformer board from Husqvarna sewing machine

Status
Not open for further replies.
I have a husqvarna chainsaw, i didnt know they made sewing machines!

Your dead component could be a varistor, or I'd guess its a ntc thermistor, but thats only a guess.

What numbers can you see on this dead component?, and are there any more electronic boards in the machine or is this it.

If it is a thermistor then maybe its sposed to be a soft start for the motor, to protect the mechanicals, is the motor ok, maybe its shorted and blown this too.
 
In similar packages there are PTC and NTC.
NTC's are used for soft start and PTC"s are used for overload protection.

When a motor starts and stops frequently, the soft start no longer works as it stays hot.

Good luck reading the value. Better to order the board
412 17 86-02
 
Last edited:
Can i find parts to bring this thing back to life?

ANY help would be appreciated
What is not shown is the encapsulated transfo. that has to be unsoldered to get to the component side
Jeebus it's your lucky day first time poster.

I've played with these several times and found my pics. Its mostly the time delay fuse popping and a couple with a flaky micro switch.
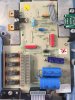
This board is simply a dual bridge linear power supply. No reverse engineer diagram so can't remember that voltages but one is for the electronics cpu board an the other provides for the motor.

Your component is a varistor on the primary of the bridge, It is used for surging.
So you either got a bigass surge, and need to check your main board for frying/shorting, or a bridge diode/s shorted and took it out which may have put ac into your main board. I can see from your pics that the fuse took a beating as well.
You need to determine what the damage is.
So, after you verify that the 4 small diodes are not shorted, you can remove the remaining varistor bits for a try without it connected to the rest on the machine to see if'n your voltages are correct and DC.
Then check the input to the board for shorts. If all is well then find a new 14 volt varistor (i think from my zoomed pic). and your done.

IMG_5122e.JPG


IMG_5133c.JPG
 
If the "varister" is the only thing wrong, it's likely just a PTC therister which would protect the motor if stalled.

They can generally be selected knowing the motor characteristics.
 
Viking Xformer.JPG
What is the component on the bottom of the circuit board on PFOFIT's picture post on Feb 17 2015 ? Mine burned up !!! Says GPC 40/085/56 PME271M610
Can I find a replacement? It split apart then burned up, very hot.
 
Last edited:
Thanks for the quick help. I have ordered the cap. That should do it because the sewing machine was working OK.
I will take your advice and check the transformer after removing the old cap and cleaning up the burn residue.
Thanks Again "pfofit" . You made my day and you have a good day !
 
Thanks from me too, pfofit. After reading this thread I'm sure that I will be able to fix my machine.

Update:
One of the bridge diodes was open - I replaced all four for good measure.

Also my PS PCB has a second socketed fuse - 860 ma that was blowing. It is located just above the on/off micro switch - and my PCB does not have the two circular components at that location, just the fuse. The cause of the fuse blowing was a shorted 1000 mfd 40v electrolytic cap on the CPU board in the machine. I replaced it and all is well.
IMG_0086.JPG

IMG_0090.JPG
 
Last edited:
Those electrolitic capacitors dry-out and become worthless after 25 to 30 years. I had two shorted elcaps in my wife’s machine. Once I got access to the board (which I could not have done without the detailed service manual), I replaced all three present capacitors. This costed me 23 euro’s
Service manual can be found here:
I did not disassemble the board, but used the original capacitor leads to connect to the new capacitors.
 

Attachments

  • B059A7CB-F096-4510-92B1-BDBF5E06F950.jpeg
    B059A7CB-F096-4510-92B1-BDBF5E06F950.jpeg
    840.3 KB · Views: 476
Status
Not open for further replies.

Latest threads

New Articles From Microcontroller Tips

Back
Top