Continue to Site

Welcome to our site!

Electro Tech is an online community (with over 170,000 members) who enjoy talking about and building electronic circuits, projects and gadgets. To participate you need to register. Registration is free. Click here to register now.

  • Welcome to our site! Electro Tech is an online community (with over 170,000 members) who enjoy talking about and building electronic circuits, projects and gadgets. To participate you need to register. Registration is free. Click here to register now.

Time Delay Relay Circuit.....is this doable?

Status
Not open for further replies.

Draguen

New Member
This is my first time here, so Greetings To All.
Just so you know, I am new at this, I have made a few projects before, but I learn as I go along and my only repository to electrical knowledge is the internet. I have a basic knowledge on how to use certain parts and that is about it. Anyways....

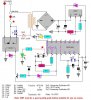
I have adapted (slightly) a 24 hour timer circuit from a certain Ron J (hope this isn't spam, but I believe I should give credit, where credit needs be), to suit my needs. The general idea was to have a "programmable" timer to cut the power to an appliance, for a specified amount of time, with the possibility to turn on and off the timer at will, and to have a reset for the timer. The circuit itself will run on 12 volts. Other than that, I do not think the rest of the info to be relevant to my problem.

When I would close SW1 (momentary pushbutton), the circuit should turn on, closing Q2, keeping the circuit on. The Relay should energize and cut the power to the appliance. The timer should also start the countdown. When the countdown reaches zero, Q1 should then cut the main power, deenergizing the circuit, and turning the appliance back on.

But what I am unsure of, is, when the timer sends Q1 high, will the circuit actually turn off? When the circuit loses power, Q1 should revert to NC state, closing the loop. Will Q2 have enough time to reverted to NO? Is there a charge large enough in the circuit to keep Q2 on when the timer sends Q1 high (thus making all this work useless)?

These questions could be irrelevant if I could make sure Q1 stays on long enough to actually kill the power and untrigger Q2?
Is this possible? If so, how (hoping that it isn't too complicated)? I have tried to research the matter, but as you can guess, no luck, maybe my noob status caused me to complicate things too much...... If there is better than what I came up with, please don't be shy.

If anyone can help, it would be appreciated.
Thanx ahead of time.

I apologize if I didn't use the right terms anywhere (if not everywhere), I unfortunately do not know better (might just be why my searches came out fruitless).

P.S. In case anybody noticed, I have yet to add the Timer's Power Off option to my schematics, I am simply gonna put a SPST switch after the diode bridge.

Edit : Might have put this in the wrong category (should'a been in Electronic Projects Design/Ideas/Reviews), If an admin reads this, feel free to move, dont think I can do it myself, and I wont double post.

**broken link removed**
 
I can't seem to find enough information on the 4060 to enable me to see exactly what's going on with that circuit. I've downloaded two different data-sheets for the device but neither fully explain it. I've managed to work out that it's a 14-stage binary counter and with that in mind I would presume your timer circuit works by switching off power once a certain count has been reached?

I can see that pin 12 is your reset, pins 9 and 10 form your oscillator and, from the look of it, pin 11 is used as your output to initiate the switching of the timer circuit. I can see that you've also got pin 7, which is the output for Q4, setup as an LED indicator output (for whatever reason).

I can't seem to find out what exactly pin 11 is for. It doesn't seem to be any of the counter outputs, and infact according to the datasheet the pin is an input not an output, although the datasheet doesn't mention what exactly the input does. Is anyone else familiar with the 4060?

Brian
 
Actually, looking closer at the circuit it doesn't appear that you're using pin 11 as the output to switch the timer on/off so although I'm still confused as to what pin 11 is being used for, I can't now see how the 4060 is relevant at all in this circuit? I can't see how it's being used to output any information at all, other than the LED which indicates when Q4 is high.

Not sure on this one.

Brian
 
I cant really say I understand it myself, not even close.
I dont know if I can do this but here is the webpage I found this on:
**broken link removed**
Maybe a few answers can be givin there.

D3 is supposedly used as a visual indicator to set the timer to wanted delay. D4 supposedly flashes while the oscillator is running. Both are optional.

For the pins not connected to anything on the chip, they should be used to select the range I will use for the time delay. The range arrow on the right side of the schematics, is to be connected to the corresponding pin on the chip, to give me a certain range of time, that I will tweak with VR3 to desired time.
I did take me a few minutes to actually understand that from the webpage (there are tables to help choose which pin). I hope I didn't give myself a headache for nothing!! (I just assumed the guy was right, and things worked as stated)

Hmm, maybe I was aiming to high in trying to make this project.....
 
As drawn your circuit will not work.

Q2 will not hold the power on, the voltage supplying the base current is less than the voltage at the emitter, this is due to the LM317. Ergo Q2 cannor possibly be turned on.

VR1 and VR2, although there will be a range of adjustments where these will work, if both are set to low (zero) resistance, the LM317 output will be short circuited.

Your requirements are (to me at least) ambiguous.
Do you want the relay to be energised for an adjustable time and then de-energise. <end of cycle>.

Or,

Do you want the relay to be energised for an adjustable time and then de-energise for some time and energise for an adjustable time. <cycle repeats>.

The original circuit by Ron J look ok, but your variations are not going in a favourable direction! :( :(

Define your exact requirements and we will be able to help you.

JimB
 
I assume what you wanted is pressing SW1 would turns relay ON and after sometimes the relay and the unit turns OFF.

The modified circuit can suit your need. You are better off using a spare contact from the relay to switch off the circuit. Use a relay that has more than one pair of contacts.
 

Attachments

  • schematic1y.gif
    schematic1y.gif
    29.4 KB · Views: 1,825
Draguen said:
This is my first time here, so Greetings To All.

Welcome aboard Draguen. Nice looking dragon :cool:

Draguen said:
I am new at this, I have made a few projects before, but I learn as I go along and my only repository to electrical knowledge is the internet.

Join the club. In fact, I am so new at this that I can't help you. :lol: Just wanted to say hi...
 
Ahhh I understand your circuit a bit better now. The 4060 is being used how I said it would be, only your schematic doesn't show which of the outputs you're using. That's why I became confused as to what the 4060 should be doing. With the range output connected to a relevant output on the 4060, the timing part of the circuit should work.
 
I recently designed a similar circuit for a friend.

He wanted to turn a fan on for a particular time and then switch it off. So I connected the start button in series with the mains with the relay contact in parallel. Thus no energy is consumed when it is off.

When you press the switch, the unit is powered, the relay operates and holds the power on after the button is released. After the delay, the timer releases the relay and the mains power is switched off.

Len
 
Wow, never expected all this help! THANX

Joel Rainville said:
Welcome aboard Draguen. Nice looking dragon 8)
Thanks. Fun to see a fellow Quebecer, a rare occasion for me. Salut 'sti! :D

ThermalRunaway said:
your schematic doesn't show which of the outputs you're using. That's why I became confused as to what the 4060 should be doing.
Sorry 'bout that. I am planning on wiring each output pin to jumper pins to be accessable from the outside of casing, so I didn't bother putting them in the schematics (would have made a mess of it). I need a 5 minute delay now, but in a few months I will need 3hours. I want to be able to change the set time at will, without having to open the casing. (also thinking about using a 10 position rotary switch, if they exist, if I can get one)

JimB said:
Q2 will not hold the power on, the voltage supplying the base current is less than the voltage at the emitter, this is due to the LM317. Ergo Q2 cannor possibly be turned on.
Hmm, guess I missed that one in Transistors 101. Gonna look into find out more about how to correctly use a transistor.
JimB said:
Your requirements are (to me at least) ambiguous.
Do you want the relay to be energised for an adjustable time and then de-energise. <end of cycle>.
Correct. When the relay is energised I want the load off (appliance). I also want the whole unit powered down when not in use.

eblc1388 said:
Use a relay that has more than one pair of contacts
The thought of those existing hadn't even crossed my mind.

ljcox said:
So I connected the start button in series with the mains with the relay contact in parallel
Putting the switching mechanisms on the mains? Meaning before the transformer? Or after?
Both transformer and appliance take the same voltage, while one is on the other is off. If before the transformer, then would an SPDT type relay be optimal? When relay is energised, power goes to timmer unit, when deenergised, power goes to appliance. If after the transformer, then I guess I would need a DPDT relay? One pair for the timer unit, one pair for the appliance. Which would be best?

BTW, I laughed when I thought of the time it takes me to put this together compared to the time it takes you guys to take it apart!! lol

You guys pretty much ironned this out for me.

Thank-you

I will be making a new schematics, with all the bells and whistles, hoping it to be my final one. I will post it up, maybe it can be of use to someone else.
 
Well here it is. Hope this fans out.

**broken link removed**

Since the original schematics had a 4700 ohm resistor in series with the base of the transistor, and eblc1388 changed that to a 10k ohm, I know not which to use, so I didn't identify it. Shouldn't cause any trouble though.

Thank-you Everyone.
 
You can use 4K7 for the resistor. The connection of the LED D3 and 4K7 should be directly to pin9. Please use a fuse with suitable rating to match your load.
 

Attachments

  • schematic2x.jpg
    schematic2x.jpg
    65 KB · Views: 757
Oops. For LED D3, it was my mistake when redrawing schematics. Thanks for pointing that out.

For the fuse, I thought only about protecting the circuit. Since the load (3 water pumps) are plugged directly into "the wall outlets", I didn't believe I should need one for the load. To protect the load, I would need a much higher rated fuse, could that protect the circuit anyway? Use two, I guess.

Thanx again.
 
Thanx for the input.
Unfortunately I want it the other way around. I want power to be given after timer expiration, and no power during timer operation. :wink:
 
Status
Not open for further replies.

Latest threads

New Articles From Microcontroller Tips

Back
Top