Continue to Site

Welcome to our site!

Electro Tech is an online community (with over 170,000 members) who enjoy talking about and building electronic circuits, projects and gadgets. To participate you need to register. Registration is free. Click here to register now.

  • Welcome to our site! Electro Tech is an online community (with over 170,000 members) who enjoy talking about and building electronic circuits, projects and gadgets. To participate you need to register. Registration is free. Click here to register now.

Tech Tips Thread

Status
Not open for further replies.

Mikebits

Well-Known Member
I know all of you have come up with clever ways to test, build, or otherwise do something in electronics, either to save time, cost, or just because it was cool. If you have something that you think would benefit the ETO community, or simply because you thought it was nifty. Post it here. Let's see how long we can keep this thread going. I will start off.
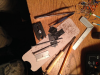
The other day, I needed a 1 ohm resistor for a DC circuit I was working on. I did not have one and did not want to wait to purchase one. So I went and rolled my own, resistor that is. :)
Tip 1.
I had some 32 AWG magnet wire which was about .25 ohm per foot. Did the math, and measured out the right length of wire.
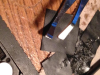
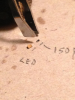
I then needed something to form the wire on, so I took some fiberglass rod I had, drilled holes on each end to insert some 22 AWG leads into and then formed the resistor to a shape on my lathe which would hold the magnet wire in place (of course, you can roll your magnet wire on any other form factor you may have on hand.
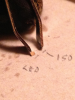
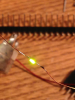
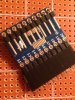
Below is my preformed resistor minus the magnet wire.
diyres1.jpg

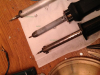
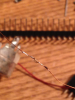
Once that was done, it was a simple matter of rolling the magnet wire onto the resistor form (I used my lathe as a wire winder to save time).

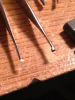
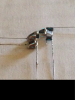
Once done and not very pretty but was pretty solid, I soldered the magnet wire to the 22 AWG leads I had glued into my resistor form earlier (I think I did not mention that before, now ya know)
diyres2.jpg
I then checked the ohmic value on my trusty Keithley 2010 DMM.

diyres3.jpg
Okay so I have about 3% error, but close enough for my circuit.

Tip 2.
Need a low ohmic value resistor (in milliohm range) for current sensing perhaps? A paper clip has about 20 - 30 milliohm resistance, just roll straightened paperclip on a shaft and you have a milliohm resistor.
(Note: for tips 1 and 2, these DIY resistors have a lot of inductance, so may not work in a high frequency circuit).
 
You could wind the wire around a few-watt larger value resistor to save the step of making the body.

Make sure the turns don't touch if you use a paper clip :)
 
Some Proto boards often do not give much space on adapter/breakout boards, so why not (as long as the board planning permits) place it as a blade card, or close enough.

Snipping the right angle pins, then a bit of stone sanding to shorten the opposite side to prevent shorts from close passing pins to more acceptable distance.

And then some stacking headers for space fillers from the upper most 0.1 right angle headers that just need to be a bit taller than these (the stackers do need be taller). as well as 0.1 headers to be soldered to the board, the cards can be removed and those headers stay on PCB.

... Or just wire out everything, just for fun of coarse!:) (as in rough draft components)
 

Attachments

  • IMG_0074.JPG
    IMG_0074.JPG
    1.1 MB · Views: 331
  • IMG_0071.JPG
    IMG_0071.JPG
    1.2 MB · Views: 293
  • IMG_0073.JPG
    IMG_0073.JPG
    1.2 MB · Views: 277
  • IMG_0068.JPG
    IMG_0068.JPG
    1.1 MB · Views: 278
  • IMG_00772.png
    IMG_00772.png
    1.9 MB · Views: 286
Back to resistors for this post.

Variable power resistors - useful in battery chargers - are relatively expensive and are not normally available from your spares/junk store, but you can make a preset variable power resistor.

I used to have some Constantan wire, which is ideal, but if not you can re-purpose resistance wire from scrap electric fires, cookers etc.

Then get a scrap mains plug, or similar, and smash the plastic off to leave the three terminals.

Cut the resistance wire to a length to get the maximum resistance you want and thread the wire through the hole in one of the plug terminals to form the wiper.

Then connect a plug terminal to each end of the wire and tighten up the screws.

You then have a power preset resistor- just move the first terminal along the wire and tighten the screw when you get the resistance value required.

To connect the home made power preset resistor to your circuit, either fit wires in the terminal holes along with the resistance wire, or solder wires to the terminals.

spec
 
Last edited:
laptop_T42_01_c_500px.jpg


The power connectors on laptops are awful things and always wear out. They are not even satisfactory when new. The problem is that the socket mating area is plastic, and poor plastic at that.

But, if you have a laptop with a loose intermittent power connector, here is a fix that will ensure that the power connection will be better than new and will not wear out again (this may not be possible with some of the later more complex power connectors).

Get a small piece of very thin flexible stainless steel (SS) sheet- the sliding aperture covers from some 3.5 inch floppy disks are ideal (I have about 30 and it is surprising how useful they are).

Cut a rectangle of SS sheet the correct size to wrap around the laptop power plug outside mating surface and butt up without overlapping.

**broken link removed**

Hold a solid rod, the same diameter as the power supply plug, in a vice and carefully form the SS rectangle into a tube around the rod in the vice.

Look inside the power socket of your laptop- there should be one or two sprung prongs (contacts)- those weedy little prongs are all that connects up to 6A to your laptop. Or there may be a single bigger prong.

upload_2017-2-2_6-42-54.jpeg


It is most important to make sure you do not damage the prongs but if they are bent, which they often are, carefully straighten them out so that they stand proud but will push down into their recesses and spring out when released.

Fit the stainless steel tube to the power plug and attempt to fit the plug with tube to the laptop power socket. The chances are that the plug will only go partly in or perhaps not at all.

This is the delicate part and there are various approaches, but I will just describe the objective.

Remove some of the plastic inside the laptop power socket until the socket and tube are a tight fit (remember not to damage the prongs).

With any luck, you will reach a stage where the sleeve will stay in the laptop power socket and the plug will simply plug in and out as normal, but the fit will feel more solid and the electrical contact will be more reliable.

Remove the SS sleeve and, if necessary, bend the prongs slightly so that they are more prominent, and make good contact with the SS sleeve- be very careful.

If the tube keeps coming out with with the plug, bend the tube open a touch and/or file the tube internal face so that the plug is a secure fit. If all else fails, you can bond the sleeve into the socket, but use the minimum amount of adhesive and keep the adhesive well away from the prongs (contacts).

Finally the lightest touch of grease on the mating surface of the power plug will put the finishing touch to the operation.

I have greatly simplified the description of the modification process for clarity. In practice you will need to do some fettling with needle files and possibly drills. You will also need to file the SS tube to make it smooth both inside and out.

I first did this modification on a written-off Lenovo T42 laptop which had been used on building sites and was full of sand and cement dust. The back-light was intermittent and the fascia was cracked and, of course, the power plug was hardly making contact and kept falling out. A good clean inside and out, a new CFL, new fascia, ($25US total) and the above power socket modification and the T42 worked perfectly for a number of years until, one day, it was finally written off in a major accident.

spec
 
Last edited:
Who has a tip for holding those tiny 0603 chip components in place while you attempt to solder it down? I had nothing sticky on hand so I tried some pancake syrup. It actually worked and the smell from the board made me want breakfast :)
 
I find that the probes that come with multimeters are a touch big to fit and stay in the sockets of Canon D type connector and other connectors.

But, if you straighten out a stainless steel paper clip and hold the resulting wire in a crock clip you have a probe that fits perfectly.:)

spec
 
Soldering as with in any direction/hobby can take time and an absurd amount of patience as with many things. Small tools can be used :D.

An LED for a side project during an on going larger one, This is for the humor of the smaller size of things category.

Some tools, some irons, and a messy desk is all that's needed!

:EDIT: Also one does not all ways need the higher, better tools in most any case, tho if I'm kidding myself, the nicer ones would be nice to have.:)

Also Electrical tape with sticky side up and edges taped sown to a stable surface can help to place parts for soldering, all tho it can smelt and create a real mess as well as allow the parts to shift and other tapes could work. Tho some may cause damage on tryng to free the parts after cooling unlike poly or vinyl type electrical tapes that are not too aggressive on holding. (Think partially dried rubber contact cement for when the vinyl electrical tapes glue is smelted a bit)

The tweezers can be used to hold parts in place with light pressure, as with smd resistors the film on the ceramic/glass material can be altered/indented by the pressure of the tweezers tip if over heated. Facing a fact of their size makes this next to impossible at most times so not good for important project builds. The Iron used is a Doorman 30W with an Diode placed inside the irons HOT lead wire from Mains to Anode to Cathode to iron coil drop to near 15W avg. Some larger irons tend to operate better at reduced power, A 60W dropped to near 30W has gave me longer life of the tip in aggressive use for de soldering of parts that tend to eat away at the tip where a 30W could work.

The large one is the dropped 60W a KTB-60W Sino foreign joint venture Ningbo Zhensheng Electric Appliances CO.,LTD.China.

Don't say that line few times too fast.....

The Middle is a Radio Shack, selectable 15W/30W (can't find my red book on model charts on it's model number) dates back to 2003-2004, and the original tip has finally worn down.

Magnet wire from a speaker coil that had seen better days. (salvage from being left out in the weather from local land fields electronics scrap yard)

Images, I do need to start reducing the image quality and the size more than. Pokes at the small LED.... it bright!
 

Attachments

  • res01.png
    res01.png
    1.1 MB · Views: 264
  • res1.png
    res1.png
    1.2 MB · Views: 260
  • res2.png
    res2.png
    371.2 KB · Views: 271
  • res3.png
    res3.png
    570 KB · Views: 251
  • res4.png
    res4.png
    648.4 KB · Views: 259
  • res5.png
    res5.png
    597.4 KB · Views: 258
  • res7.png
    res7.png
    984.4 KB · Views: 258
  • res8.png
    res8.png
    986.9 KB · Views: 258
  • res9.png
    res9.png
    690 KB · Views: 251
  • res9.png
    res9.png
    690 KB · Views: 262
  • res10.png
    res10.png
    823.7 KB · Views: 243
  • res10.png
    res10.png
    823.7 KB · Views: 268
  • res11.png
    res11.png
    775.5 KB · Views: 269
  • res12.png
    res12.png
    764.7 KB · Views: 261
This is not really a tech tip but it is related. I don't know how many you use correction fluid: Tippex, Snopake, Bicc. I use it by the gallon, as did many colleagues at work.

The problem is that after you have used about a quarter of a bottle the correction fluid thickens and finally dries out. This was not a problem in the old days before health and safety became a religion rather than a science, but about 15 years ago the little bottles of thinning solvent were banned.

The lads at work tried many substitutes and the closest they got was isopropyl alcohol, but this formed more of a suspension rather than thinning the correction fluid. The problem of finding a suitable available solvent for correction fluid was also discussed extensively on the net at the time of the ban.

Then, one day, I dropped some correction fluid on my PC keyboard and the only thing handy at the time was some lighter fluid, which I put on a rag and it immediately removed the dried correction fluid, no problem. Then I realized: lighter fuel is the answer.

Since this discovery, drawing circuits and hand writing is back to the old carefree days because I can keep my correction fluid at the optimum consistency and white out big areas at will.

Only a small thing but it has made a big difference to me.:joyful:

spec
 
Last edited:
I find that the probes that come with multimeters are a touch big to fit and stay in the sockets of Canon D type connector and other connectors.

But, if you straighten out a stainless steel paper clip and hold the resulting wire in a crock clip you have a probe that fits perfectly.:)

spec
Along the same concept, I have found those jumper wires made for Breadboards fits nicely.
 
upload_2017-2-10_11-37-47.png


This is another tip that is not directly associated with electronics, but it may give you more time to persue you favorite hobby. It concerns weeds.

Why god invented weeds I do not know, and why weeds have to be so perverse is a mystery- they have billions of acres of nice fertile soil to grow in world-wide so why the hell do they have to grow in cracks in pavia, on stone walls, and even on roofs.

I have a constant battle with weeds, especially in older houses that have large gardens and plenty of nooks and crannies for weeds to grow in.

In the days before global warming when we had global cooling and the papers were full of scares about an icy death for mankind, there was Paraquate, the most effective weed killer ever invented. It will kill everything stone dead. The trouble is that it will also kill you, in a nasty way too.

Way back, I used to pull the weeds by hand, or where possible, burn them with a blow torch.

Then this wonderful weedkiller came out. You sprayed it on a lawn and in a week the weeds grew like wildfire. When I first used it I though that this is fine weedkiller. But a week later the weeds droop and turn to dust. And the best part is that the grass is untouched. Then the health and safety boys put the mockers on that and the weedkiller was banned, so it was back to pulling weeds by hand.

The next move was sodium chlorate. It is not selective but does last a year. Sodium chlorate was also banned.

So the follow up was glyphosate, which is available under various trade names. Glyphosate works but no where as well as sodium chlorate. Also, it is expensive and needs to be applied around three times a year. So, again, weeds became a nightmare.

Then I read a review on Amazon UK about Gallup 360, which is an enhanced glyphosate, so I ordered five liters of the concentrate along with a professional seven-liter sprayer (picture above).

To fill the sprayer only takes 24 mili liters of concentrate dissolved in water.

Just give the sprayer a few pumps put the sprayer over your shoulder or on your back using the straps and leisurely wander around zapping every weed you can see (gloves and safety glasses are essential).

When I first used Gallup 360 I didn't think much of it because it had no effect whatsoever, but after about 10 days the weeds suddenly went brown and keeled over, never to return.

Since discovering Gallup 360, instead of being a dreaded chore, weed killing is almost a pleasure, and I get great satisfaction from spraying the little bastards that invade our houses. I even do the neighbors weeds on occasions. And the cost- negligible, and now I have more time for doing electronics... and posting on ETO, of course.:D

spec

**broken link removed**
 
Last edited:
Talking of weed killer...
At my last employers place, there was plenty of greenery and every so often contract gardeners would come along to tidy the place up.

One day I looked out of the window to see a guy with the weed killer sprayer, tanks on his back, all the PPE, hard hat, visor, face mask, gloves, safety shoes, he really looked the part.
Except, this was the one day per year when the sun shines in Aberdeen, and he wanted to make the most of it.
So, like a Scottish version of Vladimir Putin on a macho trip he was topless, no coat, no shirt, no hi-vis vest, nothing between the skin of his back and the drips of weed killer on the tank and harness.

So to bring this post back to the theme of the thread - Tech Tip - wear ALL the appropriate PPE.

JimB

Too true Jim,

Safety is not just a nanny thing.

The most important sense you have is sight, and the most delicate part of you body are your eyes, although, some chaps may think that they are the second most sensitive part.:D

At one time safety glasses were extremely uncomfortable and made you look like a toad, but the latest safety glassed are comfortable and look OK.

So my advice is, if you are doing anything involving a hazard, wear safety glasses and for some operations, like messing with battery acid or welding, wear gloves too.

I have had some quite serious injuries due to being blase about safety and when I look back on some of the things we used to do it makes me cringe.

In one case a chap at work permanently damaged an eye while doing a simple solder joint when a ball of solder got into his eye.

So take Jim's advice- don't mess about: wear the appropriate protective gear and that applies especially to young people who know no fear.:)

spec
 
So my advice is, if you are doing anything involving a hazard, wear safety glasses
Yes.

The only significant injury that I have ever had in an "industrial" setting was at school.
In the machine shop I was using a lathe when a drop of coolant splashed into my eye, no problem at the time.
After a few hours it started to hurt.
Next day it hurt like hell and a trip to the doctor and then to hospital was in order, there they picked a tiny sliver of metal out of my eye.
All this took place in 1965 ish, elfin-safety, nah we don't need that.

Fast forward 40 years or so and I was taking an evening class at the local technical college to brush up on my machining skills for home use.
In the machine shop, overalls, safety shoes and safety glasses were mandatory.
At the end of one session I had a tiny sliver of metal in one of my fingers, so I borrowed some tweezers from the instructor in order to pick it out, which I did quite easily. But then the strangest thing happened, the sliver pinged out of the tweezers straight up to my eyes and would have gone into my left eye if I had not still been wearing the safety glasses.
Deja vu or what!

Last year I went shopping for PPE, I bought overalls, safety shoes and three pairs of safety glasses. One pair to leave by the lathe, one pair by the milling machine, and one pair on the workbench near the pillar drill.

Being obtuse, I never wear safety glasses while doing electronic soldering.
Over the years I have been splattered in the face by tiny drops of solder a few time while dismantling some well built (should that be badly built?) thing in need of repair.

JimB
 
It won't take you long to realize when trying to place 0603 parts with your tweezers that the slightest magnetism of the tweezers will make placing the part very frustrating. My advice is get a few non-magnetic tweezers.
 
One of the most extraordinary accidents I saw was at work.

In the test department the benches had a Formica-like surface and one of the test engineers, Alan, cleared his bench of all equipment and gave the bench a good clean with isopropyl alcohol.

He then lit a cigarette (you could smoke at work in those days) and the whole bench caught fire as did Alan's hands and the cloth that he had been cleaning the bench with.

For a couple of seconds it looked serious, but as soon as the fire started it went out again.

Once we found that Alan was OK, apart from singed eyebrows, we all burst out laughing, because he had got into a panic and was trying to put the fire out by tamping it with the cloth soaked in alcohol.

spec
 
Once we found that Alan was OK, apart from singed eyebrows, we all burst out laughing, because he had got into a panic and was trying to put the fire out by tamping it with the cloth soaked in alcohol.

So lessen learned, protect those brows :)
 
I finally got time to play with a microwave transformer with this project in mind.
Wood art made with electricity
https://www.electro-tech-online.com/threads/wood-art-made-with-electricity.149653/

With more wires than I expected and a capacitor and diode to ground, the output connections weren't obvious. I'm not used to working with kilovolts. With warnings in mind, I was thinking about making a 10:1 voltage divider so I could use a volt meter without killing it. Then I noticed my big 12/24 volt AC/DC transformer and thought hmm... I applied 12 volts AC to the microwave transformer power plug. I found one wire that had 704 volts to ground. The actual input was 11.7 volts so 704/11.7=60.17. I take that as a 60:1 increase in voltage so 120v in X 60 = 7200v out. Close enough for me and I'm glad I got that figured out without getting killed.

This is my first attempt at wood art.
Electric art.jpg
 
This is not really a tech tip but it is related. I don't know how many you use correction fluid: Tippex, Snopake, Bicc. I use it by the gallon, as did many colleagues at work.

The problem is that after you have used about a quarter of a bottle the correction fluid thickens and finally dries out. This was not a problem in the old days before health and safety became a religion rather than a science, but about 15 years ago the little bottles of thinning solvent were banned.

The lads at work tried many substitutes and the closest they got was isopropyl alcohol, but this formed more of a suspension rather than thinning the correction fluid. The problem of finding a suitable available solvent for correction fluid was also discussed extensively on the net at the time of the ban.

Then, one day, I dropped some correction fluid on my PC keyboard and the only thing handy at the time was some lighter fluid, which I put on a rag and it immediately removed the dried correction fluid, no problem. Then I realized: lighter fuel is the answer.

Since this discovery, drawing circuits and hand writing is back to the old carefree days because I can keep my correction fluid at the optimum consistency and white out big areas at will.

Only a small thing but it has made a big difference to me.:joyful:

spec
Humor Side: If you used correction fluid by the gallon then is it a correct assumption that you make a lot of mistakes?
<covering head, running>
Serious side: I used nail polish remover as the solvent and worked great.
EG
 
Last edited:
Who has a tip for holding those tiny 0603 chip components in place while you attempt to solder it down? I had nothing sticky on hand so I tried some pancake syrup. It actually worked and the smell from the board made me want breakfast :)
Hi Mike
When soldering small SMD parts, I use the solder paste itself as the glue.
Put a small drop on the pins, place the part on the paste with a small tool, press down on the center with a pointed tool, then you can heat solder it or use the iron.
EG
 
Status
Not open for further replies.

Latest threads

New Articles From Microcontroller Tips

Back
Top