Continue to Site

Welcome to our site!

Electro Tech is an online community (with over 170,000 members) who enjoy talking about and building electronic circuits, projects and gadgets. To participate you need to register. Registration is free. Click here to register now.

  • Welcome to our site! Electro Tech is an online community (with over 170,000 members) who enjoy talking about and building electronic circuits, projects and gadgets. To participate you need to register. Registration is free. Click here to register now.

PWM coding with pic18f4520, and external oscillator 4 MHz

Status
Not open for further replies.

shermona7

New Member
Hi,
I know the pic18f4520 has a PWM module. but if im using an external clock of 4MHz, and want an LED to dim (20% brightness) when a button is pressed and comeback to 100% brightness when another button is pressed.. how would this be achieved?

using C language
 
Hi,

Set up the pwm module.
Load the CCPRxL register with 0xFF (100% duty cycle / full LED brightness).
When button pressed load CCPRxL with a value of, say, 0x33 for 20% brightness.
When another button pressed reload CCPRxL with 0xFF.

The above assumes 8-bit PWM.

N.B. Led brightness wont vary in a linear fashion between a CCPRxL value of 0 and 255 (0 to 100% duty cycle).
 
thanku :)

would you be able to provide me with the code? as im pretty new with C

and using a 8 bit PWM is sufficient, is it?
 
Hi,

Better to gain some experience by attempting to write code yourself.

What flavour of C are you using e.g. C18, XC8?

Make a start and if / when you get stuck post the code you've written so far and forum members will be falling over themselves to help you :)
 
C18

I have written simple programmes before!! Bt when it comes to configuring special registers I do get stuck :/

Bt will try writing my own, if only u cud tell me what registers need to b configued.. Is t only ccpxl?
 
Hi,

From the 4520 data sheet:

**broken link removed**

I have a 4520 so I'll have a go at knocking up some code myself......
 

Attachments

  • 4520PWMSetup.jpg
    4520PWMSetup.jpg
    39.3 KB · Views: 268
Hi,

There are plenty of PWM tutorials / examples out there here's just one http://www.ermicro.com/blog/?p=1461

There is little need to use an external clock/crystal when that chip has a perfectly good internal oscillator.

You just need to change the Config to OSC=INTIO67 and use the OSCCON register to select the clock speed you want.
 
Hi,

Basic PWM code.....

Code:
/* 09:17 27 February 2013
 * PIC18F4520 / MPLAB IDE 8.89 / XC8 v1.12
 * E:\Electronics\PIC Projects\Electrotech\Shermona7\4520 PWM\PWM Main(1).c
 *
 *
 * 
 * 
 * 
 */

#include <xc.h>

/*------------------------------------------------------------------------*/

#pragma config CONFIG1H = 0X08;
#pragma config CONFIG2L = 0X19;
#pragma config CONFIG2H = 0X1E;
#pragma config CONFIG3H = 0X83; // MCLRE = off is 0x81
#pragma config CONFIG4L = 0X80;
#pragma config CONFIG5L = 0X0F;
#pragma config CONFIG5H = 0XC0;
#pragma config CONFIG6L = 0X0F;
#pragma config CONFIG6H = 0XE0;
#pragma config CONFIG7L = 0X0F;
#pragma config CONFIG7H = 0X40;

/*------------------------------------------------------------------------*/

#define _XTAL_FREQ (8000000)    /* Not using xtal, only to make delays work as
                                it won't compile without this */
void pwm_init (void);

/*------------------------------------------------------------------------*/
void main (void)
{

OSCCON = 0b01110010;        // Fosc = 8MHz

ADCON1 = 0xFF;              // No analog inputs

pwm_init();                 // Set up the pwm

/********* Start of main program loop **********/

 while(1)
{}

/********** End of main program loop ************/

}

void pwm_init (void)
{
    TRISCbits.TRISC2 = 1;       // Disable pin output driver (CCP1)
    PR2 = 0xFF;                 // PWM f =  1.95kHz  / 0 to 100% duty cycle
    CCP1CON = 0b00001100;       // bit 7-6 Enhanced PWM bits (00 = single o/p)
                                // bit 5-4 Duty cycle LSBs (When 10 bit resolution)
                                // bit 3-0 ECCPx mode select bits (11xx = PWM)
    CCPR1L = 0x80;              // Duty cycle (8 bit)
    PIR1bits.TMR2IF = 0;        // Clear the interrupt flag
    T2CON = 0b00000101;         // Postscaler = 0, prescaler = 4, timer = on

    while (!PIR1bits.TMR2IF)    // Wait until the Timer overflows and the
    {}                          // TMRxIF bit of the PIRx register is set.

    TRISCbits.TRISC2 = 0;       // Enable the CCPx pin output driver by
                                // clearing the associated TRIS bit.
}

**broken link removed**

**broken link removed**
 
Hi,

You haven't said which IDE you are using. If you are using MPLAB IDE then it's easy to run this code in the simuator, that way, in the absence of a scope, you can observe changes to duty cycle if you want.

**broken link removed**
 
thank you very much Angry Badger!! :)

this PWM code is the basic right? what if i have to include a push button operation where it will become bright and dim according to the press of 2 push buttons?

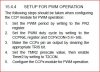
and the use of definitions:
#pragma config CONFIG1H = 0X08;
#pragma config CONFIG2L = 0X19;
#pragma config CONFIG2H = 0X1E;
#pragma config CONFIG3H = 0X83; // MCLRE = off is 0x81
#pragma config CONFIG4L = 0X80;
#pragma config CONFIG5L = 0X0F;
#pragma config CONFIG5H = 0XC0;
#pragma config CONFIG6L = 0X0F;
#pragma config CONFIG6H = 0XE0;
#pragma config CONFIG7L = 0X0F;
#pragma config CONFIG7H = 0X40;
refers to what? as we write the definitions as ;
#pragma config OSC=XT
#pragma config DEBUG=ON
#pragma config LVP=OFF
#pragma config WDT=OFF
#pragma config PBADEN=OFF

and you are using an external crystal of 8MHz?
 
Hi,

Yes, you can write the configs alternatively as you state, e.g.

#pragma config IESO = OFF, OSC = INTIO67, FCMEN = OFF
#pragma config BOREN = OFF, BORV = 3, PWRT = OFF
#pragma config WDTPS = 1, WDT = OFF
#pragma config CCP2MX = PORTBE, PBADEN = OFF, LPT1OSC = OFF, MCLRE = ON
#pragma config DEBUG = ON, STVREN = OFF, XINST = OFF, LVP = OFF

Are you using MPLAB IDE? Look on the menu bar under Configure / Configuration bits. Or search your PC for 18f4520.html (I can't remember where it's located).

No, I was not using an external Xtal but the internal oscillator. There was in fact no need for this: #define _XTAL_FREQ (8000000), it's only required if you are employing delays in your program and using XC8 compiler.

As for the buttons, it's easy enough to do what you want but you'll have to work it out for yourself. Is this a college /school project?

Regards.
 
Status
Not open for further replies.

Latest threads

New Articles From Microcontroller Tips

Back
Top