Bromeliad
New Member
Hello everyone, thank you for the existence of this forum.I decided to try to repair a Pioneer SA-540 audio amplifier ( part of an economic system from the 80s ) with almost no knowledge of the subject, but a great desire to learn.
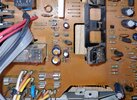
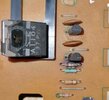
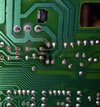
From a careful analysis of all the components on the board I noticed two 'exploded' HICHICON 100uF 25v capacitors (brownish liquid leakage); I don't notice any other damage other than the crumbling of the thermal paste on the transistors. I was present at the moment of his death, faint sound, smell of burning and two blown fuses.
I ask you if replacing the two capacitors could be enough or if I should do other checks and if so which ones. Where can I buy spare parts? Would cannibalizing them from the matching old cassette player be an option? Which soldering iron should I buy to easily remove the solder? Thanks for your time and best regards,
Samuel