Continue to Site

Welcome to our site!

Electro Tech is an online community (with over 170,000 members) who enjoy talking about and building electronic circuits, projects and gadgets. To participate you need to register. Registration is free. Click here to register now.

  • Welcome to our site! Electro Tech is an online community (with over 170,000 members) who enjoy talking about and building electronic circuits, projects and gadgets. To participate you need to register. Registration is free. Click here to register now.

PIC16F84A need help

Status
Not open for further replies.

kac121

New Member
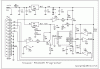
Hi all i've recently bought some component and finally construct my own pic programmer follow the TAIT CLASSIC programmer. The problem is my programmer is build on the breadboard and i want to try if it works. I'm using an external power source of 13v, when i switch on the power the 7805 of my programmer gradually become scald, not normally hot one.
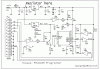
I have another set (tait classic modified version) that already soldered on the circuit board and the problem is when i verify the programmer using IC-Prog, everything is ok, but when i open the hex file and verify again, error pop out (verified failed at address 0000h !) why is this problem occur? the hex file i found it from the NOPPP programmer, its a demo hex file and i think it shouldnt be a problem.
Anyone facing the same problem like this? what is the solution?

Here how i set my IC-Prog:
i choosed 16F84A pic , TAIT serial programmer, interface=direct I/O, communication=invert MCLR,invert VCC, IO delay=20.


the demo hex file source code :

; File DEMOF84.ASM
; Assembly code for PIC16F84 microcontroller

; Blinks LEDs on outputs in a rotating pattern.
; With 75-kHz osc, each LED stays on 1/2 second.

; CPU configuration
; (It's a 16F84, RC oscillator,
; watchdog timer off, power-up timer on)

processor 16f84
include <p16f84.inc>
__config _RC_OSC & _WDT_OFF & _PWRTE_ON

; Declare variables at 2 memory locations

J equ H'1F' ; J = address hex 1F
K equ H'1E' ; K = address hex 1E

; Program

org 0 ; start at address 0

; Set port B as output and initialize it

movlw B'00000000' ; w := 00000000 binary
tris PORTB ; port B ctrl register := w
movlw B'00000001' ; w := 00000001 binary
movwf PORTB ; port B itself := w

; Clear the carry bit

bcf STATUS,C

; Rotate the bits of port B leftward through the carry bit

mloop: rlf PORTB,f

; Waste some time by executing nested loops

movlw D'50' ; w := 50 decimal
movwf J ; J := w
jloop: movwf K ; K := w
kloop: decfsz K,f ; K = K-1, skip next if zero
goto kloop
decfsz J,f ; J = J-1, skip next if zero
goto jloop

; Do it all again

goto mloop

end
 
Try connecting a 330 to 560 ohm resistor to PIC pin 4 (in parallel to R3 10K) and 0V and shorten the I/O delay to 10 to see if the problem still remains.

The important point is, did the PIC works as expected? In the code, the RC oscillator option is selected and the PIC will execute internal program very quickly upon powered up and getting it to verify is a bit tricky.
 
Last edited:
Oo everytime i burn the program i would received the verify error and i thought my burning process failed already, so i never test my pic. When i read the pic using IC-Prog the Address Program code would all turn to 3FFF. ok i'll try to adding the resistor and test it again. Thanks for the help

sorry forgot one more question, the c1 10uF capacitor, i'm using electrolytic cap 16v, would this be the problem?
 
Last edited:
kac121 said:
Oo everytime i burn the program i would received the verify error and i thought my burning process failed already, so i never test my pic. When i read the pic using IC-Prog the Address Program code would all turn to 3FFF. ok i'll try to adding the resistor and test it again. Thanks for the help

This indicates that your programmer hardware has problem or not properly setup or there is communication trouble between PC and programmer.

Inside IC-Prog, there is a pull-down menu for hardware check under "settings", with several tick boxes inside the "Signal out" section.

With no PIC in the socket, place a voltmeter between 0V and the following pin , tick one box repeatedly, with a tick a voltage should be presented and gone when there is no tick:

1) socket pin 14 and tick the box "Enable Vcc", you should be able to control the +5V ON/OFF

2) socket pin 4, tick box "Enable MCLR", +13V On with tick, OFF without tick

3) socket pin 12, tick box "Enable Clock", +5V with tick, OFF without

4) socket pin 13, tick box "Enable Data Out", +5V and a tick will automatically appears in the "Singal In" box. Tick the box again and the condition returns to normal

If any of the above tests failed, try to find out the reason why. If it appears to be reversed, (ie. voltage without tick and voltage gone with a tick) then you have to select "invert" on that signal under the "hardware" pulldown menu.

kac121 said:
sorry forgot one more question, the c1 10uF capacitor, i'm using electrolytic cap 16v, would this be the problem?

Its fine on 12V or 5V circuits.
 
i've tested the pin, 1+3+4 having no problem but the test 2 giving a trouble now, when i tick the MCLR, it gives out +13+v but when i untick it, it gives +12v. and when i test on the 7805 and 7812 output pin, i found out the figures show on my multimeter is increasing gradually until they reached the 5 and 12 v.

anyone used this software? is it compatible for 16F84A ?
http://www.covingtoninnovations.com/noppp/noppp.zip
i'm gonna get a dos version programmer software. Or can anyone free to help me test this with the TAIT CLASSIC programmer?
THanks
 
kac121 said:
i've tested the pin, 1+3+4 having no problem but the test 2 giving a trouble now, when i tick the MCLR, it gives out +13+v but when i untick it, it gives +12v. and when i test on the 7805 and 7812 output pin, i found out the figures show on my multimeter is increasing gradually until they reached the 5 and 12 v.

anyone used this software? is it compatible for 16F84A ?
http://www.covingtoninnovations.com/noppp/noppp.zip
i'm gonna get a dos version programmer software. Or can anyone free to help me test this with the TAIT CLASSIC programmer?
THanks

You have a hardware problem. When you untick MCLR, the voltage should drop from +13V to 0V. Check the components in this area. I don't have a copy of the Tait programmer, so if you attach a copy I will be able to help more.
 
kac121 said:
... when i test on the 7805 and 7812 output pin, i found out the figures show on my multimeter is increasing gradually until they reached the 5 and 12 v.

One of the leads, its cable or connection on your meter is faulty. Check to see if you can find an open circuit in the lead cable somewhere.

The output of 7805 and 7812 are there all the times. The meter should give a correct reading within half a second.
 
eblc1388@
but when i test the voltage of a battery it should the value instantly. I'm using the digital multimeter, when i switch to short circuit test mode, and touch the red probe with the black probe, it show normal beep sound. or could it be the voltage test mode malfunction only?

ljcox@
Here the TAIT classic i used.
 

Attachments

  • TAIT Classic Programmer.gif
    TAIT Classic Programmer.gif
    11.4 KB · Views: 609
kac121 said:
but when i test the voltage of a battery it should the value instantly. I'm using the digital multimeter, when i switch to short circuit test mode, and touch the red probe with the black probe, it show normal beep sound. or could it be the voltage test mode malfunction only?

I don't know but at least we now certain the meter probes are good. What do you mean by "figure increasing gradually"? 0.5 sec, 1 sec or 5 second or more ?
 
I suggest you do as follows:-
1. remove the cable to the computer.

2. put your meter on MCLR pin 4.

3. the meter should read 0V since the 7407 is TTL and it should treat an open circuit at the input as a high.

4. connect pin 5 of U3 to gnd. The meter should now read +13V.

If you still see the voltage at pin 4 change from +12V to +13V (as you wrote earlier), then measure the voltages at U3/7 and the base of Q2.

Produce a table of results as follows:-

Input U3/7 Q2b MCLR pin 4
high +13V +13V 0V
low 0V +12.3V +13V

These voltages are what you should read if the circuit is working properly.
 
Hi all thanks for the help, i have bought another new set and i re-do it all carefully this time. Finally it works with IC-prog, everything solved. So the previous set is confirm a hardware problem, i think i would desoldered them and redraw a new circuit board now. Thanks again for the help.
Only the 7805 is a bit hot after i run it for about 10 minutes or so, just scared it would spoilt if run it too long.

Anyway anyone having dos version that support this programmer and 16F84A? Or anyone having a small version that particularly for 16F84A only
 
If the 7805 is getting hot, there must be a high current through it.

So I suggest you measure the current going in and trace where it is going.

The circuit should only draw a few milliamps, not enough to make the 7805 hot.

Building a new programmer seems to be an extreme way to find a hardware fault.

To find faults you need to check the PCB for short circuits (eg. solder bridges) and open circuits (ie. dry joints, broken tracks, etc.

If that does not solve the problem:-

1. understand how circuit works.

2. measure the voltages and currents

3. deduce what the fault is.
 
kac121 said:
Anyway anyone having dos version that support this programmer and 16F84A? Or anyone having a small version that particularly for 16F84A only

You might try my old DOS software PICPROG, you can download version 2.02 from - it supports the 16F84, I'm not sure if it will work on the 84A or not?.
 
ljcox@
will it because of my adapter problem? if not wrong my adapter rated with 1000mA,12v. Its with my friend now. Actually the previous programmer was soldered by my friend, its kinda hard to troubleshoot i think, cause the circuit was badly designed and the soldering and drilling also not that good. Thats why i'm buying my own new set and redesign the circuit and re-solder my own. And i just found out that he not using the original TAIT classic programmer, he used another modified version of TAIT classic, added with few resistor, quite similar to the original one.

Nigel Goodwin@
Thanks for the source :D

eblc1388@
The figure increasing more than 10 seconds, the increasing speed quite slow. I think my meter having problem already. When i test the value of the resistor, it showing inconsistent value, sometime showing 0 only the value keep changing.
 
Last edited:
The heating in the 7805 is due to the current (~40mA instead of several mA) through it and possibly the large voltage drop across it. Your 12V adaptor, if of an unregulated design, may be outputting near 16V~18 volts at this slight loading and thus causing about 0.5W power lost on the 7805. This is what causes it to become hot.

As I replied in other postings, the 40mA loading is partly due to the 30mA supply current taken by the 7407 according to the datasheet.

A meter is an important instrument and you must make sure it is functioning correctly as you will be making discision based on its readings.
 
AS L Chung wrote, your heating problem is due to the 7407 that requires 40 mA and the fact that the plug pack is supplying 16 or more Volt.

Did you put a heat sink on the 7805?

You could insert a 150 Ohm half Watt resistor in series with the input of the 7805. See attachment.

This will drop about 6 Volt and thus reduce the dissipation in the 7805.
 

Attachments

  • Modified Programmer.gif
    Modified Programmer.gif
    13 KB · Views: 216
Status
Not open for further replies.

Latest threads

New Articles From Microcontroller Tips

Back
Top