Continue to Site

Welcome to our site!

Electro Tech is an online community (with over 170,000 members) who enjoy talking about and building electronic circuits, projects and gadgets. To participate you need to register. Registration is free. Click here to register now.

  • Welcome to our site! Electro Tech is an online community (with over 170,000 members) who enjoy talking about and building electronic circuits, projects and gadgets. To participate you need to register. Registration is free. Click here to register now.

PH Amplifier for Micro

Status
Not open for further replies.

richard.c

New Member
Hi,

There are many micro circuits for aquarium temperature controllers - one of the more desirable features is the inclusion of a PH probe.

While there are several diy versions on the web, there was always some drawback, either with supply of the part used or its suitablity to aquarium use.

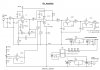
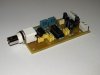
This little unit has been built, tested and used for over 6 months and gives exellent results, using very common, low cost parts.

.
 

Attachments

  • PH_Amplifier.pdf
    730.2 KB · Views: 15,233
  • phamp.jpg
    phamp.jpg
    62.2 KB · Views: 7,907
Are there any pcb files in digital form?

The original was created with Ares v5.2 - which saves as a .lyt file or a bitmap image, neither of which is allowed within these pages.
If you want either, please PM me with an email address.
 
The original was created with Ares v5.2 - which saves as a .lyt file or a bitmap image, neither of which is allowed within these pages.
If you want either, please PM me with an email address.

hi,
You can download PDFCreator [free] from the web, it uses the PRINTER function to call the PDFCreator.
Produces a good pdf.

pdfforge.org
 
Last edited:
I was under the impression that PH probe amplifiers require bias current <1pA. Also, JFET input amplifier (LF356) bias current generally doubles every 10 deg C. In addition, according to Analog Devices, the typical probe has a tempco of 3300ppm/deg C. Your circuit doesn't seem to address these issues. Have probes changed since Analog Devices wrote that app note? Are you solving them in software?

**broken link removed**
Seems a little strange, quoting myself.:)

Richard,c, if you posted this design just to get your ego stroked, I guess that must have worked.

Ignoring questions sometimes makes them go away. I'm not ready to give up yet. I would love to make a pH meter for my hot tub, but I won't use this design until my questions are answered.
 
Last edited:
Hi Richard,

Thanks for the excellent writeup, diagrams, etc.

Can you post your PCB layout file so I can try the circuit out?

Thanks in advance.

Scott
 
Hi Scott,

Afraid all the original files lost in a HDD failure

However the pcb layout in the pdf file was produced to print out to the correct scale of 39 x 88 mm . +- 0.25mm
 
Richard,

Thanks for this design. I'm trying to redo the traces in Eagle so I can order a machine made board for this. I was following your schematic and referencing the traces you have in the pdf and I found a couple of differences.

According to the schematic U2-11 connects to C6, C4, +5v and U1-7 and then to U4-3. On the board U2-11 is connected to U1-4, C7, C11 and U5-3 which is the -5v rail.

I just wanted to confirm which is the later design, the schematic or the soldering traces in the pdf.

Thanks

EDIT: I just checked the datasheet of the TL084, looks like p11 is Vcc- and P4 is Vcc+ so the schematic is reversed.
 
Last edited:
Hi TeraHz,

Yes, you are right, well spotted !

Its on the U2 A segment that power rails became the wrong way round on the schematic when I altered the gate to change the inputs around.

The pcb is correct with U2 pin 4 to +5v and pin 11 to -5v

When doing your own board the important thing is to keep all the circuitry around the LF356 as tight as possible, particularly the input path of the bnc socket, R1,C1 & C2.


Corrected schematic attached -
 

Attachments

  • phamp.jpg
    phamp.jpg
    292.9 KB · Views: 5,908
Last edited:
Status
Not open for further replies.

Latest threads

New Articles From Microcontroller Tips

Back
Top