Continue to Site

Welcome to our site!

Electro Tech is an online community (with over 170,000 members) who enjoy talking about and building electronic circuits, projects and gadgets. To participate you need to register. Registration is free. Click here to register now.

  • Welcome to our site! Electro Tech is an online community (with over 170,000 members) who enjoy talking about and building electronic circuits, projects and gadgets. To participate you need to register. Registration is free. Click here to register now.

Momentary-activated timer with no idle power consumption

Status
Not open for further replies.
All Spices have a bit of a learning curve. Good news is that LTSpice is free, and there are a few folks on this Forum that are fairly facile with it...
 
Attached is the schematic (Timer.asc) for your timer. You should be able to run it when you install LTSpice. Note that it is just a text file, which can be opened with any text editor...
 

Attachments

  • Timer.asc
    1.5 KB · Views: 141
Yep I was starting to think that way too! I've never used microcontrollers before, and have none of the hardware, so I'll need to decide whether to go down the PIC or AVR route, whether to build a programmer or buy one, etc. But it would give me far more flexibility and I have a background in software engineering so this bit shouldn't be too much of an issue.

I imagine I have a long journey ahead!

For a cheap, easy way to start playing with microcontrollers, I will recommend PICAXE: **broken link removed** They were originally intended for school classes, but are great general purpose tools. Not as fast as compiled programs in equivalent PICs, but as in your case speed is not an issue.

The chips start at about $3.50US for an 8-pin. They have chips from 8 to 40 pins. They're based on MicroChip's PIC IC. The difference is that they have an on-board interpreter burned in. The programming software is free. The only programming hardware you need is 2 resistors and a 3-wire serial cable, and a 5v power source. You write the programs is BASIC and download them directly to the chip. The chips are reprogrammable, so you can make any changes you need along the way. It also includes a simulator for each chip so you can step through your programs for troubleshooting. And they have a very active, supportive, and civil forum (not all forums are). (And I'm not referring to ETO!)

Ken
 
Mike:
Thanks for the simulation file - I'll get this installed tomorrow and try to work through it :)

Ken:
That looks perfect - I hadn't come across them in my research - all the better for being based not too far away from me. I know BASIC inside out, and the outlay for the development hardware looks minimal. I think I'll get some bits from them - looks like the PICAXE Module might be a good way to start if I'm using breadboad, I can then work up to standalone chips. I was drawn to pure PIC chips because of the in-circuit debugging, which I thought would be very useful on sensing projects, but I can live without this if the programming end is easier.

And I couldn't agree more about the forums - it's a vital thing when you buy a product that technical. And the helpfulness of the answers I read here were what swayed me to join this forum rather than the many others out there :)
 
I was drawn to pure PIC chips because of the in-circuit debugging, which I thought would be very useful on sensing projects, but I can live without this if the programming end is easier.

If you speak BASIC this will be a piece of cake.Hardware help is available. :) You can insert a debug line in the code and watch a variable as the program runs on the chip.


Ken
Ken
 
If you speak BASIC this will be a piece of cake.Hardware help is available. :) You can insert a debug line in the code and watch a variable as the program runs on the chip.

Even better! I think you've convinced me - I'm putting my order in now :)
 
You think Mike and I have given you enough to do. ;)

Ken
 
I couldn't help it...I had to try it.
Code:
'Picaxe....08M Push-ON/Push-OFF/Program-OFF Power Switch
'Use with 08M Power Switch 05a circuit


'Checking for terminate call with an Interrupt

Start:
	High 1				'Turn on power
	Low 2					'Turn off output
	Pause 100				'Debounce
	If pin3 = 1 then Start		'Check if Push Button is still down
	setint %00001000,%00001000	'Set interrupt for pretime terminate
	
Time:                                         '0-60sec
	ReadADC 4,b0			'Get timer variable
	High 2				'Turn on output
	for b1 = 1 to b0                   '1 to 256 loops
	pause 241     
	next b1
	goto Terminate			
	
Interrupt:
	goto Terminate
	
Terminate:
	Low 2   				'Pin 2 low to kill output                              
	Low 1					'Pin 1 low to kill power
	stop

Ken


Change Q1 to a BS250...more available.
 

Attachments

  • 08M POWER SWITCH 05a.gif
    08M POWER SWITCH 05a.gif
    32.1 KB · Views: 150
Last edited:
I couldn't help it...I had to try it.

Hehe yes I know that compulsive feeling - thank you for the code and the example.

I've just received the PixAxe kit along with lots of other components to try to achieve the same goal in different ways. I need to solder the starter kit together and work my way through the PicAxe manual and try to get my head around the concepts. I can follow the circuit and code you've given to an extent, but would you be able to write a brief outline of the logic that is going on? I assume that the momentary power switch fires up the MCU, which then runs the timing loop unless there is an interrupt which powers the whole thing down again? I also can't work out what J1 does - especially the bridges between some of the pins that seem to go nowhere - is this a standard connector on the PicAxe board that serves some function?

Thanks for all the help!
 
Last edited:
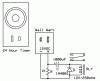
First, J1 is "my" connector to a programming cable from the circuit to a PC serial port. On the 08M, P0 is used both for serial out (for programming and other serial communications) and as a general purpose output. So, 4 to 5 would be jumpered for program down-loading. If P0 were used in this circuit, the jumper would then be moved from 5 to 6. Pins 1,2, and 3 are Rx, Tx, and Common to the serial port. I generally use this on boards when I want to reprogram the chip in-place.

The logic....

When you push the button, it supplies power to the 5V regulator and to the PICAXE chip, and to P3 through a 12V-to-5V voltage divider.
The program starts by setting P1 high, turning on Q2, which turns on Q1, which latches on power to the the regulator and chip.
The program next sets P2 Low, assuring that the output to Q3 and the relay is off.
The PAUSE is to account for a small amount of on-off bounce in the switch contacts.
The IF statement looks to see if P3 is low, meaning the pushbutton of open. The timing doesn't start until the finger is off the button, otherwise the program may think it's a shut-off push.
Once P3 goes low, it sets an interrupt mask for the next high on P3.
The time interval is adjustable, set by a 0-4.5V input from R8 to the 8-bit ADC input P4.
The timing portion first reads the 8-bit voltage on P4 into variable b0.
Output P2 is set high to turn on Q3 and the relay.
The for-next loop, repeats the number times set by the variable b0
The pause within the loop sets the delay time within each loop. This constant was fine tuned to 60 seconds max, by trial and error.
At the end of the for-next loop, a jump is made to Terminate to shut off the relay by a low to P2, and the power to the circuit by a low to P1.
If the button is pushed during the timing loop, P3 goes high, the interrupt is called, and the program jumps to Terminate.
D1 and D2 are steering diodes to isolate the P3 divider from the input to the regulator when it's powered by Q1.

Hope this helps.

Ken
 
Last edited:
That's a great explanation - thank you, I can see what all the bits of code are doing now. What does the binary in the setint command mean? Is it telling the chip in which pin at which state to fire the interrupt routine?
 
It can save a lot of time and frustration if you do. You don't have learn every detail of every code, but go through all the codes to see what they are. Also note that all codes are not used on all chips. Ask questions....and have fun. :)

Ken
 
I've assembled the PicAxe kit and got the mandatory 'flashing LED' program working on breadboard - progress!

Looking at your circuit in detail, I was wondering how I can interface it with the existing 24h timer - this can either use a logic high from its own internal circuit, or the switched 12v output from the relay connected to it. The problem is that both of these switch on constantly for a minute or more - and I want to use the set timings in your circuit (40 seconds or so), rather than this minute pulse.

What's the best way for me to interface the two circuits so both the momentary button and the minute-long pulse start the timing circuit?

At present if I simply connected the 24h relay in parallel with the momentary switch, the PicAxe code would ignore it as it would be considered to be a held-down button.
 
Last edited:
This is a circuit that I've used to get a momentary switch closure out of a wall plug timer, rather than it's normal 1-minute (digital type) or 15-minute (motor type) minimum on-time. My on-time depends on the coil resistance of the relay and the size of the capacitor..

Ken
 

Attachments

  • Relay Monostable and Timer.gif
    Relay Monostable and Timer.gif
    9.1 KB · Views: 270
Last edited:
Haven't you sorta lost the bubble viz-a-viz the zero power consumption between pulses????
 
Thanks for the circuit Ken - this looks good. Will this just briefly pulse the relay then only reset on power loss?

Mike - the 24h timer side of the circuit is solar powered with a small lithium cell to keep it going through the night, it's the logic side and the override momentary switch that I need to stay at zero idle consumption - it will also probably be solar, but the small solar panel won't support the microcontroller and relay constantly drawing current.
 
Status
Not open for further replies.

Latest threads

New Articles From Microcontroller Tips

Back
Top