Continue to Site

Welcome to our site!

Electro Tech is an online community (with over 170,000 members) who enjoy talking about and building electronic circuits, projects and gadgets. To participate you need to register. Registration is free. Click here to register now.

  • Welcome to our site! Electro Tech is an online community (with over 170,000 members) who enjoy talking about and building electronic circuits, projects and gadgets. To participate you need to register. Registration is free. Click here to register now.

Loss bridge design review

Status
Not open for further replies.

earckens

Member
I had posted this question in aother thread I had started about a soil moisture sensor module I am developping but it was probably not placed very well since no response came forward.
There are a few commercial sensors available using this technology (http://www.vegetronix.com/Products/VH400/, http://www.decagon.com/en/soils/volumetric-water-content-sensors/10hs-large-volume-vwc/, ..). Research on university level is being conducted on this sensor technology (**broken link removed** of Soil water sensors.pdf etc..). All advanced sensors for soil moisture measurement seem to use RF capacitance probes.
For this project I need to include a loss bridge. The purpose of this bridge is to measure variations in sensor capacitance. The sensor consists of a antenna inserted in soil, emitting a 100MHz signal obtained from a LTC6905 oscillator, and the measurement is done with a AD8307 logarithmic amplifier. The probe uses 2 insulated and waterproof parallel insulated copper strips; hence measurement is not done through electrical current but through electromagnetic fields.

I found a design used in a commercial moisture sensor measuring emitted power, and a design used for regular RF antenna or load balancing using a reference load.

For this project I presume both principles may be used, but I would like to receive your critical reviews on pro and con of each design principle.

The first attachment shows the design for the commercial unit where IC1=AD8307, IC2=LTC6905, R1&R2=470R, C1&C2=10nF

2016-05-31T17-soil moisture sensor loss bridge.jpg

The values for the other, second, loss bridge are marked on the drawing.

return loss bridge circuit.JPG

What would/are be the pro and con for each design?
What would be recommended for a circuit used to measure the impedance (and hence emitted power) of a probe consisting of two copper strips (insulated and waterproof covered) 10cm long, a few mm wide and a few mm apart, inserted in soil.
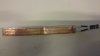
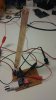
 
Loss Bridge ?
The correct term is Return Loss Bridge (RLB), this is a device used in RF applications for measuring the impedance presented by some item such as an antenna, or the input impedance of something like a receiver or spectrum analyser.
The "Return" part of the description comes from the idea that you are measuring the energy which is reflected back to the source from a termination which is different from the system characteristic impedance, usually 50 Ohms.

Second circuit
The second circuit in post#1 of this thread is a true Return Loss Bridge, it uses a Wheatstone type bridge which is made up from 50 ohm resistors R5, R6 and R8, the bridge is completed by the unknown impedance connected to Z-Port.

R7 forms a termination resistor on the input to the detector U1. (I am not sure if this resistor is strictly necessary here in this circuit.)

In a previous post:
https://www.electro-tech-online.com...capacitance-based-probes.151805/#post-1304218
I commented that the use of a return loss bridge for capacitance measurement seemed rather odd.
Having no experience in this area, I am still of that opinion although I am prepared to be convinced otherwise.

First circuit
If I interpret the first circuit correctly, it is not in the form of a bridge but a series connection of two 470 Ohm resistors in series with the capacitance to be measured (the soil moisture probe), as shown here:

Soil Moisture Meter.png

Here, the voltage is being measured across the capacitance of the soil moisture probe.
To me, this feels to be a much more appropriate measurement method than the use of an RLB.

JimB
 
Loss Bridge ?
The correct term is Return Loss Bridge (RLB), this is a device used in RF applications for measuring the impedance presented by some item such as an antenna, or the input impedance of something like a receiver or spectrum analyser.
The "Return" part of the description comes from the idea that you are measuring the energy which is reflected back to the source from a termination which is different from the system characteristic impedance, usually 50 Ohms.

Second circuit
The second circuit in post#1 of this thread is a true Return Loss Bridge, it uses a Wheatstone type bridge which is made up from 50 ohm resistors R5, R6 and R8, the bridge is completed by the unknown impedance connected to Z-Port.

R7 forms a termination resistor on the input to the detector U1. (I am not sure if this resistor is strictly necessary here in this circuit.)

In a previous post:
https://www.electro-tech-online.com...capacitance-based-probes.151805/#post-1304218
I commented that the use of a return loss bridge for capacitance measurement seemed rather odd.
Having no experience in this area, I am still of that opinion although I am prepared to be convinced otherwise.

First circuit
If I interpret the first circuit correctly, it is not in the form of a bridge but a series connection of two 470 Ohm resistors in series with the capacitance to be measured (the soil moisture probe), as shown here:

View attachment 108535

Here, the voltage is being measured across the capacitance of the soil moisture probe.
To me, this feels to be a much more appropriate measurement method than the use of an RLB.

JimB
Hi Jim, thanks for replying; we seem to agree :): I used that circuit (#1) for testing today.
Results are measured at the AD8307 output. I use selfadhesive coppertape on a thin transparent acrilyc substrate, taped all around to make it impervious to water and moisture.
1. With 2 simple strips of copper 3mm wide, 10cm long and 1mm separation I measure 2.30V in open air, 2.12V submerged
2. With more complex pattern of 2 strips 2mm wide and 20cm long, 1mm apart, both in a interwoven U-form, I measure 1.95V in open air and 1.70Vsubmerged.
The results are fairly repeatable but I have to do much more testing before conclusions can be made.

But it seems as if it will be hard to obtain more than 500mV between dry and wet, so some sort of amplification will be needed.

In circuit #1 the sensor will have to be made as discriminatory as possible between wet and dry; when the sensor is left in the air it represents a higher load than when surrounded by water because the AD8307 output is higher; so there will have to be a way to make the difference when surrounded by moisture (and hence lower loss or higher transmission between the two poles) as high as possible while when dry the sensor has to represent as high an impedance as possible.
 
Last edited:
Here are some pictures of the second sensor test and the test setup. The sensor connectors are the black Dupont plugs, the AD8307 probes are the red and black ones at the right.
Meanwhile I was able to increase the spread from 2.35V to 1.90V due to some tweaking at the sensor base.
 

Attachments

  • DSC_1147.JPG
    DSC_1147.JPG
    927.2 KB · Views: 113
  • DSC_1148.JPG
    DSC_1148.JPG
    821.7 KB · Views: 124
  • DSC_1150.JPG
    DSC_1150.JPG
    1.1 MB · Views: 110
Without testing myself I cant advise you on the best detector, however one thing I notice on your prototype, the osc in my opinion ought to be in a screening can to avoid bleed over.
Also the wires to the probe would need to form a transmission line, unless you put all the Vhf stuff on the end of the probe which is probably the best way.
Your results sound Ok.
Good idea about the canning; now the oscillator sits on a adapter board but the plan is to draw a proper PCB with direct smd soldering.
The sensor will be connected straight to the pcb, no intermediate wiring. But before I will do lots of testing with different sensor designs, this setup is not optimal but at least allows quick exchanges of sensors.

Next is the issue to amplify small differential voltages of about 300mV to something x10 volts (0 to 3 or 1 to 4V).
So I need an amplifier that also is capable to be calibrated with an offset: suppose sensor A delivers between 2.90V and 3.20V whose range needs to be amplified by x10 (0 to 3 or 1 to 4V), while sensor B delivers between 1.00V and 1.40V then its range too must be able to be amplified to say something between 0 to 3 or 1 to 4V.
In other words: an amplifier that can be calibrated both in offset as in range or amplification.
Any ideas yet?
Or should I better start a new thread?
 
I think maybe a micrcontroller with adjustable gain amp is a good idea.
You might also want to check for external interference like mobile phones & Fm broadcast stations.
 
I would prefer a hardware solution for the signal conversion, so that my sensor output is not just 2.2V to 2.5V but rather in a range of several volts. Hardware amplification is faster and makes the sensor module more universal usable.
The microcontroller will be used for A/D conversion, and directing signal transmissions (I want to use a 434MHz link). RF interference with a sensor buried in the soil? Not very likely.

So for the signal conversion, I need something that amplifies a signal of say between 2.2V and 2.5V to something x10 but still in the 0 to 5V range.
 
earckens, you have made various statements which confuse me:
1. With 2 simple strips of copper 3mm wide, 10cm long and 1mm separation I measure 2.30V in open air, 2.12V submerged
2. With more complex pattern of 2 strips 2mm wide and 20cm long, 1mm apart, both in a interwoven U-form, I measure 1.95V in open air and 1.70Vsubmerged.
Meanwhile I was able to increase the spread from 2.35V to 1.90V due to some tweaking at the sensor base.
so that my sensor output is not just 2.2V to 2.5V

Have you read the datasheet for the AD8307?
Its behaviour can be a little confusing because it is a logarithmic amplifier, which means that you only get a small change in the output voltage for a large change in the input voltage.

Also be aware that the output of the AD8307 does not really go above 2.3 to 2.5V, depending on the frequency. It could be that you are overdriving the input and the amplifier is saturating.
Have a look at Figure 7 of the datasheet.

JimB
 
Hi Jim,
I am sorry for the confusion. I realise that I will not be able to get a bigger spread than about 500mV for the output of the AD8307, at the very best: the variation in the actual AD8307 output between dry and wet depends on the change in impedance of the sensing element which in turn is dependant of the design of the sensing element as well as the values of R1,2 and C1,2.
So, currently at the very best I do get between 1.90V (wet) and 2.35V (dry) out of the AD8307. Which I did not realise but after reading your latest comments would be the very best achievable. I will study the AD8307 datasheet in very detail.

When I write "..so that the sensor output is not just 2.2V to 2.5V.." I mean the complete module: in order to get anything between say 0 and 5V I will need to add an amplifier, which will be included in the module. My goal is to make a module that puts out values usable on a more universal scale, say with a range of several volts in the 0 to 5V limit.
 
currently at the very best I do get between 1.90V (wet) and 2.35V (dry) out of the AD8307.
OK, what I suggest that you do is to reduce the drive from the oscillator to the probe, or maybe just simply increase the value of the two 470R resistors to (guess) 1 or 1.5k and see what output you get then.

The idea is to get the maximum output of the AD8307 below 2V so that you are away from the saturation/limiting area.

JimB
ok Thank you Jim; I will feed back on the results (will be in 10 days as we are leaving this weekend for a week's vacation).
 
Status
Not open for further replies.

Latest threads

New Articles From Microcontroller Tips

Back
Top