Attemp2Learn
New Member
Hi all, im new here and just a hobbyist trying to learn.
I have been playing with visible laser diodes for the past 2 years now, and am finding myself needing higher currents.
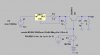
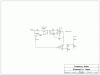
What I need is a constant current source capable of 0 amps (or close to it) up to no more than 1.2A. adjustable through the larger type pots used as volume knobs.. which can provide a SMOOTH sweep through the range of the pot.
The voltages can vary, but in order for the laser to fire I need at least 4.5v, or the laser will see just the current and produce no light.
I have made several circuits with the notorious lm317 / 350 etc, but all the heat seems to trap in the pot. This is an issue for me as I also require a circuit that takes the load away from the pot adjusting the current.
I also tried switching with a 555 and irf510 setup, but could only get the laser to operate under control from .5A to 1A. I am almost there but have hit a wall in two regards.
I have been able to make an adjustable 'driver' that allows control from 0-300mA and in this sense anything over 300mA jumps to the full output as the pot fails. Ive tried combos of resistors etc and am stuck.
I have to avoid any pulsed type regulation as the laser diodes involved do not like spikes and anomalies.
Anything pulse based directly affects the low end output, and would really like to go with a linear current regulator.
The load to be used with this is a visible laser diode requiring minimum of 4.5v 200mA threshold, and 1.2A max current.
Any help would be greatly appreciated, and thank you in advance.
Forgot to mention, I am still somewhat of a n00b, so please keep this in mind")
I have been playing with visible laser diodes for the past 2 years now, and am finding myself needing higher currents.
What I need is a constant current source capable of 0 amps (or close to it) up to no more than 1.2A. adjustable through the larger type pots used as volume knobs.. which can provide a SMOOTH sweep through the range of the pot.
The voltages can vary, but in order for the laser to fire I need at least 4.5v, or the laser will see just the current and produce no light.
I have made several circuits with the notorious lm317 / 350 etc, but all the heat seems to trap in the pot. This is an issue for me as I also require a circuit that takes the load away from the pot adjusting the current.
I also tried switching with a 555 and irf510 setup, but could only get the laser to operate under control from .5A to 1A. I am almost there but have hit a wall in two regards.
I have been able to make an adjustable 'driver' that allows control from 0-300mA and in this sense anything over 300mA jumps to the full output as the pot fails. Ive tried combos of resistors etc and am stuck.
I have to avoid any pulsed type regulation as the laser diodes involved do not like spikes and anomalies.
Anything pulse based directly affects the low end output, and would really like to go with a linear current regulator.
The load to be used with this is a visible laser diode requiring minimum of 4.5v 200mA threshold, and 1.2A max current.
Any help would be greatly appreciated, and thank you in advance.
Forgot to mention, I am still somewhat of a n00b, so please keep this in mind
Last edited:


")