Electro Tech is an online community (with over 170,000 members) who enjoy talking about and building electronic circuits, projects and gadgets. To participate you need to register. Registration is free. Click here to register now.
Welcome to our site! Electro Tech is an online community (with over 170,000 members) who enjoy talking about and building electronic circuits, projects and gadgets. To participate you need to register. Registration is free. Click here to register now.
Sets the data rate in bits per second (baud) for serial data transmission. For communicating with the computer, use one of these rates: 300, 1200, 2400, 4800, 9600, 14400, 19200, 28800, 38400, 57600, or 115200. You can, however, specify other rates - for example, to communicate over pins 0 and 1 with a component that requires a particular baud rate.
Syntax
Serial.begin(speed)
Arduino Mega only:
Serial1.begin(speed)
Serial2.begin(speed)
Serial3.begin(speed)
Parameters
speed: in bits per second (baud) - long
Returns
nothing
Example:
void setup() {
Serial.begin(9600); // opens serial port, sets data rate to 9600 bps
}
void loop() {}
Arduino Mega example:
// Arduino Mega using all four of its Serial ports
// (Serial, Serial1, Serial2, Serial3),
// with different baud rates:
be80be THANKS so much for the help and the quick response!!! I appreciate it so much!
Now that I have the original code and now the serial.begin code, would I just have to combine the two for it to work OR does that original code work with how it was shown as is with the serial.begin?
Will just typing in serial.begin be recognized by my arduino board? Once again thanks be80be!!!
Okay so I’ve made some great progress on my light meter since I last posted. I have successfully completed the “Hello World” project from the Arduino website (**broken link removed**). I’ve got the Arduino board communicating with the computer and now the LCD screen is correctly displaying the information. I have attached a picture of my project so you can see it. I feel like I’m almost there which feels great!
My last 2 parts I need to complete is hooking up the photocell that I have (Mini Photocell - SparkFun Electronics) to the Arduino board and obtaining the right code so the LCD will display the amount of lux. Well I was able to find a few codes online and try them out but they did not work. Here is one of them I tried:
The two links go together. The video is of that particular code working. I know this code does not display the amount of lux but it does display 4 different light conditions (pretty dark, dark, bright, pretty bright). I just wanted to see my photocell in action displaying the light conditions on my lcd screen. When I hooked up the photocell and uploaded the code my lcd screen just went blank for some reason. This is how I hooked up the photocell which I found on a different webpage:
I tried resetting the board and uploading the code many times. I also uploaded the “Hello World” code in between testing and that would work perfectly every time. So the possible 2 issues I think I’m having are that I do not know the type of photocell the person used or how exactly he hooked up the photocell. Even if I didn’t know his exact photocell he used I’m thinking I should still be able to see a light condition being displayed on my lcd even if it’s a wrong light condition.
I also found this code (**broken link removed**) which looks to be the best and the exact code I would need for my application but it also just makes the LCD screen go blank for some reason. Can anyone please help me out? I would so greatly appreciate it. THANK YOU SO MUCH!
I've been doing some more research and I read something about how maybe the lux code I found will work but its just that the code doesn't recognize which LCD screen I'm using. So I was thinking the code needs to be edited to the LCD screen I'm using. Remember I'm a newbe to all this so I'm not sure how true that could be but it seems like it makes sense.
First off are you sure you have the LCD hooked up right try this when you get working you can then go on and use the LDR.
Code:
/*
LiquidCrystal Library - Hello World
Demonstrates the use a 16x2 LCD display. The LiquidCrystal
library works with all LCD displays that are compatible with the
Hitachi HD44780 driver. There are many of them out there, and you
can usually tell them by the 16-pin interface.
This sketch prints "Hello World!" to the LCD
and shows the time.
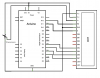
The circuit:
* LCD RS pin to digital pin 12
* LCD Enable pin to digital pin 11
* LCD D4 pin to digital pin 5
* LCD D5 pin to digital pin 4
* LCD D6 pin to digital pin 3
* LCD D7 pin to digital pin 2
* LCD R/W pin to ground
* 10K resistor:
* ends to +5V and ground
* wiper to LCD VO pin (pin 3)
Library originally added 18 Apr 2008
by David A. Mellis
library modified 5 Jul 2009
by Limor Fried (http://www.ladyada.net)
example added 9 Jul 2009
by Tom Igoe
modified 22 Nov 2010
by Tom Igoe
This example code is in the public domain.
http://www.arduino.cc/en/Tutorial/LiquidCrystal
*/
// include the library code:
#include <LiquidCrystal.h>
// initialize the library with the numbers of the interface pins
LiquidCrystal lcd(12, 11, 5, 4, 3, 2);
void setup() {
// set up the LCD's number of columns and rows:
lcd.begin(16, 2);
// Print a message to the LCD.
lcd.print("hello, world!");
}
void loop() {
// set the cursor to column 0, line 1
// (note: line 1 is the second row, since counting begins with 0):
lcd.setCursor(0, 1);
// print the number of seconds since reset:
lcd.print(millis()/1000);
}
Thanks be80be for trying to help. That's exactly what I used was the "Hello World" example from the Arduino website. It worked perfectly displaying hello world and the time. I just need to figure out how the light sensing code is going to work on it. It just displays a blank screen when I use the lux code I found.
// include the library code:
#include <LiquidCrystal.h>

// initialize the library with the numbers of the interface pins
LiquidCrystal lcd(12, 11, 5, 4, 3, 2);
int val = 0;
void setup()
{
 // set up the LCD's number of columns and rows:
  lcd.begin(16, 2);

}

void loop()
{
val = analogRead(0)/4.011764;
if (val > 252)
 {
  selectLineOne();
  delay(50);
  lcd.print("It is very dark ");
  selectLineTwo();
  delay(50);
  lcd.print("in this room.");
  delay(100);
 }
if (val > 246 && val < 252)
 {
   selectLineOne();
   delay(50);
  lcd.print("It is pretty   ");
  selectLineTwo();
  delay(50);
  lcd.print("dark here.	 ");
  delay(100);
 }
if (val > 235 && val < 246)
 {
   selectLineOne();
   delay(50);
 lcd.print("It is pretty     ");
  selectLineTwo();
  delay(50);
  lcd.print("bright here.	");
  delay(100);
 }
if (val < 235)
{
  selectLineOne();
   delay(50);
  lcd.print("It is bright	  ");
  selectLineTwo();
  delay(50);
 lcd.print("in this room.	");
  delay(100);
}
}

void selectLineOne(){  //puts the cursor at line 0 char 0.
   lcd.print(0xFE, BYTE);   //command flag
   lcd.print(128, BYTE);    //position
}
void selectLineTwo(){  //puts the cursor at line 0 char 0.
   lcd.print(0xFE, BYTE);   //command flag
   lcd.print(192, BYTE);    //position
}
void clearLCD(){
   lcd.print(0xFE, BYTE);   //command flag
  lcd.print(0x01, BYTE);   //clear command.
}
void backlightOn(){  //turns on the backlight
    lcd.print(0x7C, BYTE);   //command flag for backlight stuff
    lcd.print(157, BYTE);    //light level.
}
void backlightOff(){  //turns off the backlight
    lcd.print(0x7C, BYTE);   //command flag for backlight stuff
    lcd.print(128, BYTE);     //light level for off.
}
void serCommand(){   //a general function to call the command flag for issuing all other commands
  lcd.print(0xFE, BYTE);
}
Yes I would say the hardware is all set. So I beleive its probably the code or even maybe how the photocell is hooked up. I'm thinking its most likely the code. What do you mean by "The code posted for adc is using a serial LCD"? I'm sorry but what is adc? Thanks.
Leave your LCD hooked up as is and try the code I posted last nite this code
Code:
// include the library code:
#include <LiquidCrystal.h>

// initialize the library with the numbers of the interface pins
LiquidCrystal lcd(12, 11, 5, 4, 3, 2);
int val = 0;
void setup()
{
 // set up the LCD's number of columns and rows:
  lcd.begin(16, 2);

}

void loop()
{
val = analogRead(0)/4.011764;
if (val > 252)
 {
  selectLineOne();
  delay(50);
  lcd.print("It is very dark ");
  selectLineTwo();
  delay(50);
  lcd.print("in this room.");
  delay(100);
 }
if (val > 246 && val < 252)
 {
   selectLineOne();
   delay(50);
  lcd.print("It is pretty   ");
  selectLineTwo();
  delay(50);
  lcd.print("dark here.	 ");
  delay(100);
 }
if (val > 235 && val < 246)
 {
   selectLineOne();
   delay(50);
 lcd.print("It is pretty     ");
  selectLineTwo();
  delay(50);
  lcd.print("bright here.	");
  delay(100);
 }
if (val < 235)
{
  selectLineOne();
   delay(50);
  lcd.print("It is bright	  ");
  selectLineTwo();
  delay(50);
 lcd.print("in this room.	");
  delay(100);
}
}

void selectLineOne(){  //puts the cursor at line 0 char 0.
   lcd.print(0xFE, BYTE);   //command flag
   lcd.print(128, BYTE);    //position
}
void selectLineTwo(){  //puts the cursor at line 0 char 0.
   lcd.print(0xFE, BYTE);   //command flag
   lcd.print(192, BYTE);    //position
}
void clearLCD(){
   lcd.print(0xFE, BYTE);   //command flag
  lcd.print(0x01, BYTE);   //clear command.
}
void backlightOn(){  //turns on the backlight
    lcd.print(0x7C, BYTE);   //command flag for backlight stuff
    lcd.print(157, BYTE);    //light level.
}
void backlightOff(){  //turns off the backlight
    lcd.print(0x7C, BYTE);   //command flag for backlight stuff
    lcd.print(128, BYTE);     //light level for off.
}
void serCommand(){   //a general function to call the command flag for issuing all other commands
  lcd.print(0xFE, BYTE);
}
Hi Guys,
Sorry I haven’t been back in over a week. I was having some trouble with the lcd screen but it’s all set now. Also I have been editing the code to my needs. I have the code working to the best of my knowledge. I was able to compare my light meter design to an actual light meter and the lux readings were close to one another. I do have 1 issue though with my code that I’m hoping I could get some help with. My lux readings display on the lcd screen continually scroll and I would like it to be still but do not know how to edit the code correctly for that. Can anyone help me with that? THANKS! (If someone does respond I won’t be able to test it out until Monday.)
Here is the current code that I’m using which scrolls the results:
int photocellPin0 = 0; // the cell and 10K pulldown are connected to a0
int photocellReading0; // the analog reading from the analog resistor divider
float Res0=10.0; // Resistance in the circuit of sensor 0 (KOhms)
// depending of the Resistance used, you could measure better at dark or at bright conditions.
// you could use a double circuit (using other LDR connected to analog pin 1) to have fun testing the sensors.
// Change the value of Res0 depending of what you use in the circuit
// include the library code:
#include <LiquidCrystal.h>
// initialize the library with the numbers of the interface pins
LiquidCrystal lcd(12, 11, 5, 4, 3, 2);
int val = 0;
void setup()
{
// set up the LCD's number of columns and rows:
lcd.begin(16,1);
}
void loop(void) {
photocellReading0 = analogRead(photocellPin0); // Read the analogue pin
float Vout0=photocellReading0*0.0048828125; // calculate the voltage
int lux0=104.1*Vout0; // calculate the Lux
// Print the measurement (in Lux units) in the screen
lcd.print(" Lux\t");
lcd.print(lux0); // Print the measured level at pin 0
delay(100);
// turn off automatic scrolling
lcd.noAutoscroll();
}
Looks like your getting some where You should use code tags it makes it easier to read your code
Code:
int photocellPin0 = 0; // the cell and 10K pulldown are connected to a0
int photocellReading0; // the analog reading from the analog resistor divider
float Res0=10.0; // Resistance in the circuit of sensor 0 (KOhms)
// depending of the Resistance used, you could measure better at dark or at bright conditions.
// you could use a double circuit (using other LDR connected to analog pin 1) to have fun testing the sensors.
// Change the value of Res0 depending of what you use in the circuit
// include the library code:
#include <LiquidCrystal.h>
// initialize the library with the numbers of the interface pins
LiquidCrystal lcd(12, 11, 5, 4, 3, 2);
int val = 0;
void setup()
{
// set up the LCD's number of columns and rows:
lcd.begin(16,1);
}
void loop(void) {
photocellReading0 = analogRead(photocellPin0); // Read the analogue pin
float Vout0=photocellReading0*0.0048828125; // calculate the voltage
int lux0=104.1*Vout0; // calculate the Lux
// Print the measurement (in Lux units) in the screen
lcd.print(" Lux\t");
lcd.print(lux0); // Print the measured level at pin 0
delay(100);
// turn off automatic scrolling
lcd.noAutoscroll();
}
Just letting you know that I got the light meter up and working. I just wanted to thank everyone (especially be80be) for all the great help I received here. THANK YOU SO MUCH!
int photocellPin0 = 0; // the cell and 10K pulldown are connected to a0
int photocellReading0; // the analog reading from the analog resistor divider
float Res0=10.0; // Resistance in the circuit of sensor 0 (KOhms)
// depending of the Resistance used, you could measure better at dark or at bright conditions.
// you could use a double circuit (using other LDR connected to analog pin 1) to have fun testing the sensors.
// Change the value of Res0 depending of what you use in the circuit
// include the library code:
#include <LiquidCrystal.h>
// initialize the library with the numbers of the interface pins
LiquidCrystal lcd(12, 11, 5, 4, 3, 2);
int val = 0;
void setup()
{
// set up the LCD's number of columns and rows:
lcd.begin(16,1);
}
void loop(void) {
photocellReading0 = analogRead(photocellPin0); // Read the analogue pin
float Vout0=photocellReading0*0.0048828125; // calculate the voltage
int lux0=104.1*Vout0; // calculate the Lux
// Print the measurement (in Lux units) in the screen
lcd.print(" Lux\t");
lcd.print(lux0); // Print the measured level at pin 0
delay(100);
// turn off automatic scrolling
lcd.noAutoscroll();
This site uses cookies to help personalise content, tailor your experience and to keep you logged in if you register.
By continuing to use this site, you are consenting to our use of cookies.