Continue to Site

Welcome to our site!

Electro Tech is an online community (with over 170,000 members) who enjoy talking about and building electronic circuits, projects and gadgets. To participate you need to register. Registration is free. Click here to register now.

  • Welcome to our site! Electro Tech is an online community (with over 170,000 members) who enjoy talking about and building electronic circuits, projects and gadgets. To participate you need to register. Registration is free. Click here to register now.

I'm Stuck on this thermostat.. Please help.

Status
Not open for further replies.
Hi everyone

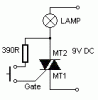
I am an absolute beginner. I am trying to impliment this design. The values shown are the ones that I have worked out from the datasheet.


**broken link removed**


The full datasheet for this can be found here:

https://www.electro-tech-online.com/custompdfs/2003/11/UAA2016-DPDF.pdf

Basically I have made the circuit as shown but have a lead with a lightglobe
attached instead of the resistance wire for testing.

When I turn it on the lightbulb comes on. I heated up the thermister but the
circuit does not turn the bulb off. If I connect Pin 4(temperature reduction) the light bulb goes out. The room temp at the time was about 24 degrees celcius.

I tried measuring the pin voltages and they seem to be out by a factor of ten. eg. pin 1 should be -5.5, I measured -0.56. Point 5 should be -9, I measured -0.8.

The capacitor that I have used is an electrolytic, is this correct?

The set point I am trying to get is 32 degrees Celcius.
As I say I am a beginner but I really need to get this circuit up and running. Any help would be greatly appreciated.

If there is more info needed just ask.

Thanks for taking the time to read this long winded post.

Cheers

Luke :?
 
My skills in this area are quite limited however I view it this way. The IC is essentially the smart portion of the circuit - a thermistor indicates the temperature and the IC produces and output to the triac based on settings and resistance of some external components and it's own internal arrangement. It would appear that pin 5 is part of the power supply and you indicated that the voltage is quite different than the datasheet specifies.

It would seem that for the IC to behave predictably and as intended, that the power supply voltage(s) be within the specified ranges. It would seem that the first step is to get the power supply input(s) corrected. I am not skilled enough to know if wiring errors or component faults on other pins can actually impact the power supply voltage you are measuring.
 
Where did your Rs = 39k come from? I assume that the shunt regulator inside the part needs a couple of mA to properly bias the internal device.
The 39k prevents this. Leave the diode in but try removing the 39k (short it) see what happens. Make sure your power supply is current limited so you dont blow something up accidentally.
 
Hi Optikon

The Rs(39k) came from the datasheet in figure 9.

**broken link removed**

On page five of the datasheet, under the Power Supply heading it states:

The application uses a current source supplied by a single high voltage rectifier in series with a power dropping resistor".

Sorry for the awful pictures, I have a really bad scanner. I just thought it would save you searching through the datasheet.

Do you still think I should try it with out the resistor?

Cheers

Luke
 
No, leave it in for now.. you say you measured pin volts? What is volts from Vcc (Pin 7) to VEE(Pin 5)? With the power dropping resistor this should be 8.6 Volts... If this is correct, then the supply voltages are correct for the part internals.
If that is the case, your triac may not be getting its gate pulses with t he proper timing, or something might be wrong with the temp sensing values..
One thing at a time though.. Check the supply volts (Vcc to Vee)
 
As i read from datasheet, the on and off delayed 40sec. Be patient, maybe nothing wrong....
 
Hey thanks for the replies.

Sorry for taking so long to reply but I have been out.

Well I have fixed the voltage problems. But I think my triac is stuffed.
Oh well I will have to buy another one tommorrow and I will reply with some
more results.

Optikon, Vcc (Pin 7) to VEE(Pin 5) == -9.16 volts.
Vref(Pin 1) to VCC(Pin 7)== -5.86 volts.

So yeah I thimk the power supply is sorted out. Thanks for all the help so far.
This forum and the people on it are to be commended.

Cheers

Luke
 
Hi all,

Well I replaced the triac and now the light on all the time.

I have an LED in series with the triac, however when the light is on the
LED is not on.

If I disconnect the gate on the triac the light dosent come on. With the stuffed
triac it was coming on with or without the gate connected.

The supply voltage and the Vref seem ok. There seems to be only a tiny voltage from the gate to Pin 6( 35 millivolts).

This little circuit is sending me bald.

Cheers

Luke
 
For the Led problem, check that the Led is the correct polarity.

The Cathode(bar) shpold be connected to the gate of the triac.
 
Check the TRIAC pinout and functionality. With 4...9V DC can You test the TRIAC: push the button and the bulb remain light. Disconnect the supply: light off. Try again with reverse polarity: also work, it is O.K.

FRED: the LED polarity is right - as the drawing show - because the
output pulse negative.
 

Attachments

  • TRIACtest_426.gif
    TRIACtest_426.gif
    1.7 KB · Views: 1,188
Yes , your are right about the diode.(this was a quick guess)
Have you gotten any further with the circuit ?
Did you replace the I.C. after the snuffed triac ?
Let me know.
I used this I.C. a while back for the built -in sawtooth generator.
It appeared like a straight forward IC to use !

Fred
 
Hi all

Well I have gotten no further.

I stuffed the first triac by shorting out the circuit.

Since then I have replaced the triac, replaced the LED and replaced the
I.C.

The Light now stays on and the LED stays on all the time.

Does it sound like my problems are with the sensing(voltage divider) part of the circuit?

luke :?
 
Hi All,

If I take out the pot and the 100k resistor in series with it, should the circuit
still work?

I have done this. I took out the pot and the 100k resistor, I then replaced the
50k resistor(Rdef) with a 500K pot. So I now just have a 500k pot and 100k NTC.

When I turn on the power the light comes on. When I adjust the pot nothing
changes, the light stays on.

luke
 
Hmmmm...unsure about the front-end ! If you want to trip the circuit by adjusting a pot, then I would suggest the following:

1. Disconnect pin 4 and pin 2. ( Floating ..may be valid ) ???
2. For Pin 3 connect the wiper of the 100K pot. Connect the other ends to Vref(pin 1) and Vcc. This simulates the "set-point" that the IC expects.

Some insight: Internally the IC is generating a sawtooth signal for comparison to the " set-point " ....some DC level = ? When the DC level
from the set-point crosses the DC level of the sawtooth, the circuit will start initiating control signals to duty cycle modulate the heater. ie. more heat , less duty , inorder to 'trim down' the power.
What is NOT stated or described in the data sheet is the sawtooth signal.
Now, I am going from memory(not the best), but I believe that the S.T.(Sawtooth) rides on a 2VDC level and spans +/- 1V

Let's connect this info to your test pot. Depending on how you wired your pot ends, you should be able to turn CW or CCW to adjust the VDC from 0 to ~ 5.5VDC. Measure the VDC , and see if you can adjust from 0 to ~ 1 to 3V.....>

Result: you should see the load light comming on when you reach the set-point in the range ~ 1 to 3V.

If NOT, return to pins 2,4 to ground(Vcc).
 
HI

Thanks soo much for the reply.

I have to run out now for a while but I will do as you suggest as soon as I get
back home.

I certainly hope I can get this circuit going.

Cheers and have a great day.

luke
 
Hello FRED6298

Well I tried what your advice and I still have had no luck.

When I set up the pot like you advised and took a reading of the voltage.
As I adjusted the pot the voltage would change from -5.8volts to 0 instead of being 0 to 5.8volts.

Would this explain why the light is always on?

Do you have any ideas how I can fix this?


luke
 
"Stuck Thermostat"

Luke,

I commend you for your electronic efforts ! I did not realize that you are an 'IT' person. But, this is a great cause...to help reptiles ! As with most problems, patience and determination will preservere, and in the end
you will remember this circuit. We will make this WORK!
I used the UAA1010, not the new guy(UAA2036) But similar. From my previous advice, the use of the 100K pot was used to simulate the temperature set-point. The set point is derived from the 47K and 100K(ntc) resistor series. First we will start with the basics of debugging prototypes. I am not sure if you are using a breadboard or the wiring is point to point.

With the circuit powered "OFF", do the following:
Steps 1..7
1. With every connection, ohm or 'beep' out the connection from the part ie. resistor,pot, diode to the pin on the IC(integrated circuit), THEN
HIGHLIGHT with a highlighter.

This will save countless hours in open or poor connection problems !

2. With your DVM, measure the value of resistors in ohms, And verify
that the value is correct on the schematic.

3. If using electrolytic(like you have 100 uF) or polarized capacitors(tantalum) insure that the positive side is connected to the positive terminal. for the 100 uf , the band or (+) is marked AND should be connected to pin 7 or Vcc. Diodes too.

From your scanned schematic, change 3 things.

4. Remove Rout(60 ohms and Led , and jumper from pin 6 to the 'GATE" on the triac.

5. Jumper Pin 2 to Vcc(GND).

6. Change Rs from 39K to 18K , 2W.

7. Make the changes to your schematic.

This strips the circuitry down some and Rs may have been to high a value.

Check the new schematic as in steps 1..3

8. With the 100K pot connected from Vref to Vcc, disconnect the wiper.
Power up the circuit and adjust the wiper to about - 1V , power down and reconnect the wiper to pin 3. Let the DVM be connected to the wiper or pin 3.
Why ?
This insure that the voltage is NOT set to high as to "Lock - Out" the safety feature.

9. Power -up and slowly adjust to > -2.75V, and allow to settle for 60 sec.
and 'treak' a little more.

Do you get the light(load) to switch from "OFF" to "ON" ? Any pulsing ?


Fred
 
HI Fred

THanks for the reply.

O.K. I have remade my circuit from stratch. I am using a prototype
board(not breadboard). I made the changes you suggested, I am using a
100K pot to simulate the set point.

I still have no luck... By adjusting the pot I can adjust the voltage from Pin3 to Pin7 from 0volts to -5.8volts.

I tried the circuit with the pot wiper at -1, -2.75, -3.00 and -3.80volts.
The light stays on the whole time and dosent even seem to vary in its output.

If I remove the jumper from Pin6 to the triac gate the light dosent come on. And if I test the triac it seems fine.

I dont understand why I cant get a positive reading on the voltage from Pin3 to Pin7.

In this circuit you refer to Pin7(Vcc) as being Ground, I have Vcc connected to the active wire(Brown) of my power lead. Is this correct?

Is it ok that I am using an electrolytic cap? Should it be a bipolar? I couldnt
find a bipolar rated for 240 volts at 100uF.


Yeah I am studying I.T. not electronics. I have always had an interest in electronics but I never really got stuck in and learnt any more about it.

Keeping reptiles is one of my hobbies and so I thought this temperature controller would be a good project to start with. To be honest when I first looked at the schematic I thought it would be a piece of cake. That was a while ago and I am still trying to work it out. I now have 27 python eggs in the incubator, so I need to get this sorted and build their cage system.

Thank you again for all your help thus far. Do you have any idea what to do now?

luke
 
Luke,

Great work ! You are getting closer. Ansewre to Ques.

1. Why Negative voltage at pin 3 ? Because (-) voltage is applied to the voltage divider(pot) referred to GND.
When th voltage is more positive @ pin 3( or less negative) THen the internal comparator flips and activates the trigger.

2. The (+) side of electrolytic Cap to GND. You may be able to get away with a voltage rating of 15V / 25V.


3. Your Active is color coded 'BROWN'. I believe that this is 'HOT'

Your Brown(Hot) should be connected to the rectifier 1N4004 and (Blue)
Neutral = GND. Why ?

The 1N4004 is a negative hal-wave rectifyer.

This may be giving you problems. Try reversing the leads and see what happens .

Fred
 
Hi Fred

I just switched the active and neutral wires and it is the same.

When I power up the circuit the light(LOAD) comes on and stays on.
I tried it with pin3 at 0, -0.8, -1.0, -2.75, -3.00, -4.00volts and the light does not go off or even flicker. Each value was tested for at least 60seconds.

:?

luke
 
Status
Not open for further replies.

Latest threads

New Articles From Microcontroller Tips

Back
Top