Continue to Site

Welcome to our site!

Electro Tech is an online community (with over 170,000 members) who enjoy talking about and building electronic circuits, projects and gadgets. To participate you need to register. Registration is free. Click here to register now.

  • Welcome to our site! Electro Tech is an online community (with over 170,000 members) who enjoy talking about and building electronic circuits, projects and gadgets. To participate you need to register. Registration is free. Click here to register now.

How to figure out what paper to use for toner transfer ?

Status
Not open for further replies.

ItsMike

New Member
Hey everyone,

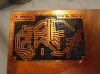
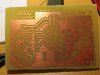
I just tried some toner transfer pcb etching today.
I used magazine paper of two kinds actually, both had poor results.

I though of using proper photo paper, but which one should I get ?
Any glossy non water proof photo paper ?

I could order some online but I gotta have it shipped to Israel cheaply.

Has anyone tried**broken link removed** ?

Thanks in advance,
Mike.
 
Magazine paper should work, if it's not you should question the rest of your setup first, not just the paper. Are you using enough heat for refusing; is it evenly spread properly? Just because the paper you're using didn't work doesn't mean it was the paper that was the fault.
 
also, how clean did you get the blank pcb? its never clean enough. and also, when you are ready to press it, if theres dust on it, don't blow on it,
l wipe it w/ another clean tissue, i use " tp" (your breath puts contaminants back on it) i also wait a few minutes after acitoning it before applieing the paper.
 
hi Mike,
In the UK some users are getting first class results using ARGOS catalogue paper, 'Ghostman' is getting good results on tracks down to about 5 thou.

ARGOS is a UK store which produces a catalogue of their domestic products.. perhaps someone at your location could suggest a source.?
 
I feel that it is a question of trilas to gain experience.
after that most types of paper work.
one has to gain skill of printing with full density, and ironing properly to suite the paper used.

there is no shortcut to experience, i fear.
i use similar papers but from DESMAT band, they work fine for me.
 
As suggested by others there are several things that could be wrong including the paper.

Post some images.

Some people get good results with a clothes iron but results are much more consistent with a good laminator.
 
I'll try it later today with the same type of magazine paper and post the results.

Since I don't have a printer at home, I have to go to some printing house to get it printed.
If those magazines prints I got won't workout i'll try out with photo paper and whatever I can find.

Also, should I bring the board and use the laminator at the printing house ?
Maybe i'll be able to print there right on the board it self with some heavy duty printer, assuming it's laser, would it work ?
 
the best is to try press n peel, FX pro etc as they are painless and consistent in results. We use TTS methods due to availability limitations.

direct printing efforts cost the cylinder inside the cartridge. Better not to venture.
 
Last edited:
Ok, I just etched my first PCB.
I've used the magazine papers and i'm pretty happy with the results.

I couldn't get all the paper out, as you can see in the picture.
But I used a needle to clear the tracks of excess paper and than a marker pen to fix some broken tracks.

For some reason the ground planes have noticeable corrosion or something, I'm pretty sure the copper clad was lying around for long time. Could that be the reason for it ?

How can I get rid of it for future boards ?
Any feedbacks/tips/suggestions are very much welcome.

P.s

I have created a "silkscreen" for the top layer to indicate where and which component goes.
But I couldn't get all the paper out of the bottom layer and had to use acetone to remove the paper with the tuner.
Is there a good way of getting rid of the paper only ?
I tried rubbing it with my finger and nails too even.
 

Attachments

  • IMG_0669.jpg
    IMG_0669.jpg
    2 MB · Views: 392
  • IMG_0671.JPG
    IMG_0671.JPG
    2.4 MB · Views: 415
The toner transfer wasn't as good as it should be, those corrosion marks you see are from holes in the toner, it's blatantly obvious if you compare the two images one over the top of the other, any place you see those marks you'll see the bubles in the toner transfer. I'm guessing you may need more heat from whatever you're using to do the paper to PCB transfer, increasing the print density of the laser print may help as well as it'll put more toner on the paper. Alternately you may have used too much heat or for too long a period of time and the toner soaked into the paper (even glossy is still somewhat absorbent)
 
Last edited:
Since all my other toner transfers were A LOT worse than this one, I ironed the layout to the board for long time - slightly over 5 minutes.
The page was really only slightly glossy to begin with.

Now that I look at the board again, I notice that the left side of it (in the picture) looks better than the right. I am pretty sure I ironed the right part of the board for longer.

So how can I tell how long I need to iron the board ?
I saw some places say 1 minute and others say 5 minutes.

If I print the same design on the same paper twice, in theory it will have twice as much toner won't it ?

Also, any tips on making the "silkscreen" it's nearly impossible to remove all the paper that stuck to the toner.
 
Last edited:
You should think of toner transfer just like an infrared reflow soldering profile. You preheat the whole board to 50 degrees bellow the melting point of the toner, then you use the iron only for a 20-30 seconds to enter well into the melting point temperature, and then immediately remove heat and allow to cool in ambient air.

The time at melt temperature has to be only long enough to cause the toner to fully flow, once it's reached it's liquid point you cool it immedaitly, such long dwell times suggest your iron isn't hot enough.

If you can't get a good transfer in 20 seconds you need to take a look at your setup.
 
Last edited:
Wow, the board appears FINE, and I am sure that as you make few more,you would surely improve.

you could use a soft brush, a spent tooth brush, while the paper removal stage, and rub the areas near holes etc in a circular fashion. Stuck paper pieces on the copper areas should not matter. But, on the process, any extra pressure might remove the carbon as well.

Acetone cleaning at the end to remove the carbon is a good and easy process. you may take care of your hands using some surgical gloves.

the initial scrubbing of copper can be less, in order to not to remove copper too close to bonding level. During that stage also, perhaps acetone helps to remove tarnished copper areas. Finger prints or left over grease or oil, would have carbon lifted, necessitating use of marker pen.
 
Last edited:
Status
Not open for further replies.

Latest threads

New Articles From Microcontroller Tips

Back
Top