blueroomelectronics
Well-Known Member
In the following series of notes I'll outline the state of a new kit called Ladybug. You can see first hand reports on why a designer makes particular choices and changes as a project progresses from concept to completion.
Of course feel free to make notes of your own.
Part 1 (TQFP or not TQFP)
Although the Ladybug an Ethernet based PIC project has already been through dozens of different design phases I’ll begin this thread with the design in its current state.
For this kit I wanted an easy to assemble (through hole) design and the first prototypes used the ENC28J60 and a PIC18F4620. This popular combination is the basis of several Ethernet controllers but I’m leaning towards something a little better…
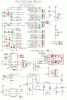
Here’s a brief description of Ladybug
MPU
PIC18F67J60, 128K RAM, 3.8K SRAM, onboard Ethernet 39 I/O pins
Peripherals
Two 8 bit I/O connectors
Ethernet
RS485
RS232
SD Card socket
So
I looked at the PIC18F67J60, a powerful single IC that contains both the microcontroller and an Ethernet controller, more memory, more I/O…
BUT
The 18F67J20 is only available in a TQFP package (from 64 to 100pins). A TQFP unlike a PDIP does not have self-aligning features. You must get it positioned exactly right (masking tape helps) before soldering. You also need flux and a fine tipped soldering iron OR you can blob down the solder and wick it up with solder wick.
No matter how you do it’s still open to errors but lots of folks said they have no issues with TQFP soldering…
Solution(s)
1. partially assembled PCB with the PIC pre soldered
2. have Schmartboard make the PCB (the TQFP fits into grooves on the PCB)
3. let the user solder down the TQFP
I’m going with 1 & 3, this will reduce the PCB price and the kit price.
Part 2 coming soon, oh were oh where does the I/O go…
* Actually my desk is well worn walnut veneer
Of course feel free to make notes of your own.
Part 1 (TQFP or not TQFP)
Although the Ladybug an Ethernet based PIC project has already been through dozens of different design phases I’ll begin this thread with the design in its current state.
For this kit I wanted an easy to assemble (through hole) design and the first prototypes used the ENC28J60 and a PIC18F4620. This popular combination is the basis of several Ethernet controllers but I’m leaning towards something a little better…
Here’s a brief description of Ladybug
MPU
PIC18F67J60, 128K RAM, 3.8K SRAM, onboard Ethernet 39 I/O pins
Peripherals
Two 8 bit I/O connectors
Ethernet
RS485
RS232
SD Card socket
So
I looked at the PIC18F67J60, a powerful single IC that contains both the microcontroller and an Ethernet controller, more memory, more I/O…
BUT
The 18F67J20 is only available in a TQFP package (from 64 to 100pins). A TQFP unlike a PDIP does not have self-aligning features. You must get it positioned exactly right (masking tape helps) before soldering. You also need flux and a fine tipped soldering iron OR you can blob down the solder and wick it up with solder wick.
No matter how you do it’s still open to errors but lots of folks said they have no issues with TQFP soldering…
Solution(s)
1. partially assembled PCB with the PIC pre soldered
2. have Schmartboard make the PCB (the TQFP fits into grooves on the PCB)
3. let the user solder down the TQFP
I’m going with 1 & 3, this will reduce the PCB price and the kit price.
Part 2 coming soon, oh were oh where does the I/O go…
* Actually my desk is well worn walnut veneer
")