Hi friends, first of all i thanx for answers given to my previous questions.
Now i am making a power level indicator with circuit diagram and description below.
I am not getting how R2 is working as it is connected directly(not as a pot) and what is a purpose of diode D2. please explain...
Circuit description:
Parts:
R1__________100K 1/4W Resistor
R2___________50K 1/2W Trimmer Cermet
R3__________330K 1/4W Resistor
R4____________1M2 1/4W Resistor
R5__________470K 1/4W Resistor
R6,R7_______500K 1/2W Trimmers Cermet
R8____________1K5 1/4W Resistor
R9-R11______470R 1/4W Resistors
C1___________47pF 63V Ceramic Capacitor
C2__________100nF 63V Polyester Capacitor
C3___________47µF 25V Electrolytic Capacitor
C4____________1µF 25V Electrolytic Capacitor
D1______BZX79C5V1 5.1V 500mW Zener Diode
D2_________1N4148 75V 150mA Diode
D3-D5________3mm. Yellow LEDs
IC1_________LM339 Quad Voltage Comparator IC
SW1__________SPST Slider Switch
B1_____________9V PP3
Clip for 9V PP3 Battery
Circuit operation:
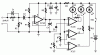
This circuit is intended to indicate the power output level of any audio amplifier. It is simple, portable, and displays three power levels that can be set to any desired value. For a standard HiFi stereo power amplifier like the 25W MosFet Audio Amplifier described in these pages, the power output values suggested are as follows:
* D5 illuminates at 2W
* D4 illuminates at 12.5W
* D3 illuminates at 24.5W
The above values were chosen for easy setup, but other settings are possible.
IC1A is the input buffer, feeding 3 voltage comparators and LEDs drivers by means of a variable dc voltage obtained by R5 and C4 smoothing action. In order to achieve setting stability, the supply of IC1 and trimmers R6 & R7 is reduced and clamped to 5.1V by Zener diode D1.
Notes:
* The simplest way to connect this circuit to the amplifier output is to use a twisted pair cable terminated with two insulated crocodile clips.
* Setup is best accomplished with an oscilloscope or an audio millivoltmeter like the one described in these pages. Precision Audio Millivoltmeter
* A 1KHz sine wave generator with variable output is also required (see a suitable circuit in this website also). 1KHz Sinewave Generator
* Connect the generator to the amplifier's input and the Audio Power Indicator to the output of the amplifier, in parallel with the oscilloscope probe or the audio millivoltmeter input.
* When using high power outputs disconnect the loudspeakers to avoid Tweeters damage and connect in their place an 8 Ohm 20-30 Watt wirewound resistor.
* Remember that VRMS output is equal to output Peak-to-Peak Voltage divided by 2.828.
* RMS power output in Watts is equal to VRMS2 divided by speaker impedance (usually 8 or 4 Ohm).
* Example: set the output of the 1KHz sinewave generator to read 14V on the audio millivoltmeter (24.5W @ 8 Ohm). Set R2 until D3 illuminates, and be sure that D3 turns-off when diminishing a little the generator's output.
* Do the same with R7 for D4 and R6 for D5. The readings of the audio millivoltmeter must be 10V (12.5W @ 8 Ohm) and 4V (2W @ 8 Ohm) respectively.
Now i am making a power level indicator with circuit diagram and description below.
I am not getting how R2 is working as it is connected directly(not as a pot) and what is a purpose of diode D2. please explain...
Circuit description:
Parts:
R1__________100K 1/4W Resistor
R2___________50K 1/2W Trimmer Cermet
R3__________330K 1/4W Resistor
R4____________1M2 1/4W Resistor
R5__________470K 1/4W Resistor
R6,R7_______500K 1/2W Trimmers Cermet
R8____________1K5 1/4W Resistor
R9-R11______470R 1/4W Resistors
C1___________47pF 63V Ceramic Capacitor
C2__________100nF 63V Polyester Capacitor
C3___________47µF 25V Electrolytic Capacitor
C4____________1µF 25V Electrolytic Capacitor
D1______BZX79C5V1 5.1V 500mW Zener Diode
D2_________1N4148 75V 150mA Diode
D3-D5________3mm. Yellow LEDs
IC1_________LM339 Quad Voltage Comparator IC
SW1__________SPST Slider Switch
B1_____________9V PP3
Clip for 9V PP3 Battery
Circuit operation:
This circuit is intended to indicate the power output level of any audio amplifier. It is simple, portable, and displays three power levels that can be set to any desired value. For a standard HiFi stereo power amplifier like the 25W MosFet Audio Amplifier described in these pages, the power output values suggested are as follows:
* D5 illuminates at 2W
* D4 illuminates at 12.5W
* D3 illuminates at 24.5W
The above values were chosen for easy setup, but other settings are possible.
IC1A is the input buffer, feeding 3 voltage comparators and LEDs drivers by means of a variable dc voltage obtained by R5 and C4 smoothing action. In order to achieve setting stability, the supply of IC1 and trimmers R6 & R7 is reduced and clamped to 5.1V by Zener diode D1.
Notes:
* The simplest way to connect this circuit to the amplifier output is to use a twisted pair cable terminated with two insulated crocodile clips.
* Setup is best accomplished with an oscilloscope or an audio millivoltmeter like the one described in these pages. Precision Audio Millivoltmeter
* A 1KHz sine wave generator with variable output is also required (see a suitable circuit in this website also). 1KHz Sinewave Generator
* Connect the generator to the amplifier's input and the Audio Power Indicator to the output of the amplifier, in parallel with the oscilloscope probe or the audio millivoltmeter input.
* When using high power outputs disconnect the loudspeakers to avoid Tweeters damage and connect in their place an 8 Ohm 20-30 Watt wirewound resistor.
* Remember that VRMS output is equal to output Peak-to-Peak Voltage divided by 2.828.
* RMS power output in Watts is equal to VRMS2 divided by speaker impedance (usually 8 or 4 Ohm).
* Example: set the output of the 1KHz sinewave generator to read 14V on the audio millivoltmeter (24.5W @ 8 Ohm). Set R2 until D3 illuminates, and be sure that D3 turns-off when diminishing a little the generator's output.
* Do the same with R7 for D4 and R6 for D5. The readings of the audio millivoltmeter must be 10V (12.5W @ 8 Ohm) and 4V (2W @ 8 Ohm) respectively.