Continue to Site

Welcome to our site!

Electro Tech is an online community (with over 170,000 members) who enjoy talking about and building electronic circuits, projects and gadgets. To participate you need to register. Registration is free. Click here to register now.

  • Welcome to our site! Electro Tech is an online community (with over 170,000 members) who enjoy talking about and building electronic circuits, projects and gadgets. To participate you need to register. Registration is free. Click here to register now.

Staples Easy Button circuit...n/off push button?

Status
Not open for further replies.

edz504

New Member
Hey everyone,

Electronics noob here.

Attached images for reference.

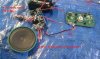
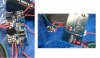
I just started a small project for fun - it's the Staples Easy Button hack with the voice recorder. I've been able to rewire the recording module with a new momentary switch and the original speaker, but I can't figure out how and where to connect the wires from the recording module's switch station to the original Easy Button circuit board. Basically, I can play back what's recorded by touching wire A to the recording switch position, X (or just send a charge with my finger), but I can't connect it so that it only triggers upon the push of the button.

I've attached a few images for clarification.

If anyone could just point out where I connect wire A to on the original board, and where I connect wire B to and from (I've attached it to the recording module, but it's probably in the wrong place)

Any help would be much appreciated :)
 

Attachments

  • IMAG0027.jpg
    IMAG0027.jpg
    1.8 MB · Views: 320
  • 2.jpg
    2.jpg
    3 MB · Views: 318
  • IMAG0067.jpg
    IMAG0067.jpg
    1.4 MB · Views: 334
hook up your wires to the switch contacts on the back of the board.
 
Right, so the little tabs that hold the switch in on the back? I've made the connection but the switch still doesn't do anything. I feel like it's where wire B is wired to on the back of the recording module. Can anyone tell me where that should be?
 
I always knew the "Easy Button" would still be too complicated for some.:rolleyes:
 
@duffy, yup those are the switches I was trying. It still doesn't work, however, I'm pretty sure it was an issue with the other end of the wire on the recording module. It's ok, I figured out a way to alter the plastic part and just go straight to the recording module's button.


@above, haters gonna hate
 
Yes, you have to scrape off the green solder resist. Second connection goes to that metal ring around the switch.
 
edz504's photo shown above shows two wires: A which is connected to the recording module where the button goes.
and: B... where does B connect on the recording module?

Once both wires are connected to the recording module, Does Wire A connect to the scrapped off part of the original switch? And wire B connects to the metal base of the button?

Thank you for your help!
 
On the blue board, the wires are connected to either side of the interdigitated switch contact, over the "RoHS" mark. Be careful not to bridge the contacts. On the green board, one wire goes to the area I marked with the arrow - that's the one you have to scrape. The other wire goes to the ring, but it would be smart to solder it to the back of the board (where the ring connects) to avoid melting the plastic button.
 
You don't have the wire on the same trace I was pointing to -

View attachment 58829

The arrow points to the thin trace, you have it on the thick one.

**broken link removed**
 
Last edited:
On the picture you just posted with the arrow. I have the wire soldered to the top thin trace, not the bottom trace. If you look at the wire in my photo closely, you'll see that it's on the top, thin trace.

Are all of my other connections correct?

Or is there another way to make this work?

Thank you again for your help.
 
Last edited:
1. If you just touch the two wires together, does it work?

2. This wire looks suspect here, are you sure it is attached?
wire2.jpg

3. Try disconnecting the wires from the BLUE board, connect them to an ohmmeter, and press the button. The ohmmeter should go from "Open" to near 0Ω.
 
The module does work when I touch the two wires together.

I tried connecting the wire to both the top of the ring and the bottom with no result...
 
I'm sorry, I screwed up - the wire that goes to the thin trace is correct, leave that - but the OTHER wire going to the back of the board should go to that thick trace near the thin one on the top of the green board.
 
Seriously its been nearly 7 months, and counting, and you are still working on figuring out how to make the "Easy Button" work? :p

Are you guys part of a government funded research department? :eek:
 
See what NASA does now. They pay the private sector, e.g. SPACEX to get the work done on time and on budget.

Just no spin-off products.
 
Last edited:
Status
Not open for further replies.

Latest threads

Back
Top