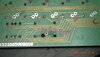
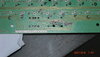
Hello all! I'm new to this sight and I have a question about repairing the PCB on an old Atari 800 computer keyboard. I'm familiar with repairing traces
and replacing through-hole plating, but this is a new one on me. This is a single sided PCB (and keyboard) that I bought on ebay. It said the space
bar didn't work. When it arrived and I looked at it, I saw where someone had tried to do some terrible garage repairs. Evidently they had lifted the pads,
broke the traces and then for some reason tried to drill out the holes with larger drill bits. My question (beside the obvious one of throwing the hole thing out)
is what is the best way to fill in the two holes so I can safely put an eyelet into each them. I'll attach a picture so you can see what I'm talking about. Any
suggestions would be greatly appreciated. My wife suggested Bondo, and I thought about using super glue mixed with dust from other PCB's, but I'd like to
get some ideas from others. I'm retired and do this as a hobby so I'm not trying to make money here. Also there is no stress on the repairs from keyboard use.
Thank you for any suggestions,
David