Hi
I need to repair an AC powered white LED table lamp. The AC mains voltage is 230Vrms. The LED's are a single string of 40 white LED's in series. When I switch it on all the LED's light extremely dimly and show a rapid steady flicker. Maybe it is 25Hz flicker, I really do not know
I have done the following...
1. Replaced the 1n4007 diodes
2. Replaced the 220nF 400V capacitor
3. Replaced the 3.3uF 250V electrolytic capacitor
Even after I did the above changes there is no change. All the 40 LED's light extremely dimly and it shows a rapid steady flicker. I measured the DC voltage across the 40 LED chain. It shows 310 VDC.
Can any one suggest what the problem is ?
Should I replace the resistors also ?
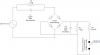
Attached is the circuit diagram that I got by tracing it out from the PCB.
Regards
olcal
I need to repair an AC powered white LED table lamp. The AC mains voltage is 230Vrms. The LED's are a single string of 40 white LED's in series. When I switch it on all the LED's light extremely dimly and show a rapid steady flicker. Maybe it is 25Hz flicker, I really do not know
I have done the following...
1. Replaced the 1n4007 diodes
2. Replaced the 220nF 400V capacitor
3. Replaced the 3.3uF 250V electrolytic capacitor
Even after I did the above changes there is no change. All the 40 LED's light extremely dimly and it shows a rapid steady flicker. I measured the DC voltage across the 40 LED chain. It shows 310 VDC.
Can any one suggest what the problem is ?
Should I replace the resistors also ?
Attached is the circuit diagram that I got by tracing it out from the PCB.
Regards
olcal