Continue to Site

Welcome to our site!

Electro Tech is an online community (with over 170,000 members) who enjoy talking about and building electronic circuits, projects and gadgets. To participate you need to register. Registration is free. Click here to register now.

  • Welcome to our site! Electro Tech is an online community (with over 170,000 members) who enjoy talking about and building electronic circuits, projects and gadgets. To participate you need to register. Registration is free. Click here to register now.

Old Generator power low

Status
Not open for further replies.

Soloboss

New Member
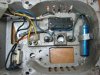
I have an old generator project. I have the 35 year old Briggs and Stratton humming along nicely at the correct rpm. I had a low output problem when I got it - 3-4 amps max from a 2000watt generator. I cleaned and checked all of the connections and verified the two diodes and the 100 microfarad cap using a simple DVM. Upon reassembly it did deliver the full 13 amps needed to run my quartz heater. But 30 seconds into the test the amps out dropped back to the 3-4 amp output that I saw earlier. For whatever reason I didn't check the voltage. That will happen tomorrow.

I can put 12v on the cap and two hours later I get a little spark, so that works. Diodes that are screwed into threaded sockets in the chassis don't have vibration issues. Brushes look new, but I didn't clean the contact rings yet. I guess I'll clean the connections again and retry. I sort of expect the output to be acceptable for the first minute or so - don't know if it will hold.
Any thoughts on what might be changing at high load? Whatever it is, it kills the output and even the original 6 amps is gone. I can try to flash the cap via the brushes while it's running . . . It pulls 6 amps with no problem, but 20 seconds of 10+ amps and it drops to very little output.
I'm stumped and going to bed. I'll look for anyone's thoughts tomorrow.
Thanks, Soloboss
 
From everything you've done I would have to say it is a S/c or o/c problem with the stator or field windings. Only happening from heat or vibration?
 
Ross - thanks for the reply. I'm lacking in the terminology area - S/c or O/c problem?
Certainly heat and vibration are a concern. I first need to separate mechanical from electronic issues. I'm starting with electrical tests.
This old unit is cast aluminum and fan cooled. It's very well built. FYI - I have checked impedance through all coils and all seems to be well. The condition of the wires and insulators at the rotor and stator appear to be in very good condition.
My thought is to add a switch that will allow me to remove the ground from the capacitor immediately after the output is established. This generator is 35 years old and the likelihood that the capacitor has been undamaged through a life lived in outdoor sheds is slim. Whether it's heat or vibration, the capacitor is subject to failure.
The rotor loop is connected via brushes to diodes and then ground. Diode failure could certainly cause the problem. The plan is to establish power output, remove the cap from the circuit and monitor the result. If there is another failure, I'll get a Volt and Amp reading at the AC outlet. I can also check the DC voltage at the rotor brushes, but I have no idea at what voltage that circuit should run.
Any additional input is certainly appreciated.
Mark
 
S/c = Short Circuit

O/c = Open Circuit
 
Sounds like field current is failing. Field rectifier may be going intermittent. Other possibility is bad connection on rotor field winding to slip rings or comnmuntator brushes connection. I am surprised there is an electrolytic cap as they don't like the heat that they would be exposed to inside a generator. Replace it first.
 
Last edited:
Sounds like field current is failing. Field rectifier may be going intermittent. Other possibility is bad connection on rotor field winding to slip rings or comnmuntator brushes connection. I am surprised there is an electrolytic cap as they don't like the heat that they would be exposed to inside a generator. Replace it first.

All responders. S/C O/C. Talk about feeling out of it. Since I had already checked for resistance, shorts and opens the SC and OC didn't even cross my mind. Sorry.

OK, now the problem has changed. I believe that I have found the actual problem. The circuit breaker has very likely not seen any activity in a very long time. And corrosion is inevitable unless the contacts in the circuit breaker are gold. I'm thinking . . . Hmmm . . . probably not gold. So when I loaded the generator down I popped the breaker. The contacts never really 'clicked' when I reset it, but I had most of the power available. Until I popped the breaker again tonight. This time it reset with a solid CLICK. I have 10 amps on the low side of the heater and 15 amps on the high side. A manual reset circuit breaker. Certainly plausible, certainly likely. Agreed?

So now I have the expected amperage output. And I have more than enough voltage. I'm talking 135 volts no load and 127 volts with a 15 amp load. Maybe that's the way this bugger was designed?? 127 volts X 15 amps is 1900 watts and the amp meter is just a panel meter so a 5% error would be normal. 35 years ago no one was thinking about running a household with anything sensitive. Heck, back then the line voltage may have been nearly 130 volts in some areas! IF there is an inexpensive way to bring that down, I'm interested. Otherwise this thing is great for electric heaters and motors and such.
So once again I'm listening with interest.
I'm fascinated by the governor on the engine. My digital tach shows only a 15 rpm drop when I add full load. 3600 no load, 3575 loaded. Oops - that would be 3585 loaded.
 
Last edited:
Well I'm back. It seems that I was a bit hasty in my determination. I have no doubt that the circuit breaker was bad but that's easily resolved (temporarily) by jumpering around the breaker.
On the trial that showed excellent power output I had flashed the capacitor with 12 volts and then started the unit within minutes of the flash. Voltage was a bit high at 135v no-load and it was still 127 volts at 15 amps.
Last evening I tried it again, but this time I had not flashed the capacitor. And the output was 3 or 4 amps. I expect that the output will be restored when I flash the unit and then operate it.
This brings to mind a question. If the capacitor will leak off it's charge over several months of storage, obviously it's not the voltage in the cap that provides the jump start to the coil - initiating the generation of AC power. What actually initiates the generation of power in a slip ring brush type generator? I read somewhere that the capacitance has a direct bearing on the voltage and current output as more voltage in the rotor equals more voltage in the stator. That's reasonable. But what the heck starts it all?
 
Any chance you could provide any form of schematic as to how its wired? Small generators have may different ways they are regulated. Same with the self excite principle as well. Right now there are simply to many possible variables that are unknown.

Is it a two, three, or four ring rotor system?
Does it use just slip rings or does it also have a commutator system like a DC motor?
What output voltages does it have? Just 120 or 120/240?
 
Yes, I have a schematic. I've pulled the head apart and checked all with my DVM -no shorts, no opens. Two brushes run on rings and they're like new. I've cleaned all with contact cleaner. The diodes work like diodes and the cap works like a cap - everything was checked out of circuit.
I've tried to attach a schematic and I hope it works. I'm new to this forum and I'm just winging it right now! Please be patient.
AG-TRONIC.jpg
 
Since the schematic attached properly, I'll add a shot of the inside of the generator head. The head connects to the windings via a 7 connector plug.
 

Attachments

  • AG-TRONIC.jpg
    AG-TRONIC.jpg
    44.2 KB · Views: 504
  • IMG_1077.JPG
    IMG_1077.JPG
    224 KB · Views: 598
Definitely helpful. Can we get a picture of the exciter unit and the generator coils themselves too?

The schematic doesn't seem to indicate where the exciter gets its drive power from as I see it any way. I have worked on a number of similar systems over the years and I have suspicions that the exciter may have a problem and or the capacitor may have an internal bad connection that is limiting the rotor power by not filtering the input power well enough at times.
Being 35 years old (according to the schematic) things tend to get bad connections and other intermittent problems.
 
If needed I will take the generator apart again so you can see the inside. I can tell you that the two coils (black/white) that produce the AC power enter and exit the stator windings side by side. And the Exciter coil (yellow wires) go in and come out pretty much alongside the power windings. The stator windings for AC and Exciter are terminated at the connector body attached to the stator housing (the middle section of the generator head). The front panel of the generator head is removable (as shown in the photo) and the electrical connections are made via the other half of the connector body. And there's nothing else in there. The rotor is connected to the output shaft of the engine. And it's all pretty basic. The inner brush is connected to ground. The (-) side of the cap is connected to ground. The (+) side of the cap is connected (via the blue wire) to the exciter winding.
Basic except the answer to the age old question - what the heck drives the exciter? Maybe the rotor is a bit magnetic? About the electrolytic cap. It is very old and although it looks good, the probability that it is at the correct capacitance is unlikely. But it does act just as a cap should when I put the DVM on it. It holds a 12 volt charge for about 24 hours per my bench test. Let me know if you need the photo and I'll post it tomorrow night. Thanks for the support! Mark
 
Okay I see. The schematic is partially wrong or at least drawn in a way that is schematically wrong. The exciter coils produce AC which is apparently center tapped with the center tap connected to the blue wire that goes to the one brush and the capacitor from there. The two diodes are on the outside ends of the exciter winding and go the diodes to complete the circuit.
Most likely there are several corroded connections that are causing the problems. The spade connectors look old and crusty on the capacitor. and the green ground wire that goes to the capacitor bracket looks like it could cause problems with a loose and dirty connection there as well.

Come and go electrical issues are most often caused by dirty, corroded or loose connections. I would recommend a good physical cleaning and possible replacement of the spade connectors on the capacitor and the capacitor bracket and point of attachment to the end bell body. also cleaning the end bell body to stator contact points.

Contact cleaners are no substitution for a physical cleaning. They are a good wash down afterwords.
I run across people all the time that try to fix bad battery and power connections just by spraying them with contact cleaner. It never works for long if at all.
Physically cleaning the connection to the point of getting down to good metal works and then making sure that there is a firm physical contact between the different parts does work!

I'll start at the top and work through what I know to be true. I won't make any suppositions.
The exciter coil is an AC coil that is wound with the AC power windings. They all go into the stator and come out of the stator together.
The blue wire is a center tap. It routes from the (+) brush through the connector and into the stator windings (that explains why there are 7 wires in the connector. That seemed odd until you mentioned a center tap.) The end opposite the center tap is connected to the brush and the (+) connection at the cap. The other terminal of the cap is grounded.
Yes, the two diodes are at the ends of the yellow (exciter) winding.
As far as the connections, I did disconnect each spade terminal, spray with cleaner, connect/disconnect each connection at least 3 times with contact cleaner while wetting the connection - and then plugged everything back together. There is bright metal at the contact points at each connection. I did not tighten any of the connections as they felt pretty good to me. But to be certain I will pinch each female terminal a bit to ensure everything is making metal to metal contact. Or perhaps a light tinning of each terminal would ensure bright metal and perfect connections.
The ground terminals and the bell end connection point were all brushed and sprayed. I have a stainless steel brush and I'll re-clean those connections more aggressively. And I'll ensure the cap terminals are very tight.

It would be easy for me to say "I did that" in response to your suggestion that everything be cleaned. But the unit still doesn't produce power so obviously I didn't get it fixed! I'll have another go at it. I'll do the mechanical scrub and clean and tin of each joint. The brushes and rings are clean - each has been scrubbed and sprayed and the areas on each side of each ring is clean to ensure no voltage leaks away from the contact rings.
I have some gaskets coming for the engine so the engine is down for a couple of days. That gives me ample time to clean connections. I'll also fix the schematic to indicate that the blue wire is a center tap.
And later this weekend I'll be back with the results. I'll test with everything clean. If it works, all is well and I'll stop messing with it. If the results are bad, I'll take voltage readings at the AC outlet and the DC exciter voltage - Then I'll flash the cap and try again and I'll post the exciter voltage and AC output results. If it's just connections I'll be one happy guy!
Thanks again tcmtech A couple of years ago I was acting as one of the "Go To" guys on a helicopter forum. I enjoyed working a problem to the resolution. Now it's my turn on the other side of the table.
Mark
Thanks again
 
There could be corrosion at the wire to terminal joints if they are just crimped on. Run into that enough times.
 
Last edited:
There could be corrosion at the wire to terminal joints if they are just crimped on. Run into that enough times.

I may as well get out the solder gun and hit each crimped wire/terminal joint - and then tin the terminals. There will just that many fewer things to worry about.
I got this generator because the all cast generator head is nearly indestructible. I'm sure that has lots of service left once I get past this little problem. If nothing is shorted and nothing is open and nothing is connected to the wrong loop, it's gotta work. I'm going through the engine now. It runs great but I think it's a bit rich. With a generator load it needs to be right.
Thanks for the input!
Mark
 
Good point.

On electric motors I have seen where the connection point between the actual solid wire of a winding and the multi strand lead gets corrosion or was not ever properly soldered and gives up after time. If its a crimp connection at that point it definitely a place thats worth looking at as well.
Crimp on butt splices are a notorious place for intermittent connection problems and its not always easy to find either.
It can have a good connection on a ohms test when cold or when nothing is moving but later it acts up when hot or being vibrated.
 
Hi,

I think that this flashing you speak of,
is restoring some of the residual magnetism.

If this is your intention then i suggest you remove
the capacitor connections and the diode connections
while you do this, as this is quite aggressive electrically.

And make sure you have it the right way round.

Best of luck with it,
John :)

"Quite aggressive electrically". Well stated. I actually flashed it by connecting a 12v / 7 ah battery to the generator ground and touching the positive side of the battery to the positive brush which shares a connection with the (+) side of the capacitor. I can do that with the generator shut off and it's all quite safe.
My thought was that the voltage on the cap somehow induced a magnetic charge within the rotor coil, but looking at things tonight it appears I'm off base. My father in law looked at the situation tonight and noted that the copper rings that the brushes run on are not bright copper. As I think about my activities surrounding this generator I may have stumbled across another variable.
The generator bell end is supported on a needle bearing set. No doubt the bearings have never been serviced. So I removed the bearing, cleaned it, repacked it and reassembled it. It's entirely possible (to the point of being likely) that any excess grease pushed out of the bearing might end up on the brush/ring contact area. Just a drop of grease would immediately spread itself very thin over the contact area of the ring. The ring is now sanded and the excess grease has been wiped from the bearing.
Tomorrow I'll assemble the carburetor and give things another go. And of course I'll post results.
Thanks all for the interest and ideas. We'll get this old rascal going.
Mark
 
Well that may have just been too obvious. :eek:
I have seen that many times on farm equipment where oil of one form or another gets into alternators and coats the slip rings with what eventually becomes a poorly conductive residue. The result is a intermitant alternator that works one day and then not the next.
Its also a very common problem in other slip ring applications as well. The wind generator guys (myself too) have that problem on occasion with stuff.

If you can get a hold of some fine sand paper or emery cloth in the 600+ grit range and the generator is capable of being ran with just the rotor supported by the engines crankshaft it is fairly easy to clean one up while the engine is idling. Us considerable caution though.
 
Status
Not open for further replies.

Latest threads

New Articles From Microcontroller Tips

Back
Top