Continue to Site

Welcome to our site!

Electro Tech is an online community (with over 170,000 members) who enjoy talking about and building electronic circuits, projects and gadgets. To participate you need to register. Registration is free. Click here to register now.

  • Welcome to our site! Electro Tech is an online community (with over 170,000 members) who enjoy talking about and building electronic circuits, projects and gadgets. To participate you need to register. Registration is free. Click here to register now.

my "precision" current measurement project design review/ check

Status
Not open for further replies.

super7800

New Member
hello!

I was wondering if anyone could take a look at my circuit for my second version of my "precision" current sensor, specifically the analog section. (TL/DR Last Paragraph). my first version, discussed , was a overall failure, although I did learn quite Abit from that so it wasn't a total loss, and my professor seemed to agree since I did end up getting an good grade on it.

I have obviously not given up, and have since designed a second version. It is for my final project for an advanced digital systems class, so features more of a digital system than my previous attempt. it is not part of the assignment to design my own board or circuit, but where's the fun in that : )

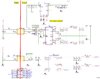
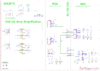
the "goal" of the project is accurate measurement of currents ranging from 1uA to 1A, with a burden of 10uV/mA and 10uV/uA, using a 10R and a 0.01R shunt. the "application" is to measure sleep currents of microcontrollers, but obviously this can be accomplished more simply, I would want my device to offer features for other "precision" current measurements. (the theoretical value for 10uV/mA is likely to have a slightly higher burden, maybe 15uV/mA)

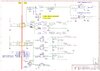
it works by using two shunts, which are amplified by a differential op amp, and then again by a PGA, and then fed into a dual channel (multiplexed) 24 bit ADC. both shunts can be measured (almost) at the same time, as each has their own amplification path, and the 10R can be shorted with a relay. No I don't expect to get 24 bits of usable data on this prototype, but the more usable bits the better.

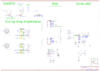
analog side is isolated from digital using a pair of dc/dc isolation modules and an spi isolator. analog side is controlled by an ICE-40 fpga, and digital from a ATSAM arm mcu. the fpga does all the signal processing tasks, the mcu handles the 240x320 color tft lcd, pc communication, and other tasks. the device is battery powered from 1s lipo, although it is not designed for maximum battery life, as its intended to be plugged into USB for most applications. also of note the pictured 10R shunt is likely to change to a lower wattage rated one.

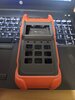
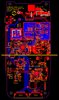
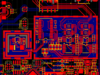
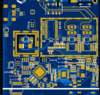
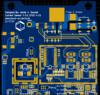
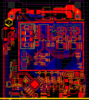
that's the brief summary, If anyone wants more information I would be more than happy to elaborate. Attached and pictured below are images of the case, analog amplification, analog power supplies, and PCB layout. also attached is a full pdf schematic. PCB layout has inner power/GND layers hidden. I don't expect anyone to fully or even partially review my design, but if anyone has any input on my analog section/ layout, my full design, or has a suggestion for an entirely new way to approach the shunt measurement problem, I would appreciate it, as I'd like this ~300$ prototype to at least somewhat work (lol), as I probably couldn't do a new version for awhile if this one fails catastrophically . Thanks.

Here is the analog "section":

View attachment Analog Section.jpg
 

Attachments

  • Analog Power.jpg
    Analog Power.jpg
    713 KB · Views: 284
  • case.jpg
    case.jpg
    1.9 MB · Views: 271
  • PCB V.1.5.jpg
    PCB V.1.5.jpg
    5.1 MB · Views: 280
  • Schematic_3.1 low burden current sensor_2021-03-12_01-16-56.pdf
    664.6 KB · Views: 254
  • Analog Section.jpg
    1.5 MB · Views: 246
In other words, you wanted to build one of these: https://eevblog.com/files/uCurrentArticle.pdf

I built a 4-terminal I-V converter for an in-house project. It was the fron-end for a Lock-in amplifier. 4 ranges from +-100 mA in decade steps down with +-10V output. I added a polarity based clipping indicator. e.g. Above 10V, blink red for 1 sec. Below -10V, blink green for 1s.
It was capable of biasing +-10V unless suppression of +-50mA was used. It had a Voc mode (measure open circuit voltage), and a 2 terminal/4 terminal mode. Suppression could be enabled, It had a zero check/zero correct which I wasn't able to finish the design. Without correction, bias was +-1mV and offset current was about 40 pA.

AC performance mattered. What I missed was the DAC did not output 0V for 0V. It was Labview controlled and did have an auto0range mode. The voltage and output were read with 2 HP system DVM's IEEE-488 controlled and the output was the input to a lock-in amplifier.
Control was from an IEEE-488 quad D/A converter (bias, suppress, <zero>, <spare>) with 8 digital output ports.

The idea was to configure the converter to amplify the offset voltage and use 2 ranges to solve in the zero check mode, but zero wasn;t zero. There wasn't a way to manually create offsets,

==

There would be issues in measuring sleep current/power of a microprocessor. the device used would probably need hep from the micro.
1) create a gate (for a period). Then you have to multiply V and I and do the integral average math. Your project is tougher than you made it.

Mine was pretty cool too. The other two issues I had would have doomed the project. 1) forcing a tiny current in a nearly 0 ohm wire was one problem. 2) The second was isolating a capacitive load and 3) was the zero issue which I wasn't allowed to solve.
 
yes, my design is very similar to the uCurrent, but doesn't have a nA range (no 10K resistor). interesting project, thanks for the input.

I've changed my design slightly, specifically on the x10 amplification stage. pictured below is my new circuit, but it does have its downfalls, mainly requiring 2x 8$ resistor packages each (total of 4). Cost is not the issue, I just feel that I might be overlooking a simpler solution, and I ask whether or not my design is a good implementation, any improvements to my design, or if anyone has a solution requiring less matched precision resistor packages (but similar performance). I might add a potentiometer to adjust the CMRR, but I'm hoping the resistors match closely enough.

Pictured is a "clear" picture of what I'm considering using (NOT the one used). the one actually used has two packages of 4x 5K and 4x 1K resistors, as the 4 values need to match closely, but the ratio is software calibrated. VREF = 2.5v. it is fully differential. differential in, differential out.

clear.png


attached are the new design for the analog frontend (picture = full), and the PCB layout (not pictured are inner layers 1&2, which are GND and power + GND) (Picture = layout, render 2, and render 4).
 

Attachments

  • full.png
    full.png
    335.9 KB · Views: 253
  • layout.PNG
    layout.PNG
    328.1 KB · Views: 238
  • render 2.PNG
    render 2.PNG
    249.7 KB · Views: 247
  • render 4.PNG
    render 4.PNG
    202.7 KB · Views: 248
That's what sets off many designs:
1) How good the reference is
2) How good the matching is.

Laser trimming within an IC is where it's at. The laser penetrates the passivation.

When you really have to dig is when symmetry matters of the leads and thermal gradients or maybe the resistors have to packaged in a big thermal case.

Potentiometers are bad and like I learned, 0.000000V, or how many zeros is required, can be hard to achieve. I was watching youtube about a guy building a CERN precision voltmeter. He went through incredible lengths to duplicate it.

Don't forget the thermoelectric cooler. I hate when you have to cool stuff with liquid Nitrogen.

When you build stuff even using commercial instuments to work at the pico-amp or sub pico-amp leve which I did`1`l, there is a whole new level of understanding. triax cables with graphite between the shields, grounding and guarding. The piezoectric effec, the triboelectric effect and maybe for you the seeback effect.

Keithley now part of tektronix has some free measurement handbooks (PDF). Well worth reading.

I think the wierdest part I had to replace was something like a 3 Meg-ohm 200 W resistor for a high voltage bleed4r.
I purchased a 0.5 ohm 1000 W adjustable resistor for troubleshooting an Arc lamp power supply and I made a calibrator for an Ionization gauge. A couple of high value resistors emulating the ionization tube.

I used 400M resistors for my differential amplifier bias return paths because I didn't know how to do a JFET stage,
 
Last edited:
Laser trimming within an IC is where it's at. The laser penetrates the passivation.

When you really have to dig is when symmetry matters of the leads and thermal gradients or maybe the resistors have to packaged in a big thermal case.

The resistor package i'm using, the (rather expensive, and I need 4) lt5400 are ~0.0125% matching, with a temperature coefficient of ±25ppm/°C, and resistor ratio drift of ±0.2ppm/°C (but with a 7.5-15% tolerance on values), which I consider "pretty good" for an SMD quad resistor package.

would a laser trimmed IC outperform this? also in "maybe the resistors have to packaged in a big thermal case" are you referring to the shunts? should I consider something other than banana jacks for an input (triax is obviously overkill for this i think) thanks.

no thermoelectric cooler (lol) as this is a "handheld" device, and I Don't need 8.5 digits, although the FPGA does have a temperature sensor (not like that matters, the device is a lab device and likely won't witness extreme temperatures in its use)

I will look into the keithly handbooks, thanks.

I believe that I have now reached my final design, with likely very little left to change (I might replace the x10 stage with something else). I have added two more fairly low cost ADC's (16 bit), that i'm using just for their high sample rate, and (almost) couldn't care less about their actual accuracy as long as their values can show a trend. I'm using them in the FPGA to help implement some data algorithms, and outputting a "compressed" sample rate to the ARM micro for graphing, analysis, and storage. The ltc2442 is still the main ADC.

I'm curious on anyone's opinion on reference filtering, do you think that I should do any filtering on the voltage reference, perhaps similar to this Design Note? thanks.

The only other change is to the analog power section, where I'm using adjustable regulators now, and a power sequencer. I have also added a second reference for the Vcm. I may also add some form of filtering to the reference aforementioned.

I do not expect to reach the goals of my project on this revision, and would expect to have to design at least one more version before I reach my goal. I will likely not fully populate this prototype's analog section, probably removing the 10R shunt and its accompanying components from the digikey order, but if the prototype exceeds expectations I would order the additional analog parts. I will likely order the PCB's and parts for this prototype sometime this week, perhaps on 3/25/21. any input on my design is appreciated, thanks.

attached are new design files. the pcb has the two inner layers hidden, GND and power + GND.
 

Attachments

  • Analog Power 1.jpg
    Analog Power 1.jpg
    1.3 MB · Views: 255
  • Analog System.png
    Analog System.png
    401.6 KB · Views: 262
  • frontend render.PNG
    frontend render.PNG
    227 KB · Views: 251
  • frontend.PNG
    frontend.PNG
    314.9 KB · Views: 246
  • Schematic_3.2 low burden current sensor.pdf
    746 KB · Views: 227
Last edited:
Status
Not open for further replies.

Latest threads

Back
Top