Continue to Site

Welcome to our site!

Electro Tech is an online community (with over 170,000 members) who enjoy talking about and building electronic circuits, projects and gadgets. To participate you need to register. Registration is free. Click here to register now.

  • Welcome to our site! Electro Tech is an online community (with over 170,000 members) who enjoy talking about and building electronic circuits, projects and gadgets. To participate you need to register. Registration is free. Click here to register now.

LED's on 10 element display going out after time

Status
Not open for further replies.

darkenreaper57

New Member
I will begin by saying that I am new to these boards and still a beginner when it comes to electronics :( .

Anyway, I built a fan controller a while back, but I finally put it into practice for long duration overnight.

Basically, I use 3 LM317 circuits to run 3 120mm fans. Two of the LM317 chips are run in parallel, however, to a single potentiometer. The other LM317 circuit (it is on the same board, but logically separate from the other two) uses its own potentiometer.

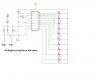
The schematics are located here. I only made the minor modification of hooking 2 circuits to 1 pot , for aethetic purposes - I wanted 2 knobs, not 3. **broken link removed** -

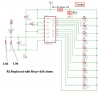
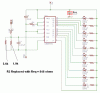
I also hooked up 2 LM3914 voltage monitor circuits - one per potentiometer. Here are the schematics **broken link removed**

Now, I woke up this morning to check things out. I've been running the fans at around 6V, and they were still fine. The LED's on both meters showed 6 bars (as they should).

When I turned up the knobs to max voltage (around 10V), I noticed something. The LED's on the meter hooked up to the LM317 circuit in parallel all lit up, but the ones hooked up to the single one did not. 2 or 3 were unlit.

I have a hunch that they will light up again after I unplug the fan controller and let it sit. Hopefully they did not burn out. Sorry for the lack of a complete diagram - I'll made one if needed.

Basically I want to know if this is due to applying too much voltage (and thus too much current) to the LED's, and if so, how to fix it (resistors, I assume?).

Thanks for any help, and I'll clarify things if necessary.

EDIT: As expected, all of the LED's except the very top one are now lighting up. Argh, I hope I don't need to go back to the drawing board...

EDIT 2: Also, as expected, the 9th LED is beginning to flicker (10th is off). I also remeber another modification I did to the LM3914 circuit: In place of the 680 ohm resistor, I put a 5.6k and 1k in parallel to yield about 850 ohms. I did this so the meter would light up completely at 10V instead of 12, as my fan controller can only go up to 10.5V or so.

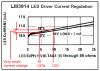
This wouldn't change the current through the LEDs though, right? According to the datasheet, R1 in the casemods.com diagram determines current, and I used the same 1.2k resistor. Current is just over 10 mA.

I suppose I could always crank out my multimeter and read the current, but that would mean unsoldering and possibly screwing something up (and a hassle).

Argh. Hopefully someone here knows what is going on.

EDIT 3: Yep, they aren't burnt out. I went to class and turned it all of, and just fired everything back on. All of the LED's are lit up.
 
Ok, I finally got the time to rip the front panel off and test some stuff. The first thing I did was run the circuit overnight so the top few LED's would go out (as described above).

I then swapped the signal wires for the separate LM3914 meter circuits. As I guessed, the problem was limited to the one meter, even though it was hooked up the other other fans.

I haven't swapped the LM3914 IC's (they are in sockets) yet because of complications...let me explain.

These meters are joined the the front panel of my external watercooling unit for my PC. I managed to paint the front (after LOTS of work) to a mirror finish.

The LM3914 circuits were slightly epoxied in, but fortunately the faulty one (they are on separate boards, remember?) wasn't too difficult to get out. The second one, however, is pretty much stuck (this is the one that works).

I really don't want to remove it since I could ruin the front that I worked so hard on. It could also damage the circuit. So, in short, I would like to try and fix this circuit without removing the other one.

I think the problem lies in either the LM3914 IC or the 10 element LED bar itself. I suppose there could be a problem in the wiring, but I doubt this is the case. Is there an easy way to figure out exactly where the problem lies?

I would purchase another LM3914 IC, but they aren't available locally at radioshack (they don't carry them). I'd need to order it online and probably pay $5 just for shipping for this cheap IC.

I can get the 10 element LEDs locally at radioshack. I am, however, reluctant to do this since it would mean desoldering the other 10 element LED (a royal PITA) and painting the new one (I masked off each individual LED and spray painted the trim...once again, another hassle).

So, before I start doing things, it would be GREATLY appreciated if someone could give me some advice as how to go about troubleshooting.

In the meantime I'll pull out the schematics of the entire LM3914 circuit and verify that it has been created correctly.

Thanks.

EDIT: Something else, the LM3914 circuit does get pretty hot. I held my finger on it for about 10-15 seconds, and it started to burn. It isn't scalding hot, but it isn't simply warm either. Is this normal?

In addition, I measured the current between both signal wires. both are the same at around 1.62 mA. Nothing to be worried about there.
 
Your casemods links don't work. Please download their schematics, make changes you've done with Microsoft Paint or another program and attach a GIF or PNG file to your post.
 
Here are the schematic for the modded LM317 circuits. Note that 2 are in parallel (I didn't want to overload the LM317 circuits with more than 1 .65A fan each). This allows me to adjust 3 fans with 2 pots (as said before).

**broken link removed**

Here is an image of the modified LM3914 circuit. I changed the voltage divider a bit so the LEDs light up completely at about 10V instead of 12. If I would have left it, all but 2 LEDs would light up, since my fan controller allows voltages of 1.25 to about 10.2V.
 

Attachments

  • modded_lm3914.jpg
    modded_lm3914.jpg
    48.9 KB · Views: 968
Hi Dark,
Your LM3914 circuit is correct. :lol:
With 12V as its power supply and 1.7V red LEDs it will get hot when all 10 LEDs are lighted:
1) The 1.2k resistor sets the current of each LED to 10.4mA each x 10= 104mA for them all.
2) The voltage across the outputs of the LM3914 is 12V-1.7V= 10.3V.
3) The power dissipation of the LM3914 is 104mA x 10.3V= 1.07W.
4) The datasheet says the LM3914 heats 55 degrees C per watt so if the ambieint temp is 30 degrees then the internal temp is (55 x 1.07)+30= 89 degrees C. It will be hotter if it is sealed in a box and the LM317's will also heat the box. Its max temp is rated at 100 degrees C.

The LM3914 will operate much cooler if you add a power resistor and another capacitor like in my sketch.

You shouldn't parallel voltage regulators since they fight each other. You should use the correct regulator:
An LM317 is rated at 1A but some of them can supply 1.5A. It reduces its max current by reducing its max output voltage as it heats.
I suspect that one fan is too much current for your single LM317 so it reduced its output when it heated.

Why not use the correct regulators? An LM350 is rated for 3A and an LM338 is rated for 5A. The pins and circuits are the same as an LM317. :lol:
 

Attachments

  • modded_lm3914.png
    modded_lm3914.png
    161.9 KB · Views: 1,192
Basically I want to know if this is due to applying too much voltage (and thus too much current) to the LED's, and if so, how to fix it (resistors, I assume?).
First, determine how much current or wattage each LED can handle. The packaging should have the answer.

Next, determine the MAXIMUM voltage you intend to use.

Now, use ohms law to find the lowest value resistor you could possibly use for your design.

Use ohms law again to find the minimum wattage your resistor must handle. If you select a resistor that can't handle the wattage, then it may heat up, and the value can change, producing unpredictable results, most likely against your favours.

now for each LED, you will connect a resistor (as calculated above) in series with it.

It is better to do it this way than to have +ve connected to all the anodes through a resistor, because the brightness of the LEDS will be more consistent, no matter how many are on.

You will notice what I mean when you begin to deal with about 15+ LED's.

EDIT: take a look at the attachment.

I had to convert it to gif, because bitmap was not accepted, and it seems that takeone 4 (my graphics editor) has a colour bug in it, so some colours will look a bit off. Colour is irrelevant.

The unmarked resistors are the ones that need to be calculated using ohms law.

If you are lazy, you can usually get away with 1K.

and that resistor audioguru highlighted is not of a benefit. If it is supposed to benefit the capacitor, connect them both in series.
 

Attachments

  • ckt_170.gif
    ckt_170.gif
    24.1 KB · Views: 927
mstechca said:
and that resistor audioguru highlighted is not of a benefit. If it is supposed to benefit the capacitor, connect them both in series.

The resistor he added does the job of the ten you added!, thus saving 90% of the cost!.
 
MStechca,
Look on the datasheet of the LM3914 and you will see that it has current regulation for its outputs. The amount of current is determined by the resistor R1 in this circuit, 10.4ma for each output.

As I said before without my added resistor, when all 10 LEDs are lighted the total current is 104mA and the IC will have 10.3V across its outputs resulting in a power dissipation of 1.07W.

With the 56 ohm resistor added in series with the supply for the LEDs then the 104mA will cause a 5.8V drop across it and the outputs of the LM3914 will have 10.3V-5.8V= 4.5V which is still plenty to drive each LED at 10.4mA but the power dissipation of the IC is reduced to 468mW.
Since the IC has current regulated outputs then each LED will be the same brightness when their supply voltage is changed by my added cooling resistor.
 

Attachments

  • lm3914_output_current.png
    lm3914_output_current.png
    12.5 KB · Views: 916
audioguru said:
MStechca,
Look on the datasheet of the LM3914 and you will see that it has current regulation for its outputs. The amount of current is determined by the resistor R1 in this circuit, 10.4ma for each output.

As I said before without my added resistor, when all 10 LEDs are lighted the total current is 104mA and the IC will have 10.3V across its outputs resulting in a power dissipation of 1.07W.

With the 56 ohm resistor added in series with the supply for the LEDs then the 104mA will cause a 5.8V drop across it and the outputs of the LM3914 will have 10.3V-5.8V= 4.5V which is still plenty to drive each LED at 10.4mA but the power dissipation of the IC is reduced to 468mW.
Since the IC has current regulated outputs then each LED will be the same brightness when their supply voltage is changed by my added cooling resistor.

Thanks for all the help. Next time I will definetly use a LM350 or better. The reason I did not this time was because they aren't available locally at Radioshack.

As for the LM3914 circuit modifications you made, if I added the resistor and capacitor, would this still allow the LED meter to work properly? That is, as I have it set up now, each LED signifies 1 volt. I want this because it is a fan controller, so I know roughly what voltage the fans are running at. Will it still do this if I add the resistor, or will each LED correspond to a different value, say 2V?
I did some testing and checking last night. It looks as though the LM3914 circuit was built just fine. I built it at the same time as the other one that works properly. I honestly think I have a faulty LM3914. I placed an order for one online and I will replace it when it comes in. Good thing I used a socket!

The LED's are appearing and disappearing more irratically now.

It would make a LOT of sense if the LM3914 was faulty too. A while ago I got a new 10 element LED because the top bar miraculously stopped working. Note that this was on solderless breadboard, and everything else worked properly.

A new 10 element LED bar fixed the problem. It is possible that the cool down time allowed everything to work, and the LED not lighting up wasn't a related to the actual LED itself at all.

Come to think of it, I had a few mishaps during the testing phase of the circuit. I even cause a capacitor to smoke and burn out because I goofed. It is possible that the LM3914 was damaged during this process.

I'll post the results here.
 
Let's ignore the IC for the moment, and assume the outputs were converted to ground.

I don't like the fact of the LED's hogging power from one measly little resistor. My method is more like a "power sharing" method.

Ohms law can greatly help here as well.
 
mstechca said:
Let's ignore the IC for the moment, and assume the outputs were converted to ground.

I don't like the fact of the LED's hogging power from one measly little resistor. My method is more like a "power sharing" method.

Ohms law can greatly help here as well.

It shouldn't matter as long as the resistor is capable of dissipating the power though, right?
 
mstechca said:
Let's ignore the IC for the moment, and assume the outputs were converted to ground.

I don't like the fact of the LED's hogging power from one measly little resistor. My method is more like a "power sharing" method.

Ohms law can greatly help here as well.

If the outputs were connected to ground, then your solution of ten resistors would be the correct one - however, as we've mentioned repeatedly in other threads, IC's don't work in that way. In this case it's even less so, because the IC is designed specifically to drive LED's, and doesn't require series resistors for them. Audioguru's single resistor is simply to reduce the voltage to the chip, to keep it's dissipation within it's limits - it doesn't set the LED current as normal resistors would (and neither would your ten).

Ohms law is incredibly useful (and should be tattooed on the back of all babies hands immediately after birth :lol: ), but you have to know where it applies, and where it doesn't - as a very crude generalisation it applies to passive devices (like resistors) and NOT active devices like transistors and IC's.
 
Nigel Goodwin said:
Ohms law is incredibly useful (and should be tattooed on the back of all babies hands immediately after birth :lol: ), but you have to know where it applies, and where it doesn't

You said it, it applies to the babies hands, not their cheek :lol: j/k

and for those babies that turn out to be equivalent to William Shakespeare (did I spell it right?), ohms law to them would mean jibberish. :lol:

In fact, newborns can't recognize any law.
 
Hi Dark,
The resistor and capacitor that I added to your circuit don't affect the operation in any way. They just reduce the power in the IC and allow it to be cooler by letting the resistor share the power dissipation. I spec'd the resistor at 1W so it doesn't get too hot.

MStechca,
Look again at the graph I posted. The outputs of the LM3914 have current regulation. The LEDs don't need current-limiting resistors because each output automatically adjusts to hold the current at 10.4mA. The circuit is set so each output is regulated at 10.4mA and their currents are identical so they have perfect "power sharing". The resistor I added shares the total power that would be dissipated in the current regulator transistors.

Transistors used as current regulators don't saturate, so you can't think their outputs are grounded.
 
Radioshack doesn't seem to carry 1W resistors. Would a 1/2W suffice? What if I put two 1/2W resistors (roughly 136 ohms each) in parallel?
 
136 ohms isn't a standard value. Use two 120 ohms, 1/2W resistors in parallel so their result is 60 ohms/1W.
 
Well, I finally got the new LM3914 IC off ebay and swapped it out. I still have the same problem.

The IC gets pretty hot...it burns my finger if I hold it there. I plan on putting in a resistor in the spot suggested a few diagrams back.

Would this one work even though it isnt quite 56 ohms? https://www.radioshack.com/product/index.jsp?productId=2062292&cp=&kw=resistors&parentPage=search

I really want to buy from RS because it is close and readily available. They don't seem to have many 1W resistors, though. They don't have 56 or 68 ohm 1W resistors. Nor do they have 1/2W 120 ohm resistors. They do, however, also have these https://www.radioshack.com/product/...62295&cp=&pg=6&kw=resistors&parentPage=search

I think it makes more sense to just get the first one, though, since it has a higher dissipation rating.

I'm seriously thinking the IC is simply overheating and shutting off LEDs one by one as a result. I think I read somewhere that the LM3914 has thermal protection, and perhaps this is it. Does this make sense?

Also, just curious, what is the purpose of adding a capacitor AND a resistor? Does it help filter voltage?

Thanks.

EDIT: What if I wanted to keep the IC even cooler? What would you say the maximum resistance I should use would be to keep all of the LEDs lit? Better yet, how would I calculate this myself (I am curious to know)?

I am thinking of using two 150 1/2W resistors in parallel. It would mean that they would need to dissipate about .81W total (.4W or so each) which is under .5W. Would this work, or am I stressing the resistors too much in doing so, or am I limiting the voltage too much?
 
darkenreaper57 said:
Well, I finally got the new LM3914 IC off ebay and swapped it out. I still have the same problem.

The IC gets pretty hot...it burns my finger if I hold it there. I plan on putting in a resistor in the spot suggested a few diagrams back.

Would this one work even though it isnt quite 56 ohms? https://www.radioshack.com/product/index.jsp?productId=2062292&cp=&kw=resistors&parentPage=search

I really want to buy from RS because it is close and readily available. They don't seem to have many 1W resistors, though. They don't have 56 or 68 ohm 1W resistors. Nor do they have 1/2W 120 ohm resistors. They do, however, also have these https://www.radioshack.com/product/...62295&cp=&pg=6&kw=resistors&parentPage=search
Hee, hee, hah hah ho ho hee! Hee, hee, ha ha ho ho hee! Hee, hee, ha ho ho hee! :lol: :lol: :lol: :lol:
The rip-off joint is trying to sell two resistors and they don't even know how many Ohms they are!!!!!!!! Burnt? Washed off markings? Made just before or during a typhoon?
Are you a gambling man like they hope you are?

I think it makes more sense to just get the first one, though, since it has a higher dissipation rating.
You think better then RS does. It is kinda big but maybe you have space for it.

I'm seriously thinking the IC is simply overheating and shutting off LEDs one by one as a result.
Good, you think the same as me! :lol: :lol:
You are darn'd right it is too hot, maybe meltdown!

I think I read somewhere that the LM3914 has thermal protection
Nope. Its absolute max internal temp is 100 degrees C and any hotter causes meltdown!

Also, just curious, what is the purpose of adding a capacitor AND a resistor? Does it help filter voltage?
Look at its datasheet. :wink:

Thanks.

EDIT: What if I wanted to keep the IC even cooler? What would you say the maximum resistance I should use would be to keep all of the LEDs lit? Better yet, how would I calculate this myself (I am curious to know)?

I am thinking of using two 150 1/2W resistors in parallel. It would mean that they would need to dissipate about .81W total (.4W or so each) which is under .5W. Would this work, or am I stressing the resistors too much in doing so, or am I limiting the voltage too much?[/quote]
 
Status
Not open for further replies.

New Articles From Microcontroller Tips

Back
Top