Continue to Site

Welcome to our site!

Electro Tech is an online community (with over 170,000 members) who enjoy talking about and building electronic circuits, projects and gadgets. To participate you need to register. Registration is free. Click here to register now.

  • Welcome to our site! Electro Tech is an online community (with over 170,000 members) who enjoy talking about and building electronic circuits, projects and gadgets. To participate you need to register. Registration is free. Click here to register now.

Induction heater control circuit capacitor blew up, don't know why

Status
Not open for further replies.

steltzer

New Member
Hi Guys,

I am up to the next part in my induction annealer control circuit project.

I have run into trouble.

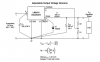
I wired up the circuit (Drawing attached. Sorry about the drawing. Free online circuit drawings don't allow some components, so I have drawn them as text boxes, hope that's ok).

When I plugged it in, Capacitor C1 blew up within 1 second.

The whole eprocess is meant to go as follows:

1 - 36V DC from the meanwell supply is feed to the relay contacts, to run the induction circuit when called by the relay
2 - The LM2575T Adj drops the voltage from 36V to 12V, so I can run the 12V relay coil
3 - The LM317T Adj drops the 12V power to 5V so I can run the arduino and other control components (Momentary switch, Time setting pot, LED, and MosFet which switches the 12v relay)
4 - The LED lights up and shows when the is power being supplied to the MosFet

The application for this circuit is basically a timer, controlled by arduino (and code).
When the momentary switch is pushed, 5V power is feed to the MosFet gate.
The circuit closes the 12v relay for a period of time.
This period of time is set by the timer set pot (up to 10 seconds, as an input into the arduino).
This allows the induction circuit to be on for that period of time.
Once the timer runs out, the 5V feed is dropped from the MosFet and the relay turns off, turning off the induction circuit.

I am very new at this.
This circuit is kind of a bit of a frankencircuit, as I grabbed all the necessary circuits I needed and put them all together hoping it would work.
It probably has some heaps of parasitic capacitance, or stray inductance or the like.

I just want to know why C1 popped (as it is a requirement for the LM2575 circuit), and how to fix it.

Thanks in advance guys.

Untitled Circuit_Circuit.png
 
Welcome to ETO!
The obvious question is, did you have the cap polarity correct?
If you did, then the cap could have been duff to start with, or the initial switch-on surge current could have fried it. You could try limiting the surge current with a resistor of a few Ohms, rated to suit whatever power you expect to provide via the 2575.
 
Last edited:
Look at the LM2575.
Cap on pin 2 NO it should be on the other side of the inductor.
Diode on pin 2. 1N4004. That diode is too slow.
 
R1 would be more useful in series between ground and the lower end of POT1, to restrict the adjustment range.
 
Ron - I rechecked the spec sheet for the LM2575, and it is the same I have have done it. I just used a pot for "R2" on the spec sheet, so I could vary the voltage out and get bang on 12V for the coil.
I have attached a screenshot from the spec sheet.
And diode too slow....sorry, not sure what you mean, too slow for what? (told you I was a noob)

Alec - I placed R1 there as R1 and R2(pot 1 in my case), are the resistors that specify how much voltage is actually comes out of pin 2, as far as I can tell.
If I placed R1 under Pot1 to ground, the wiper would be all that feeds back to make the Vout correct at 12V, and I will get a different voltage.

Thats my thought process anyways.
I might be wrong
 

Attachments

  • Screen Shot 2015-11-15 at 2.18.09 pm.png
    Screen Shot 2015-11-15 at 2.18.09 pm.png
    49.9 KB · Views: 313
As Ron says the output filter capacitor should not be connected to pin 2. (Only the inductor and flywheel diode sould be connected to pin 2 as shown on the data sheet.) The diode that you have used does not switch off quickly enough for use with a 50 Khz square wave. Use the specified Schottky diode or similar. The resistors do not control the voltage on pin 2. The output in pin 2 is a rectangular waveform with a high level almost equal to the regulator input voltage and a low level of about zero. (Actualy a negative voltage equal to the forward voltage of the diode.) The two resistors divide the desired output voltage down to the reference voltage (1.3 volts.) The comparator in the regulator changes the duty cycle (The ratio of on time to off time of the waveform on pin 2) to maintain 1.3 volts at pin 4 (And hence your disired output voltage at the output side of the inductor.)

Les.
 
What is the answer on polarity (post#2), and what type of capacitor is/was C1?

Note, if the capacitor is a tantalum, their voltage needs to be derated for high ripple current.

John
 
Les - I am going to need to read that a few times LOL

jpanhalt - I actually pulled out the capacitor before I posted this, so i never checked. So today I put another one in the right way....lasted 4 seconds before lots of smoke......polarity was not the problem unfortunately.

I am still not sure where the problem lies.

I understand the diode is wrong, I will have to change that.
Could the incorrect diode be popping the cap??

C1 was a 100uF 63V electrolytic capacitor (little black cap with a grey negative stripe showing polarity)
 
My mistake Ron, and Les, I have done the inductor and the output cap wrong. you are totally right!
But would that pop the cap C1?
 
Tantalum capacitors are also electrolytic. The issue is that the black strip on a tantalum cap goes to the + pole, not the negative So, the type of electrolytic is important. Even so, non-tantalum capacitors also have ripple ratings. Check the ripple rating on the capacitor you are using.

John
 
dam it, now I blew the inductor and both the 330uF and the 100uF caps.....

ok.....I decided to wire up just the LM2575 circuit on the breadboard, and see what was going on, and see if I could get 12V.
I understand the problem with the drawing I did.
The C2 cap should be on the other side of the inductor as has been mentioned. I actually had it wired up correctly, but drew it wrong.
So having cleared that up, and having it wired up the right way.

I wired it up, and I popped the 330uF cap.
I replaced it and made sure my wiring was correct, then popped the 330uH inductor, with 330uF cap getting hot really quick.
I thought it might be dodgey parts....replaced them again, popped the 2nd 330uH inductor and the 2nd 330uF cap.
The inductors i used were - https://www.jaycar.com.au/PRODUCTS/...-&-Suppression/Chokes/330uH-RF-Choke/p/LF1540
and I swapped it with (incase it was the wrong kind of inductor) - **broken link removed**
and the 330uF 16V cap c2 was - https://www.jaycar.com.au/Passive-C...6V-RB-Electrolytic-Capacitor---105oC/p/RE6188

I am lost, I have no idea what I have done wrong.

I still used the pot in place of R2 (on attached diagram), so I could adjust the pot to get a different voltage if I needed it.

No idea.

jpanhalt - It is not a tantalum cap I don't believe. the 330uF cap (C2) is rated at 360mA ripple current.
 
Your originl inductor although it is the correct inductance is not suitable as it's current rating is too low and its resistance too high.
The second inductor that you link to is the wrong inductance but one of this type of the correct inductance should be OK. An inductor similar to this would normally be used.
**broken link removed**
I suspect you have destroyed the LM2575 and it now has a short between the input and output (Pin 1 and Pin 2 ) I think this will be putting the full 36 volts input voltage across the 330 uF capacitor which is only rated at 16 volts.
I suggest that you start with the circuit exactly as in the data sheet and when you have that working make changes one step at a time.

Les.
 
Last edited:
Yep, I tested the LM2575....totally shorted between pin 1 and 2.
Filed under B for bin.

So now that I have successfully blown up every component bar the diode. I will start again LOL.

So just so I understand, the initial inductor was too high resistance and too low current capacity, it blew, and in doing so, shorted itself, which stuffed the LM2575.
So once I swapped out the choke type inductor for a toroid (actually I tried 2 x 150uH's in series, I forgot to mention that. I tried to get as close to 330uH as possible), the LM2575 was already stuffed and I was pumping 36V past a 16V cap C2.....dam it.
How did you know that the choke type inductor was too low rated in current? I thought hardly any current was flowing, seeing as there was next to zero load connected??

I have A LOT to learn.

Thanks Les. I will go try again.
 
I do not think using the wrong type of inductor destroyed the regulator chip. (I am not certain of this as the fact that it would saturate may possibly could have destroyed the chip.) I suspected when you said that you had the 330 uF capacitor connected to pin 2 that this could destroy the chip as very large current pulses would be flowing through it. (But you now say it was not connected to pin 2 It was just your schematic that was wrong.) If you could be sure that your input voltage did not go above 36 volts then it would be cheaper to buy one of the step down regulator module that use the LM2596 from China such as this.
**broken link removed**

Les.
 
If you go the TI datasheet, starting around page 11 is a list of recommended/suitable components for the critical parts. There are also charts to help select components that need to be changed for your intended use. That is common for most of the "Simple Switcher" line. I recommend that you take TI's advice, if you want to build yourself.

John
 
I got it working!! I went back to the drawing board, got all the bits together, followed it exactly...no smoke. I just must have had it wired wrong without realizing it? I dunno.
Guys you have been the most help!
Thanks so much.
image1 (1).JPG
 
Status
Not open for further replies.

Latest threads

Back
Top