Continue to Site

Welcome to our site!

Electro Tech is an online community (with over 170,000 members) who enjoy talking about and building electronic circuits, projects and gadgets. To participate you need to register. Registration is free. Click here to register now.

  • Welcome to our site! Electro Tech is an online community (with over 170,000 members) who enjoy talking about and building electronic circuits, projects and gadgets. To participate you need to register. Registration is free. Click here to register now.

How to solder ADXL180?

Status
Not open for further replies.

CCD

New Member
Hi friends,

I've just got the ADXL180 accelerometer from Analog Devices. I was so excited after seeing the specifications that I just ordered it without realizing how I would solder it in the first place!!

Now, could somebody please indicate how to solder this tiny LFCSP package with pads hidden beneath??

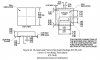
Here is an image from datasheet showing the package outline and dimensions.
 

Attachments

  • ADXL180_pad.JPG
    ADXL180_pad.JPG
    65.3 KB · Views: 296
Its tricky but not impossible to solder this one by hand. Some practice may be needed. Too bad you don't have some practice parts with similar footprint. I recommend:

- make a pcb with pads as recommended by AD
- apply flux to the pads
- tin the pads with a modest amount of solder (or just apply a bit of solder paste if you have it
- apply more flux to the tinned pads
- apply flux to the bottom of the part
- put the part on the pads, and hold it down with a metal pin or sharp implement applying modest force straight down to the middle of the part
- using a hot air tool with a 0.5 inch nozzle (not a tiny nozzle since we want to heat up the area around the part more than the part itself), blow air at about 800degC vigorously onto the area with the part. Aim beside the part first to heat the pcb substrate up. Move the nozzle around the part to try and heat the substrate on all sides. After a few seconds of getting the substrate hot, hit the part directly with air and let air spill all around by holding the nozzle a couple of inches away.
- At some point within a couple of seconds, the solder will liquify. You need to keep the heat on it until it obviously sinks down and lies flat onto the pcb. This may not happen all at once so don't pull the heat off the moment the solder melts, stick with it until the part is totally flush with the pcb.
- remove heat as soon as the part sits flat on the board, but keep your sharp implement against the part for a few seconds

I've done this with CSP type parts with success. The key mistake I made at first was not keeping at it until the part sinks down to be flush with the pcb surface. The whole process only takes about 7 seconds if you have the right amount of hot air.
 
Last edited:
Hi RadioRon,
I've got a hot-air tool (in-built in the soldering station) for shrinking the sleeves on cables, I hope that one would have sufficient temperature.
I'll check that one out. I'll go ahead now with the PCB design first.
Thanks for get me going!
 
Last edited:
Status
Not open for further replies.

Latest threads

New Articles From Microcontroller Tips

Back
Top