Continue to Site

Welcome to our site!

Electro Tech is an online community (with over 170,000 members) who enjoy talking about and building electronic circuits, projects and gadgets. To participate you need to register. Registration is free. Click here to register now.

  • Welcome to our site! Electro Tech is an online community (with over 170,000 members) who enjoy talking about and building electronic circuits, projects and gadgets. To participate you need to register. Registration is free. Click here to register now.

How to convert this 24 Hour clock code to 12 hour Clock?

Status
Not open for further replies.

manojsoorya

Member
Hi Everyone,

I need to make a 12 Hour LED Clock. But I have 24 our clock ASM Code. Can you someone to convert tis code to 12 Hour Clock Code?

Please check the attachment..

Reguards

Manoj Soorya
 

Attachments

  • simply_clock.asm
    13 KB · Views: 262
I'd try changing the two places where,
Code:
         movlw d'24'
occurs to 12.

Mike.
 
How do you tell if it is AM or PM? What is wrong with 24h clock? Much better than 12 hour clock.
 
Yes put 13 in place of 24 not 12.
In clock and skip hours routines where you replace 24 for 13, you can toggle a bit to specify am or pm, exclusive oring a port bit would toggle a led.
 
I really no need to display or show the AM/PM indicator. Only want to show the time 1.00 12.00 and again...

I test the code that change to movlw d'24' to movlw d'11'. That is correct. After 11.59 then 0.00 on Display.

Any hope to convert my simply_clock.asm correctly?

Thanks for your all reply

Reguards Manoj Soorya
 
I don;t know the syntax of the compiler, but I think the changes should be in parenthesis which I will show as comments, not code changes.

Code:
movlw   d'24'                    (compare to 13, not 24)
   subwf   hours,W        
   btfss   STATUS,Z
   goto   skip_clock   
   clrf   hours        ;           (set hours to 1 and not 0)    

[code]
 
OHHHHHHHHHHHHH.................geko................

GREATTTTTTTTTTTTTTTT...............THANK YOU SOOOOOOOOOOOOOOOOO MUCH FOR YOUR HELP................SUPER GEKO.............THANK YOU THANK YOU SOOOOOOOOOOO MUCH. GOD BLESS YOU ALWAYS IN YOUR ALL WAY..................


Thank you so much GEKO.............and a Big thanks for the ADMIN of this GREAT SITE..


REGUARDING manoj soorya
 
Last edited:
Hi geko

Can you help me again?

I want to ON the Dp point of the 3rd display too... (00.0.0). I want to multiplex 4 display and the last two digit in reverse direction. So I want to blink the 3rd display Dp Point too..Like the connection to the below circuit.

In the code we use common anode dsiplay. How can we use common cathode display in the circuit?

jp8410-4-schematic.gif


Reguard Manoj Soorya
 
Last edited:
That schematic and the original source code don't belong together in my opinion.

In the ASM file PORTA RA0-3 are set to output, RA4-7 as input.


Code:
    movlw    b'11110000'        ;Íàñòðàèâàåì RA0-RA3 íà âûâîä RA4-R5 íà ââîä (RA6 RA7 íå èñïîëüçóþòñÿ)
    movwf    TRISA

That doesn't seem to relate to the connections for PORTA in the schematic

So sorry but I'm out of this one now.

Cheers
 
Last edited:
Hi geko

The circuit is a sample of the connection of Display that I want use in my circuit. Actully my circuit work on with 16F628A.

This is the circuit i want to make into my circuit.....
jp8410-4-schematic.gif


please reconfigure the electrotechclockhelp.zip to work the above display diagram. Your cod eworks 100% fine for my hardware. But I want to Blink the 3rd digit display decimal point with recpect to the 2nd Display decimal point.


So please help me Geko..

Reguards

Manoj soorya
 
Last edited:
Hi Geko

I made it........(See Attached Photos before and after the DP point Blinking)

Now Its Looks good as good

Thanks you so much your valuable help geko.......

May I get your mail ID for contact you sometimes?

Reguard

Manoj Soorya
 

Attachments

  • Photo0010.jpg
    Photo0010.jpg
    61.2 KB · Views: 247
  • Photo0011.jpg
    Photo0011.jpg
    63.7 KB · Views: 239
Last edited:
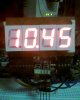
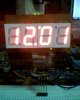
MyOwn Development Board...

Features

1. Upto 40 PIN IC support
2. Verticle and Horizontal ON/OFF Switch
3. Changeable LCD Module
4. PIC/ATMEL and LOGIC chips are suitable
5. External Crystal connector ( If need to Change Crystal frequency)
Copy of IMG_20140611_102056 copy.jpg

6. ON/OFF Indicator
7. LCD ON/OFF Indicator with Slide Switch
8. 12V/1 Amp Input
9. 5V constant OUTPUT
10. 12V Output
11. 10 negative Strip PIN
12. 10 Positive Strip PIN
13. Separate Reset Switch for PIC/ATMEL Chips
14. 5 Tact Switch
15. 5 Common Anode LED
16. 10 Common Cathod LED
17. IR Module
18. Single 555 Module (monostabe/astable : Selectable)
19. Separate 20 LED Strip Board
20. 3 Line LCD Interface (74LS164)
21. Solderless Bread Board
22. USB Module (FT 232) and many more.........

I would like to publish here for free the PCB designe of my Development Board..... But now its on testing...... Need to print the PCB First....


I made this on a common board. Many projects had tested and designed in this Board


Many Members Help me in this Fourm for making this board...for their valuable Suggessions

Thanks to Ian Rogger, Mike2545, Geko, 3V0 etc for their valuable Suggessions

Manoj Soorya
 
Status
Not open for further replies.

Latest threads

New Articles From Microcontroller Tips

Back
Top