Continue to Site

Welcome to our site!

Electro Tech is an online community (with over 170,000 members) who enjoy talking about and building electronic circuits, projects and gadgets. To participate you need to register. Registration is free. Click here to register now.

  • Welcome to our site! Electro Tech is an online community (with over 170,000 members) who enjoy talking about and building electronic circuits, projects and gadgets. To participate you need to register. Registration is free. Click here to register now.

dsPIC + GLCD = Spectrum Analyzer :D

Status
Not open for further replies.

kchriste

New Member
Forum Supporter
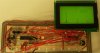
Here is an example of a simple spectrum analyzer I built with a dsPIC33FJ64MC802, AGM1264F GLCD and a 555 timer. The 555 was used to generate a 200-5000Hz square wave for test purposes. It is on the left side of the photo. I knew I'd find a use for a 555 timer one day. ;) The LEDs in the center helped in debugging the GLCD routines.
Since MicroChip supplies a DSP library which includes FFT routines and I had just received my GLCDs from **broken link removed**, I figured this would be a good challenge after my "Hello World" on a dsPIC. I wrote the code in 7 steps:
1) Hello world LED flashing and navel gazing.
2) Getting the ADC to output something meaningful to some LEDs.
3) Writing/testing some GLCD routines. (A little bit of futz's code in there)
4) Wrapping my head around FFT, complex numbers, etc.
5) Playing around with the MicroChip FFT library in SIM.
6) Writing a fast 16bit integer square root routine. No floating point here.
7) Integrating all of the above.

My to do list:
1) Make the span, resolution, etc, settings adjustable on the fly.
2) Add a LPF to the ADC input.
3) Bump up the dsPIC's clock and see how much bandwidth I can squeeze out of it. It is currently only clocked at 7.37Mhz and the display updates apx 4x a second. Span is 0 - 5000Hz in 39Hz steps. Not bad.
4) Compare it to a HP spectrum analyzer.
5) Clean up the bodged source code and post it. :)
 

Attachments

  • Spectrum.jpg
    Spectrum.jpg
    79.5 KB · Views: 1,593
Looks really good so far!:)

What is that metal plate under your bread board? You aren't going to - gasp:eek: - box up the bread board in a case are you?:D
 
The metal plate is a square lid from an old Hammond box. At the first job I had, they manufactured a device that used a large Hammond box. An engraved panel was fitted in place of the lid. Needless to say, many of these lids were discarded. The lid, with some rubber feet, makes a good base for mounting breadboards and development PCBs to.
 
Looks really good. I see that chip can run at 40MIPS, will that allow you to increase the refresh to 40fps or will the GLCDs speed become the limiting factor.

Mike.
 
I like it too, although it's not my piece of cake.
It's one of these things worth the effort of constructing
and criticizing afterwards.
I wish I had found an application for a 555. :D

on1aag.
 
Cool project, if you need any inspiration look on youtube, there are hundreds of identical projects.

Good luck
 
That looks pretty nice. Some PICs in that fast 33F family can run 40 MIPS off its internal oscillator using a PLL. If you find your self lost in the datasheet section for the PLL (Like i did) I just downloaded a sample code from microchips website that sets the PLL for 40MIPS (Thats 80Mhz input clock) For some strange reason the PLL has to be turned on inside your code by setting certain registers for this family.

The 33F chips are lighting fast, i seen someone do a spectrum analliseer on a bigger LCD with 256 points and it ran at over 200 fps
 
RadioRon & on1aag:
Thanks for the comments. :)

Pommie:
There are 1024 bytes of data which make up the 64x128 bit display. The data sheet states that you can cycle the enable line every 1000ns which would give you a crazy 977fps. However, when I tried this, the display would get "busy" and wouldn't accept data at this high rate. Since I'm not blanking the display on this project and simply overwriting each vertical column with each FFT sweep there is no noticeable flicker at all at 4fps. The pixels dance nicely.
The KS0108B chip used in the display has a max frame frequency of 70Hz. I think I managed 10fps reliably without checking the "busy flag" when testing the GLCD routines with a simple animation. I was blanking and rewriting the entire screen so it wasn't a very efficient way of doing it. I think I'll play a little more with animations to see how high the fps can go.

andy257:
I did find a few scope/spec analyzers on the web based on various PICs and GLDs. Designing my own was suitable motivation for reading the data sheet and learning dsPIC. I find I learn best by doing a project rather than just reading a book or data sheet. The goal of project completion keeps me going.

Someone Electro:
Yup, it'll do 40MIPS with the PLL but will draw apx 90ma at that speed. I agree, it is rather complicated to switch oscillator configurations so I'll probably go the same route rather than decipher the Chinglish data sheet. :D
The large amount of RAM, the high speed ADC, and 40MIPS were the reasons I chose this 33F series chip. It was nice that the GLCD had TTL compatible inputs on most IO pins so mixing 5V logic with 3.3V wasn't a problem.
 
That's why I like the 33F family too. With the GLCD I was plazing around with I think I got 150 fps without the bussz flag. And your right the GLCD is a major bottleneck. There is a good workaround tho, you use a buffer inside of RAM and draw everything in to that. Then after the frame is drawn its dumped to the LCD in a big chunk. It may not realy help your current app but if you are drawing lots of stuff on the display it can give over 10 times faster performance.If your are working with dsPICs you mostly are not gona cry for that 1KB of ram used by the image buffer. I have wrote a simple lib for working with GLCDs. It can draw 100 pictues of about 90x90 with trasparacy and still keep going smoth.(Ii also did floating point math to make each picture bounce around the edges of the display) Without a buffer this would grind down to a painstaiking 1fps or less. I was runing this on a dsPIC30F
 
kchriste wrote:
It was nice that the GLCD had TTL compatible inputs on most IO pins so mixing 5V logic with 3.3V wasn't a problem.
If I remember correctly from an earlier post, the BGMicro display needed a negative voltage. Is that voltage source supplied on board the GLCD unit?
 
Someone Electro:
150fps Hmmm,... I assume that was with a different GLCD than the AGM1264F? I would be happy with just 30fps.
I did consider double buffering as you mentioned, but it wouldn't change the performance of this application because I'm never reading from the GLCD RAM. But for animation with ORing, XORing, ANDing, etc of bitmaps, double buffering would be the way to go for sure. At this point, my current fps bottle neck is sloppy coding. :D
Even with sloppy coding, I'm only using 7% of data memory and 6% of program memory.

nickelflippr:
The negative supply voltage is generated on board the GLCD unit itself. I was also in doubt about this when I looked at the datasheet because they showed it powered by two supplies (One -10V and one +5V) and that the DC-DC converter was optional. I ordered 4 of these displays and they all have two 7660's on board for -10V generation from +5V.
 
Yes I was doing OR merge all the time.As for fps you don't realy need any more than 30 fps since that's pretty smoth looking and cause of the horibke pixel response times of these displays you can't realy see more speed than that.Oh and if you have a PicKit 2 programmer for your pics you can do a little trick. change Io pins when you finish a certan part of the code. Like adc sample,calculation lcd draw... and then look at those signals with the logic analiser tool. It will give you an idea what part of the code is causing the big slowdown so you can go and try make that part faster. Even at only 7Mhz it should be able to do atleast 15 fps if not over30fps (So if you get 4 fps you got optimising to do) You will proaboly find that just a few lines of your code are responsible for the slowdown.
 
Yes, I noticed that the pixel response time is fairly slow. They tend to fade to grey when you toggle them quickly.
change Io pins when you finish a certan part of the code. Like adc sample,calculation lcd draw... and then look at those signals with the logic analiser tool.
I have an IDC2 but not a PicKit, though I can look at it with a scope. Thanks for the reminder of a good debugging technique. So far, I've just been optimizing in SIM because I'm too lazy to drag the scope out of the closet. :eek:
 
Yes a scope can also work. But the biggest "optimisation" is switching on the PLL to crank the PIC to its max 40MIPS.The PLL switch on sequence is used in most code examples on microchips website(works on all 33F)

Also remember to adjust the ADC, since higher clock means the ADC runs faster too.

But if you really want to squeeze the most fps out of it you would need to multitask. That means while its calculating you are sending the data to the GLCD at the same time, so while the GLCD is at work the pic is not waiting for it but doing the calculations.

Also you donut happened to draw the GLCD from top to bottom are you? Since its much faster to draw on it from left to right.
 
But the biggest "optimisation" is switching on the PLL to crank the PIC to its max 40MIPS.
Certainly the easiest. Are you sure you don't work for Micro$oft? :D
But if you really want to squeeze the most fps out of it you would need to multitask.
That method had crossed my mind. Putting frame buffers in PIC memory and having the display update via a timer interrupt would enable use of page flipping, etc. Don't need that much sophistication for this project, but maybe for something else.
Also you donut happened to draw the GLCD from top to bottom are you? Since its much faster to draw on it from left to right.
I am drawing left to right, bottom to top and taking full advantage of the auto-increment feature of the Y address counter. Does blanking the display, via the 0x3E command, allow faster writing? Currently, I do not blank the display.
 
No i don't work for Microsoft but yeah thats there way of making software run faster, just say to get a faster PC.

But if you got 4fps on 7Mhz then theoretically you get over 40fps on 80Mhz, but you will need to slow down the GLCD writing routine for the slow display.

Oh and also one thing in your GLCD code wait a little after toggling the E pin, sometimes the pulse is too short(too slow display,wire inductance/capacitance etc) because pouting a pin high then imidietly low in the next line will create a very short pulse because of the fast CPU speed.

Also use the busy flag its supposed to speed things up a considerable amount. Also be smart and check for the flag in the beginning of the LCD send routine rather than wait in the end of it. Since instead of waiting in the routine for the send to finish it can just jump out of the routine and run some code in that time.Then if the LCD write is called before the LCD was done then it will wait just a little while for it to complete. If you are doing calculations betwen writes to the display it should be a big performance boost, since the PIC is never waiting for the display.This is already multitasking but without interrupts.

I don't think blanking it should make it work any faster, but it could cause it to start flickering.
 
Hi kchriste,
Nice work :)
Does you PIC work at maximum speed (40 MIPS) on the breadboard? I've tried mine dsPIC33FJ12GP201, wouldn't work with maximum speed on the breadboard :(
 
A breadboard should have nothing to do with not running at 40MIPS. And i had one run at 40MIPS.

Oh and you didn't happened to try run it at 160Mhz have you? Because it work at 40MIPS with 80Mhz
 
No, I was using internal oscillator and PLL for 40 MIPS (80 MHz). It didn't work because I had the PIC SPI interfaced with a RF transceiver, with maximum speed (10 MHz if I remember correctly). It worked when I lowered the oscillation frequency, and the SPI frequency was reduced too. I think the capacitance of the breadboard caused the problem.
 
Status
Not open for further replies.

Latest threads

New Articles From Microcontroller Tips

Back
Top