Continue to Site

Welcome to our site!

Electro Tech is an online community (with over 170,000 members) who enjoy talking about and building electronic circuits, projects and gadgets. To participate you need to register. Registration is free. Click here to register now.

  • Welcome to our site! Electro Tech is an online community (with over 170,000 members) who enjoy talking about and building electronic circuits, projects and gadgets. To participate you need to register. Registration is free. Click here to register now.

Confused Robo !!!!!!!!

Status
Not open for further replies.

yadnesh

New Member
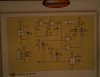
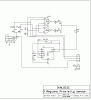
I am into making a robo as my final project.
My main objective is to detect land mines and retrieve them.
Thinking of using a micro controller for the entire process.
Metal detector will used to detect the mine , while I(R sensor will detect the obstacles on the path of the robot.:confused:

I want help in designing a suitable electronic compass, IR sensors as well as the control circuitry:p
 
Are you from India ? ^^
no joke - why don't you do it yourself first, and if you are faced with some problems, ask us ?
 
parallax makes a compass, as well as every device you have mentioned above, either buy the products at a sum of ~$400, or go with nox's idea. *compatible with most basic-like microcontrollers
 
It is a very good project idea, and it has me thinking hard.

Under some terain conditions a bot might be able to map a suspect area without human intervention , as for retrieving the ordinance itself.. that is a difficult task to automate.
 
Maybe this is an ideal swarm task. If you can build the mine detector cheaply enough then there is no need for retrieval, just detonation. at least they couldn't be recycled.

I suspect this is much harder than it sounds, though.
 
What are you planning to do about the improvized "pill-box" land mines made out of wood or advanced mines made out of plastics?
 
Hello

For IR sensors you may take a look at the tutorial that i wrote on proximity sensors:

**broken link removed**

but this one is made for indoore application, for outdoor applications, i suggest you use one of those IR receiver ICs locked at 38 khz instead. In case you have one of those receiver i have a schematic that may help you.

I am sure this is the best solution for outdoor IR obstacle detection.

The schematic is quite simple if you keep in mind that:
-Rx is the IR receiver,
-there are 2 IR emmiter leds, which are switched on and off, one after the other, very fast. Each led is on one side of the sensor, so this way you can know usefull infos about your obstacle position (middle?, right?, left?) instead of just knowing weather if there is an obstacle or not.

I know it did not elaborate a lot, but am not sure you are interrested in that solution, and i don't like to waste time writing if no one is gonna read! are you interrested?
 

Attachments

  • sensor.GIF
    sensor.GIF
    25.4 KB · Views: 397
Last edited:
i know i'm interested in it...
but i cant understand why are those 2 LED's connected to op amps/analog comparators positive input?

also what signals are coming/going from the plugs?
 
Last edited:
Okay,

I'll try to make as clear as possible.

-The compoment Rx is an IR receiver locked at 38 Khz

-The leds D1 and D2 are for sending IR

-leds D3 and D4 are normal red Leds

-IC 555 generates 38khz pulses.

-Plug J1 is for :
[J1.1] Lighting IR led D1
[J1.2] Lighting IR led D2
[J1.3] reading the output from the sensor, which goes the 0V in case of reception.

-The 2 opamps act as buffer, and could be replaced with a switching transistor.

Now here is how it works:
you send 5v on [J1.1] which will result into sending IR through the IRED D1 which is placed at the right of the sensor, and also [J1.1] will power the RED LED D3, which will glow IF the sensor Rx receive IR, meaning there is an obstacle.

Then do the same thing for the left side of the sensor (Diodes D2 and D4), alnd also if an obstacle is detected on the left side, D4 will glow, because is is fed with 5v through the pin [J1.2] , which is by the way also connected to the +ve input of the opamp to drive the led D2

Repeating this sequence very fast will give the following result:
D3 will glow if there is an Obstacle at the right
D4 will glow if there is an Obstacle at the Left
D4 and D3 will both glow if there is an Obstacle at the midle of if there is smth big like a wall.

Those are the visual results. but sure the data can be stored and processed into a microcontroller.

I hope its clearer now. i did my best!
ika.
 
Last edited:
Nigel Goodwin said:
It seems highly confusing?, and doesn't seem to make any sense?.

Here's a far simpler (and effective) version that uses a PIC

Well mine is the same priciple, but more complicated because it doesn't use a microcontroller. in the project you propsed, all the complex processes are made in the code.

Please don't say it doesn't make any sens, it is not v.nice! because this project worket perfectly for me.

I apologise if, maybe the shcematic is not very well done, and maybe my description is poor.. And maybe you didn't read it!

:)
 
Hello, here is the exact same design in an electronics magazine of mine.

instead of opamps it uses NAND gates for both buffering and for generating the 38Khz frequecy for the senders.

And, as a matter of fact the Doides D1 and D2 are used for sending, D3 and D4 are just indications Leds (RED leds), exactly as in my design.

Other wise the perofrmance is the same.

Sorry it is in french but you all you need to understand it is that.

Droit = Right
Gauche = Left
Rec = receiver
CI - circuit intégré = IC!

And just so you don't get confused, the C1P is nothing more than the power of the nand gate IC.
 

Attachments

  • P-sensor.JPG
    P-sensor.JPG
    179.9 KB · Views: 320
Last edited:
Status
Not open for further replies.

Latest threads

Back
Top