Continue to Site

Welcome to our site!

Electro Tech is an online community (with over 170,000 members) who enjoy talking about and building electronic circuits, projects and gadgets. To participate you need to register. Registration is free. Click here to register now.

  • Welcome to our site! Electro Tech is an online community (with over 170,000 members) who enjoy talking about and building electronic circuits, projects and gadgets. To participate you need to register. Registration is free. Click here to register now.

Advice needed for problems etching first PCB

Status
Not open for further replies.

ukphil

New Member
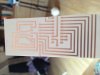
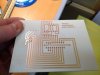
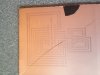
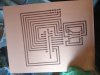
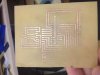
I have started to etch my own boards but it's not going too well. I have printed the layout with an inkjet printer onto film and the result looks pretty good. I have a UV exposure unit from RS which contains 2 x 8W tubes and have tried a wide range of exposure times- It seems to need quite long times (20 mins) in order to yield what looks like a good result in developing after a couple of minutes. Etching starts well, but I always end of with some of the tracks dissolving away- the resist seems to flake away exposing the copper underneath.

Any advice appreciated- as there are a lot of variables in the process and I have wasted quite a lot of board already experimenting!

thanks
Phil
 
Many thanks for the replies, I am using pre-sensitised boards and developer from Maplin and ferric chloride currently. I did start with shorter exposure times, maybe my developer was too weak so will double check the concentrations. Next time I have a go I will document what I do exactly and get some photos at each stage.

Phil
 
In the thread I gave, the problem was developer. His boards were underdeveloped leaving resist where it shouldn't be. Testing with a little water or ferric chloride will show those areas. If you continue to have problems, please include a picture.

I may have mentioned that early on, I had a few underdeveloped boards. I don't think I have ever had an overdeveloped board. The unexposed resist is really quite durable; although, the exact mechanism of conversion from alkali-resistant to alkali-soluble is apparently not fully understood.

John
 
It's really strange- I reverted back to trying an exposure time of 2 mins 40 seconds and the developed result looks very underexposed to me (pic1). After a brief time in the etchant, the tracks had all dissolved (pic2). I then pushed the exposure time very long (40 mins) and the developed result looks better to me (pic3). However, the result in the etchant was the same with the resist dissolving.

Previously, I had exposed for around 10 mins and got slightly better results with the resist mostly staying in place, (pic4) and (pic5) shows the best ones.

Phil
 

Attachments

  • pic1.JPG
    pic1.JPG
    631 KB · Views: 495
  • pic2.JPG
    pic2.JPG
    599.9 KB · Views: 476
  • pic3.JPG
    pic3.JPG
    570.3 KB · Views: 507
  • pic4.JPG
    pic4.JPG
    528.3 KB · Views: 570
  • pic5.JPG
    pic5.JPG
    545 KB · Views: 469
In picture 2, did the copper etch, or was it just that the tracts that disappeared? Since the picture is orange-red, not the greenish of FR4, I assume the copper did not etch.

John
 
In that example, I did not leave the copper to etch after the resist had gone, but from previous attempts all the copper etches away. I have run out of boards now but have ordered some more (from a different source) so will try some more in a few days time.
 
I have received some new boards today from Rapid, these have a different coloured resist (green) and I have just exposed a board for about 5 mins. It developed totally differently to the previous boards (clearly defined traces) and I have put it to etch. I will report back how it turns out!
 
Last edited:
First test attempt at etching with the new boards from Rapid and a very good result :)

Thanks for the advice guys; do you find a wide variation in board quality from different suppliers? I might contract Maplin because I suspect they may have some old/bad stock.

thanks
Phil
 

Attachments

  • 1stgood.JPG
    1stgood.JPG
    547.9 KB · Views: 460
That's a good result

I've only used the board from Rapidonline for about the last 5 years so can't comment on other suppliers.

However in my own experience board that has been sitting around for many months/years :eek: was a bit unpredicatable to use. These days I tend to buy it as I use it for this reason.
 
Nice looking board.

Positive resists are similar, but not identical chemically. The boards I get from DigiKey last years before use. Since water is required in one of the reaction steps, I will fog old ones (>2 years) with my breath or put them in a humid chamber (plastic box with wet paper towel) for 10 to 15 minutes before use. I don't know if it helps, but it is cheap to do and makes me feel better. After development, I also use a hot air gun to "polish" the resist pattern.

Are you using Eagle? If so, there is a ULP, "Drill-aid.ulp" that you may want to use. It effectively gives you a center punch for drilling the pads of TH components.

John
 
Here is the next attempt, a proper drilled board this time.

I have been playing with software called OsmondCocoa for the Mac- just using the basics at the moment but it seems quite good. A lot more to learn!

FYI I am printing the transparencies with an HP officeJet 6700 onto Jetstar Inkjet film.
 

Attachments

  • pic6.JPG
    pic6.JPG
    514.6 KB · Views: 469
Pre-Sensitised Board Problems

ukphil,

I've used pre-sensitised boards from both Mega Electronics and Rapid.

I've never had any problems with the former, but have had minor issues once with the latter. - The black plastic protective sheet on a board from Rapid left some whitish adhesive on the surface which could not be removed without damaging the photosensitive coating. So when the board was developed, the tracks in that area did not appear.

Despite that one-off problem, I've found boards from Rapid to be reliable.

Analogue.
 
EDIT:

I didn't see the second page of this until after I had posted - seems like you have your problem solved. The first board I see a picture of seems to be slightly over exposed, and the board wasn't in contact with the artwork properly - one of your traces has thinned a little, a sure sign of it.

That white PCB board is the same as I use, Economy Photoboard II ;) Good choice :)

My original post:

Sounds like the board you're using is a bad batch or way past it's shelf life. I use either "economy" Photoboard II" (from Mega) or FR4 from Rapid electronics. The resist surface is green, and goes a sort of purple-green colour once exposed. I expose usually for around 7 minutes (home made light box, using two blacklight CFL's) and develop my boards in Seno developer - it's non caustic by all accounts. I pretty much get perfect results every time, only time it messes up is either because I've forgotten to mirror my artwork (but the board still develops and etches perfectly) or the edges of the board have uneven coating of photo resist (but this is a manufacturing issue).

Recently I have taken to using the Seno SN100 photo resist applicator - and as long as the copper is clean (and I mean CLEAN) and you get a fairly even coating of the lacquer, all works pretty well. Exposure and development is as Photoboard II.

By all means try the spray on stuff (Positiv20), but know now that to get fine quality high resolution work, the makers recommend you to bake the board. It also stinks like you wouldn't believe and to get an even coating is next to impossible unless you have experience using a spray can. Too thick a coating and it'll run and curtain. Once it's at that stage, you need to strip it all off, clean the board and start again - the Seno applicator is so much more simple to use, you just wipe it on.

Again, I will repeat the golden rule - make sure the copper surface of your board is CLEAN, and by clean, I mean use a scouring pad on it until it the copper gleams. Don't use Brasso or something like it unless you can clean off ALL the residue - including any fingerprints. Photo lacquer simply will not adhere to a mucky board, and the resist WILL flake off in the etch bath. The same is true of the etch resist marker pens that you can get - the copper MUST be clean.

Developer that is too strong or too hot will strip unexposed resist. Under exposure will also cause problems, but it will lead to parts of the board not etching, since not all the resist will be removed during development - it certainly won't lead to tracks dissolving or the resist flaking off in the etch bath. OVER exposure is what leads to tracks being etched, UV leaks through the blackened out areas of the artwork! I suggest that the board you are using is either faulty, or just old stock - photoboard DOES have a shelf life, as does camera film.

Obvious as it seems, don't handle photo board or apply photo lacquer in strong daylight, do not develop it under a fluorescent tube light - it will get exposed, and the developer will remove ALL the resist. Seno SN100 can be applied on a dull overcast (rainy) day - at least I have never experienced issues doing it.

I've been doing it this way for 30 years, honestly, it does work the way people here are telling you.
 
Last edited:
I use boards from Rapid normally (both economy and the decent FR4) and have also used 30 boards directly from Mega UK for a one off job I did for a company.

Only had one duff board from Rapid where there was a strange blob on the board after developing.

I use the Rapid developer crystals in 500ml hot water - good for around 6-8 100mm x 160mm boards.
Exposure is best for me at 5 minutes with an inkjet transparency
Etching in hot FeCl (38 degrees) in my tanks (not bubble unfortunately) can be done in around 10 minutes with reasonably used etchant

Beware that the developer can do strange things when left on the shelf - I've had a ruined board when trying to use older developer and for the sake of a quid a batch, I always use fresh (< 3 days old) developer.

I have a 25kg sack of Sodium Persulphate and another 25kg sack of developer which I really must get round to having a play with .....
 
Yes, old developer can cause problems. The stuff I use tends to gel - sounds strange, but it seems to form a gel like substance at the bottom of the air tight container I keep it in over time. I just pass it through a bit of kitchen paper once in a while. It doesn't like to be left out in the open, I assume it oxidises.

As you say, it's cheap enough and it's always easy to use caustic soda if you run out. Sodium hydroxide is a little "fierce" though, too strong by just a tiny bit, and say goodbye to ALL the lacquer. exposed or not lol! I've heard people say that they just shake the exposed board in the stuff and it's ready to etch in 5 seconds or so!

The stuff I use lasts longer than 8 boards however, it's still good to use when it's gone a very dark green colour, from the stripped resist lacquer, I throw it away then and mix a new batch.

I too use an inkjet transparency film, the ink in my printer is made by Jet Tec, it seems very UV proof, better than the output from my old 6L laser printer.

Just a tip, add a spoonful of ordinary table salt to tired FeCl3 - I have no idea why it works, but it rejuvinates the etchant for "just one more" board.
 
I've not used photo-resist when I made my PCBs, but I got those results when I tried making wall pack PCBs. Missing links were replaced with soldered wires between connections.
 
Status
Not open for further replies.

New Articles From Microcontroller Tips

Back
Top